Publisher Guide
Working as a DeskAlerts Publisher
Introducing DeskAlerts
As a DeskAlerts publisher, you have the tools to quickly and efficiently communicate critical information to your audience.
With DeskAlerts, you can reach your audience through a variety of channels, including:
- Desktop alerts
- Video alerts
- RSVP alerts
- Surveys, quizzes, and polls
- Scrolling tickers
- SMS alerts
- Email alerts
- Text-to-speech notifications
- Microsoft Teams bot integration
- DeskAlerts Mobile Agent for Android and iOS
You can also manage wallpapers, screensavers, and lock screens on devices linked to DeskAlerts, ensuring consistent branding and messaging across your organization.
For digital signage, you can create images and link them to the Digital Signage browser to display content or send emergency alerts directly to those screens.
Emergency Alerts That Save Lives
The Emergency Alerts module is one of DeskAlerts' most powerful features. By setting up preconfigured emergency buttons in the DeskAlerts mobile and desktop agents, you can instantly notify your audience about emergencies. When activated, these buttons trigger an alert to all relevant users, ensuring critical information is delivered without delay.
What You Can Do as a Publisher
-
Send alerts instantly
Create and send alerts that appear within seconds on the DeskAlerts Desktop Agent for your selected audience. -
Customize alerts
Use templates and skins to personalize alerts for different groups or message types, ensuring your communications are clear and visually appealing. -
Target your audience
Choose who receives your alerts:- Broadcast to all users
- Send to specific groups or organizational units (OUs)
- Select by IP range
- Deliver personal alerts to selected individuals
-
Use multichannel messaging
Send SMS, email, and text-to-call alerts using your SMS provider’s gateway integration. -
Send high-priority alerts
Push urgent notifications that override all other alerts and browser windows to ensure they are seen immediately. -
Run surveys and analyze results
Create and distribute surveys to gather feedback. Analyze responses with built-in tools, including charts that show how many users selected each option. -
Approve content
If you're assigned the approval role, you can review and approve other publishers’ content before it's delivered to the intended audience.
By leveraging DeskAlerts' features, you can streamline communication, improve engagement, and ensure vital information reaches the right people at the right time.
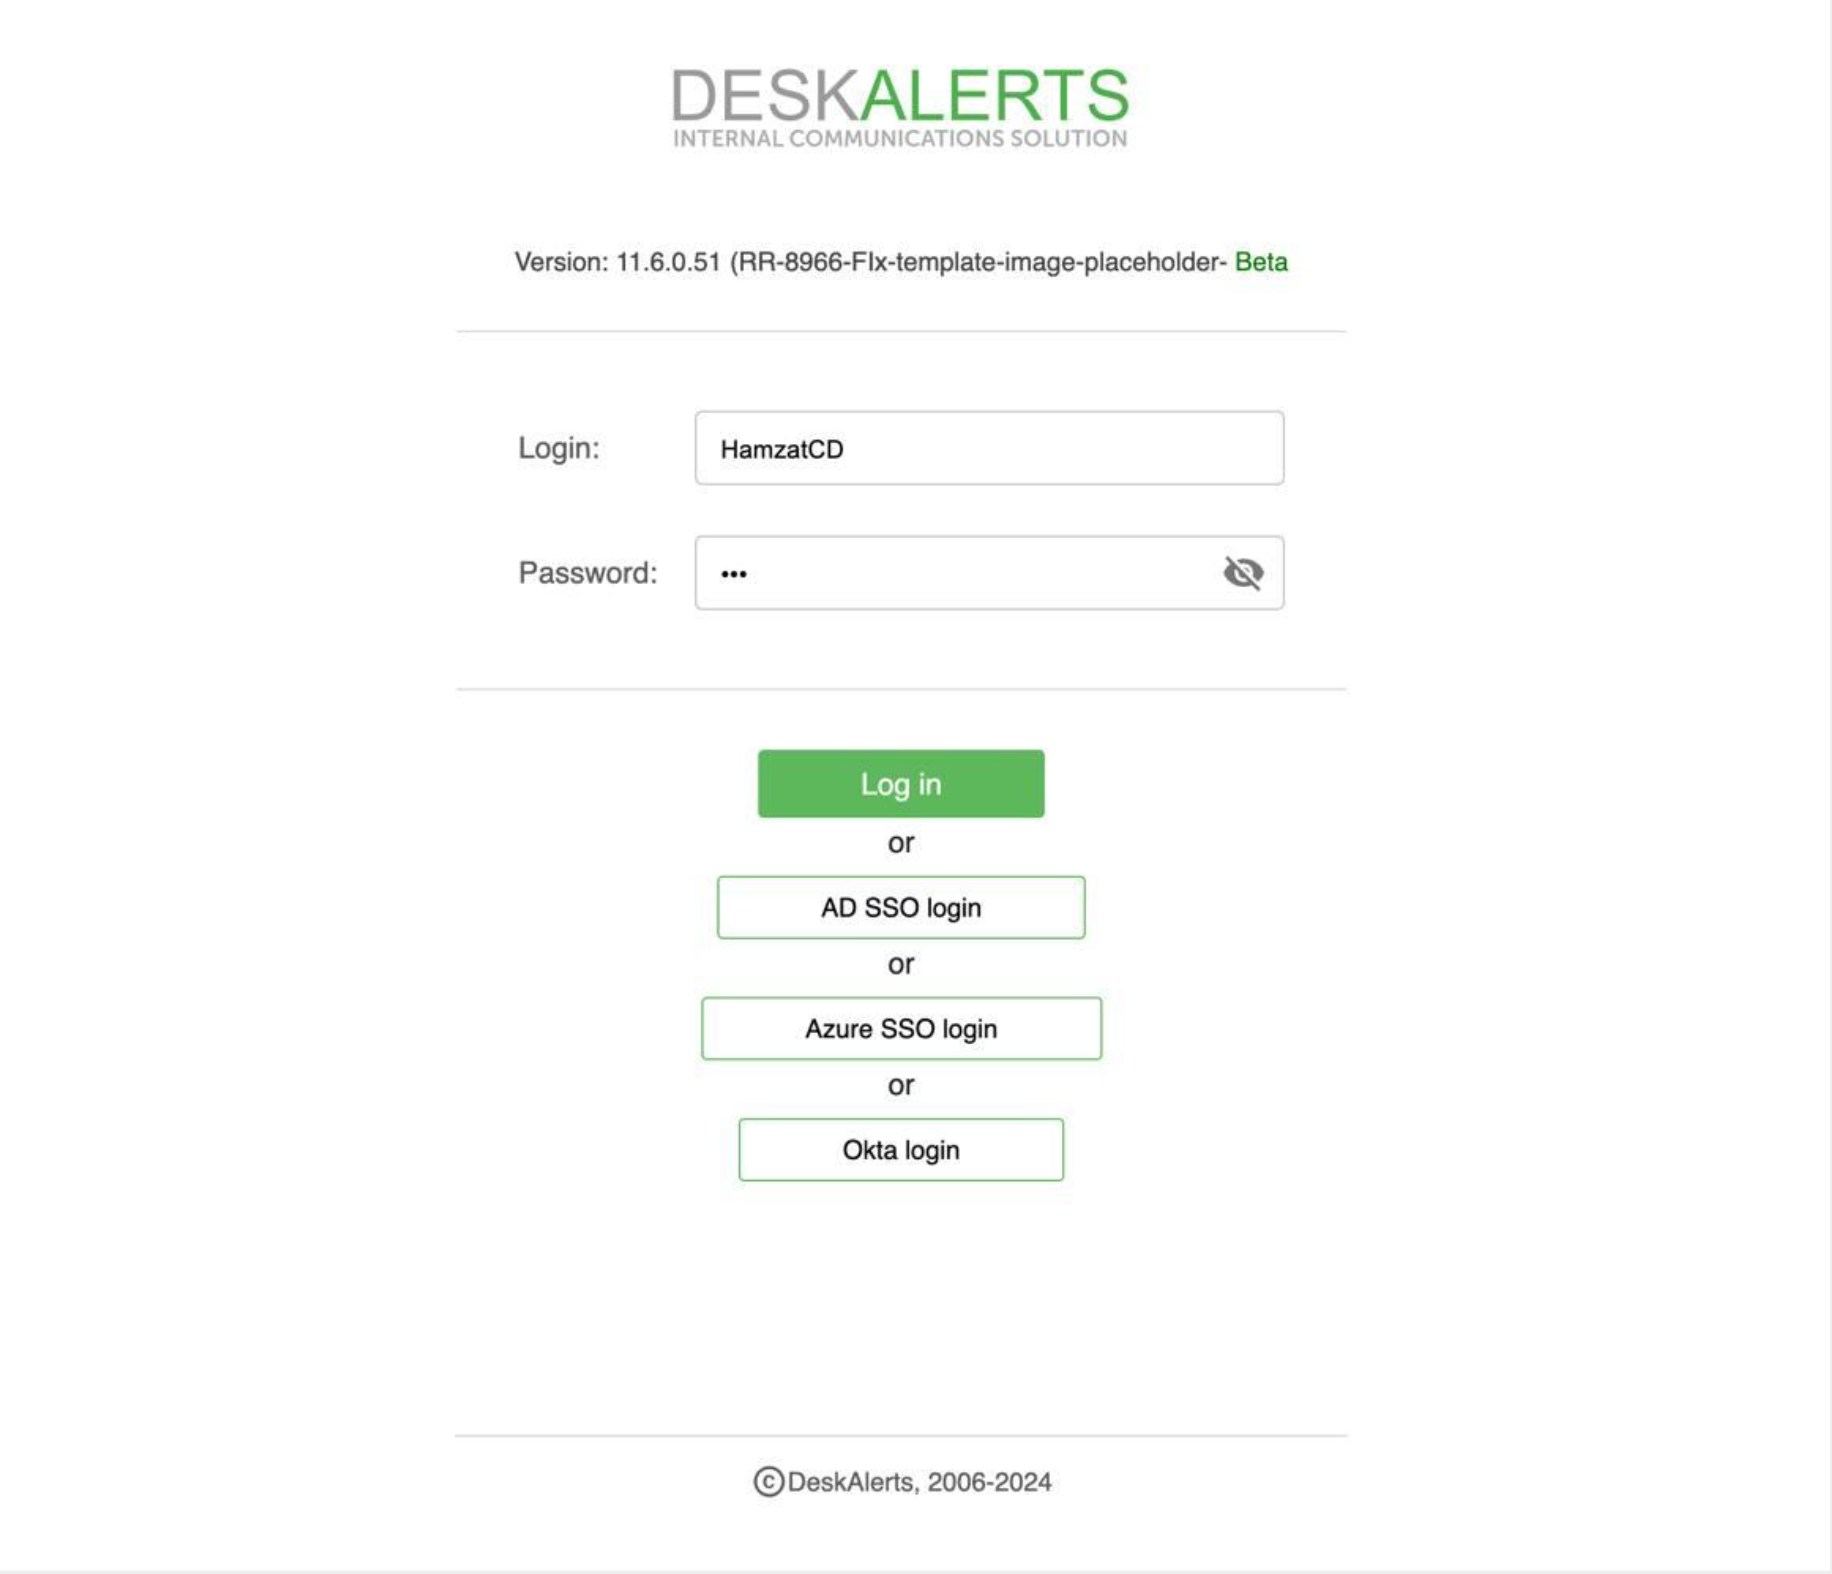
Logging In to the DeskAlerts Control Panel
To access the DeskAlerts Control Panel:
-
Open your web browser
Launch your preferred browser (e.g., Chrome, Edge, Firefox). -
Go to the Control Panel URL
Enter the URL provided by your administrator. It typically looks like:
http://yourdomain/deskalerts/admin/ -
Enter your credentials
On the login page, enter your assigned username and password. -
Click Login
After entering your credentials, click the Login button to access the DeskAlerts Control Panel.
Dashboard And Control Panel Menu
When you log in to the DeskAlerts Control Panel, your primary workspace is displayed on the right-hand side, while links to your main tasks are located in the left-hand menu. The items visible in this menu depend on your assigned permissions. If you believe you need access to additional features or links that aren’t displayed, please contact your DeskAlerts administrator for assistance.
The Dashboard is the first screen you’ll see upon logging in. It provides a quick overview of your scheduled content and includes widgets that are visible to all publishers. Alert Statistics widget, as an example, displays key metrics such as the total number of alerts sent, delivery rates, and engagement rates.

Compose Alert Button
At the top of the DeskAlerts Control Panel, you’ll find the Compose Alert button—your main tool for creating notifications.
Compose Alert:
By clicking this button, you are taken directly to the page for creating a Pop-Up Alert. This is the quickest and easiest way to send urgent notifications to your audience.
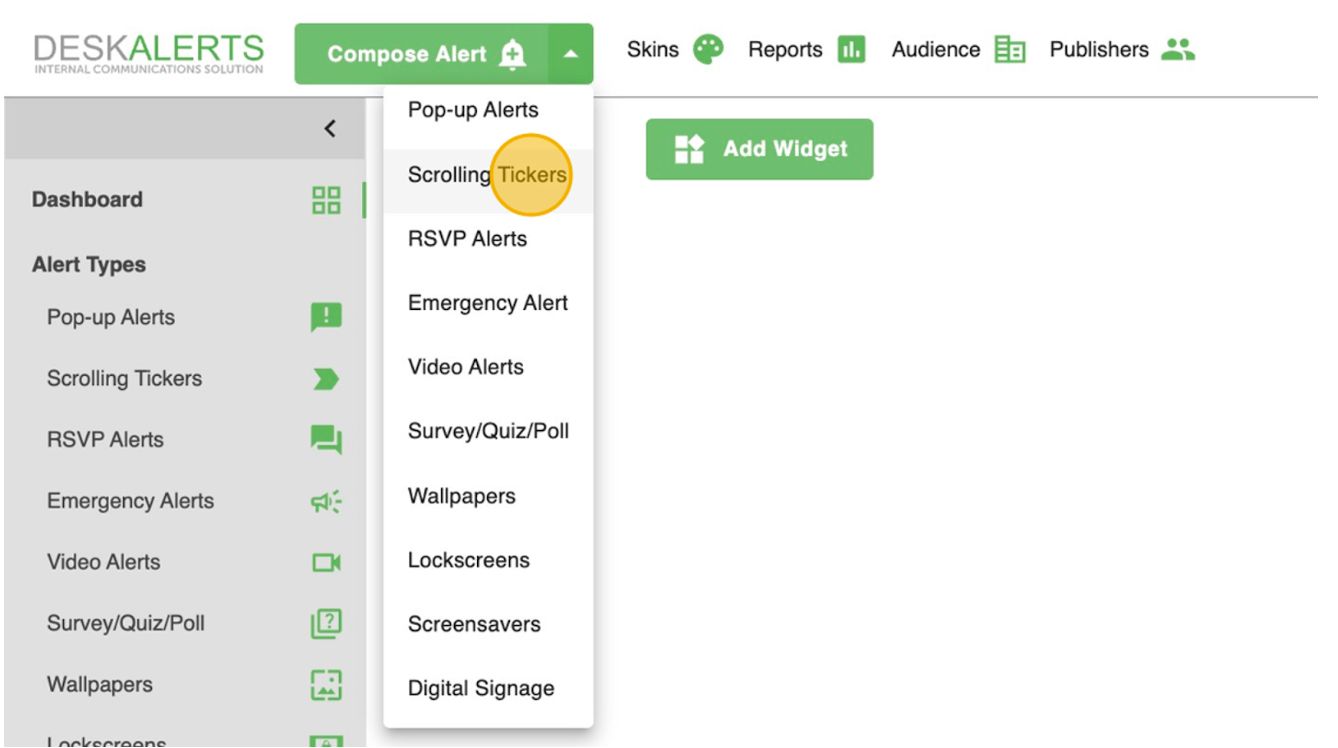
Dropdown Button:
Next to the Compose Alert button is a dropdown arrow. Clicking this reveals a list of content types you can create. From this list, you can select the specific type of alert or content you want to create, such as:
- Scrolling Ticker
- RSVP Alert
- Emergency Alert
- Video Alert
- Survey/Quiz/Poll
- Wallpaper
- Lock Screen
- Screensaver
- Digital Signage
This allows you to easily access the full range of DeskAlerts’ capabilities, ensuring you can quickly choose the right format for your message.
Top Right Menu Features
-
Language Settings: Change the interface language by selecting from English, French, Spanish, Portuguese, German, or Arabic.
-
Account Icon: Clicking on the account icon provides access to:
- Your profile settings.
- Your publisher name.
- The option to log out of the control panel.
Left Menu Features
The left-hand menu contains links to all key sections of the DeskAlerts platform. Each section under Alert Types will take you to the corresponding page where you can create, manage, or edit specific types of content.
-
Dashboard: Provides an overview of key metrics and widgets.
-
Alert Types:
- Pop-up Alerts: Manage and send pop-up notifications.
- Scrolling Tickers: Create and configure scrolling alerts for users’ desktops.
- RSVP Alerts: Set up RSVP-enabled alerts to track responses.
- Emergency Alerts: Configure critical emergency notifications.
- Video Alerts: Manage video-based alert content.
- Survey/Quiz/Poll: Create surveys, quizzes, or polls and analyze responses.
-
Wallpapers: Manage wallpaper content for synchronized Windows devices.
-
Lock Screens: Set up and customize Windows desktop lock screen images.
-
Screensavers: Configure screensavers for synchronized Windows devices.
-
Digital Signage: Manage content displayed on digital signage screens.
-
Panic Button Alert History: Review the history of triggered panic button alerts.
-
Pending Approval: Visible only to approval publishers, this section allows you to review and approve content created by other publishers before it is sent.
💡If you’re unsure about any feature, refer to support@deskalerts.com or consult with your DeskAlerts administrator.
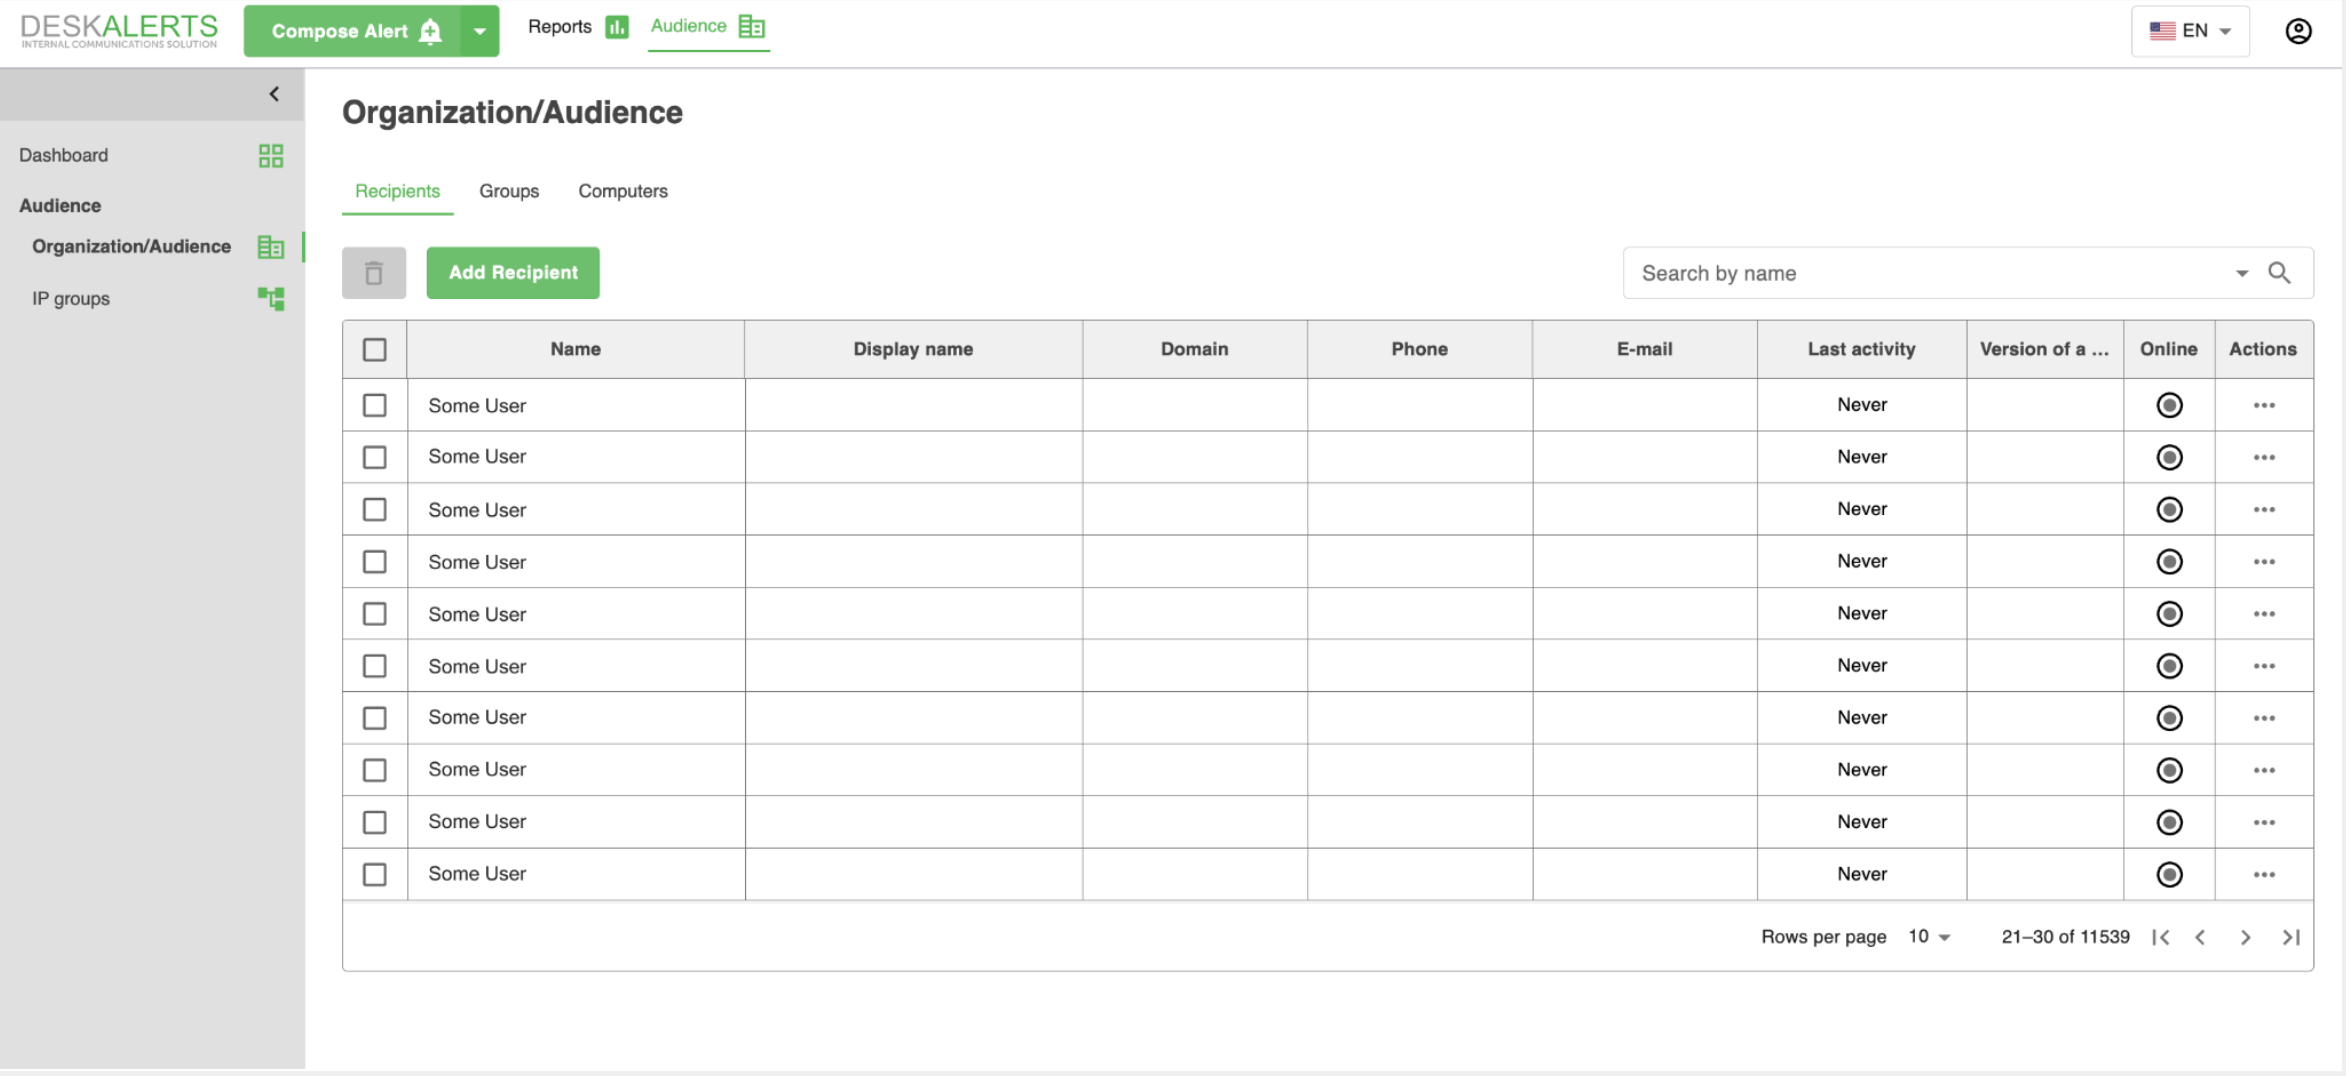
Audience List
The Audience section in the DeskAlerts Control Panel allows you to manage and interact with your synchronized audience. This is the group of users and devices that can receive your content. The tools in this section help you review user information, manage devices, and organize groups efficiently.
Recipients Tab
- View and manage all synchronized users in your organization.
- Access detailed information about each user, including:
- Name
- Display Name
- Domain
- Phone Number
- Email Address
- Last Login Activity
- Connection Status (Online/Offline)
- Add new recipients with the Add Recipient button if necessary.
Groups Tab
- Create and manage groups manually or check synchronized groups.
Computers Tab
- Manage all synchronized devices within the DeskAlerts system.
Key Features of the Audience Section
- Search Functionality: Quickly locate specific users by typing their details into the search bar, saving time when working with large audiences.
- User and Device Management: Gain complete visibility into the status of your users and devices, including their online/offline status and last activity, to ensure everything is functioning properly.
- Group Organization: Use groups to streamline communication, making it easy to send targeted alerts to specific teams or departments.
Sending Alerts
Composing a Desktop Pop-up alert
To compose a desktop pop-up alert, admin or publisher must simply click on the ‘Compose Alert’ button in the header of the DeskAlerts Control Panel.
💡The publisher must possess an account for DeskAlerts Control Panel, with the Policy including desktop alerts creation. If this is the case, the main menu will feature Alerts > Create alert items for them.
Navigate to your company's DeskAlerts console -> Click the "Compose Alert" button.

Determine the urgency of the alert
Depending on whether the alert is critical or informational, select the appropriate urgency level.
High-priority alerts always appear on top of other windows of the recipient, even if a Do Not Disturb mode on a agent app is on. High-priority mobile alerts appear in standard format.
Normal-priority alerts will appear on the recipient's desktop unless Do Not Disturb mode is active. Normal priority is a default behavior.
Select the alert's audience
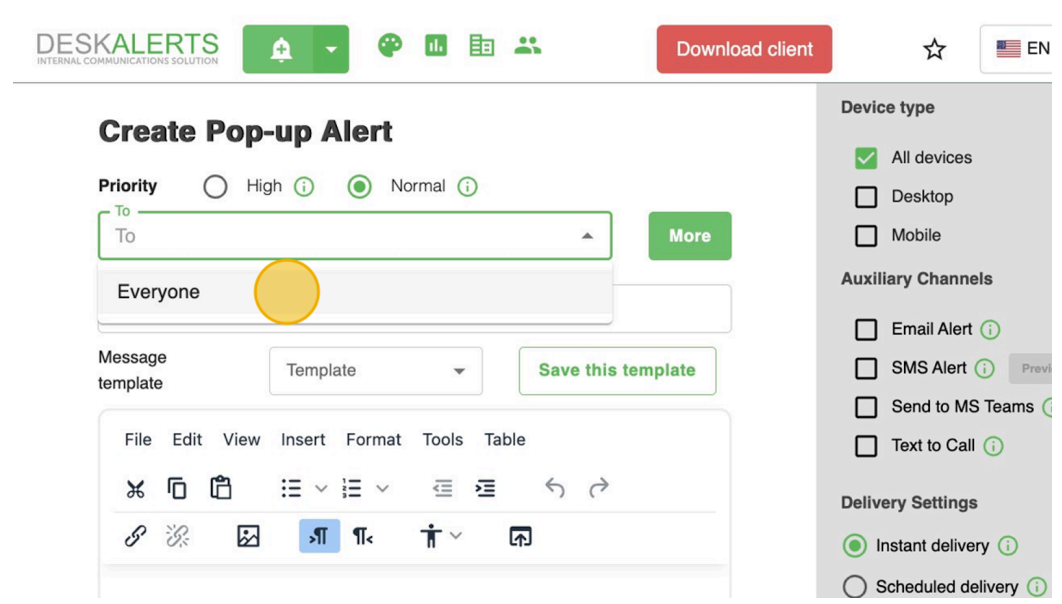
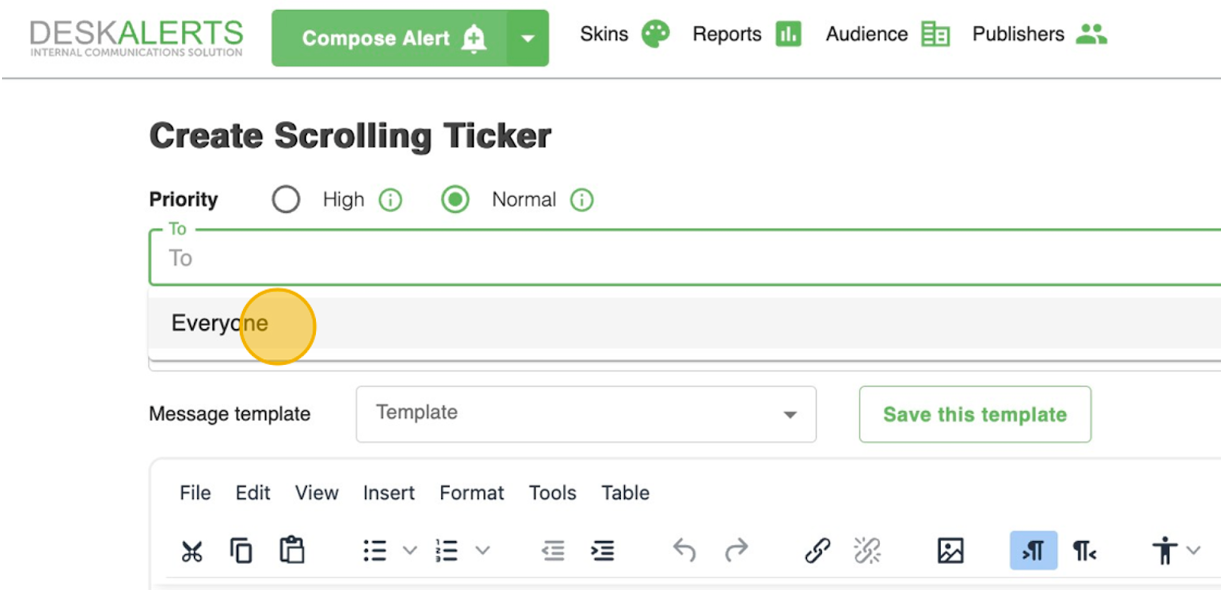
Continue by selecting the alert's audience. Click the 'To' field to enter the names of the alert recipients.
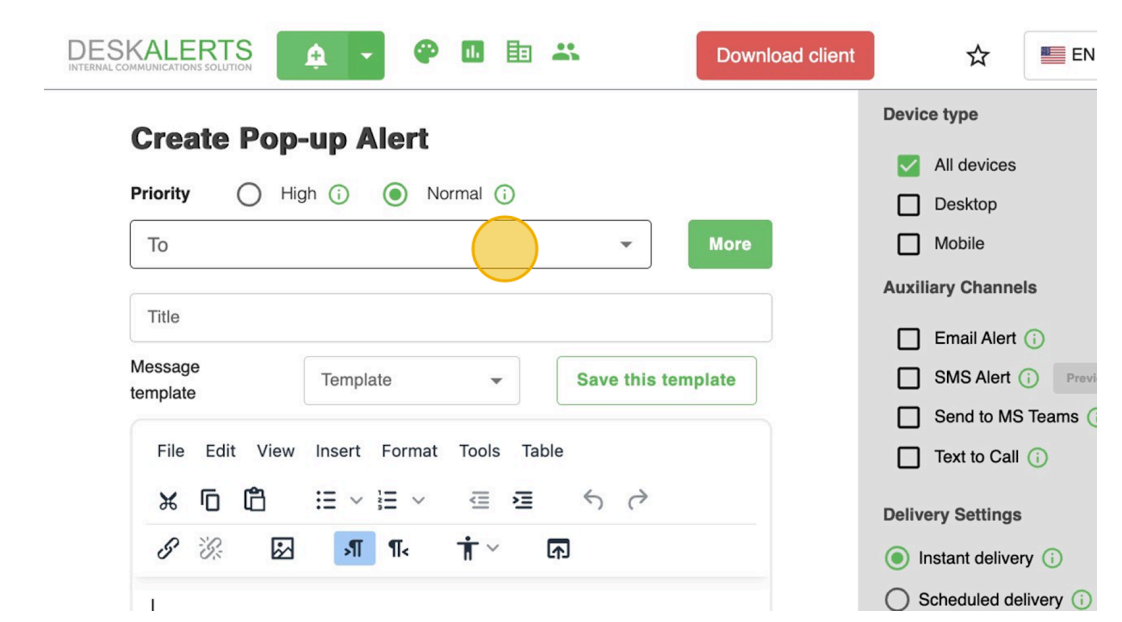
Click the 'More' button to open an advanced menu for selecting recipients. Publishers can navigate through users, groups, machines, IP groups, and organizational units.
Publisher can also choose the "Everyone" option to send a broadcast message.
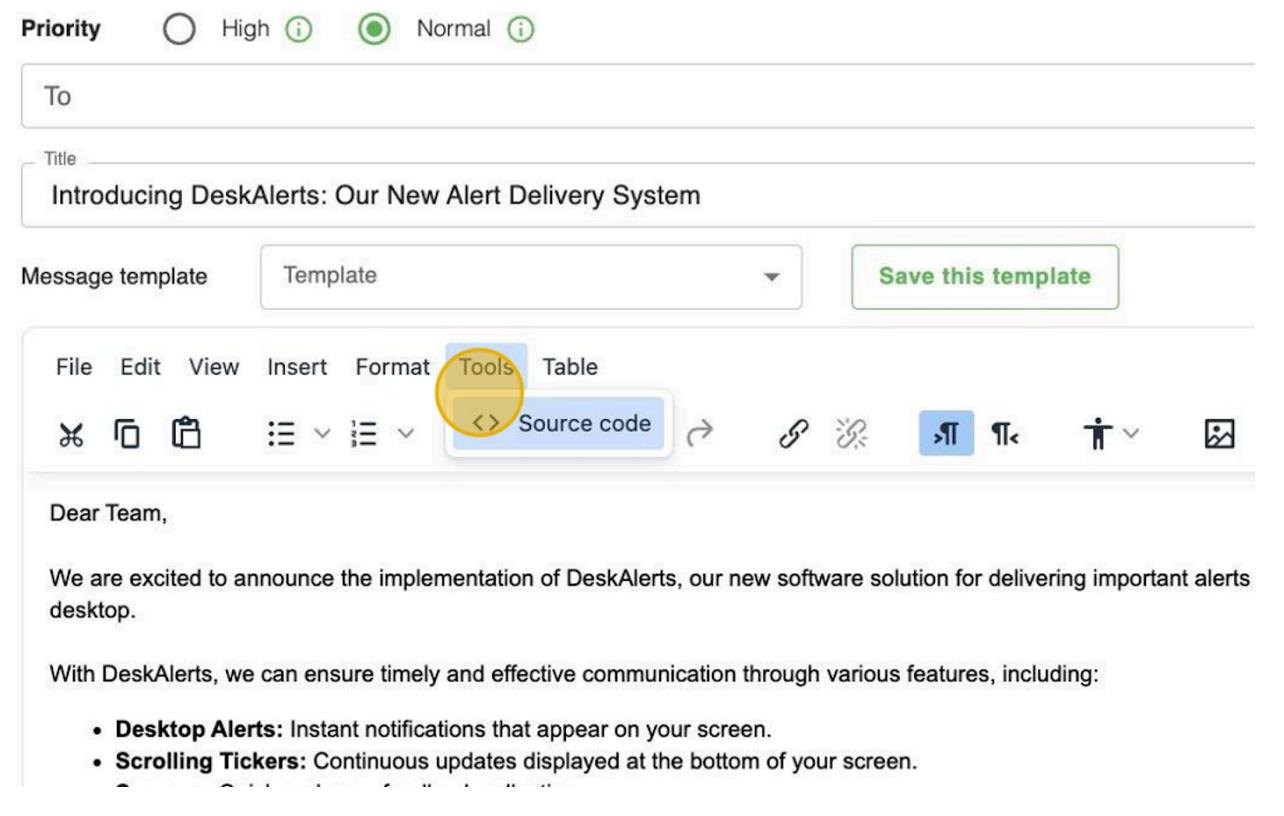
Compose the alert's message
Next, compose the message for the alert. Enter a title for the alert, for example: 'Introducing DeskAlerts: Our New Alert Delivery System'.
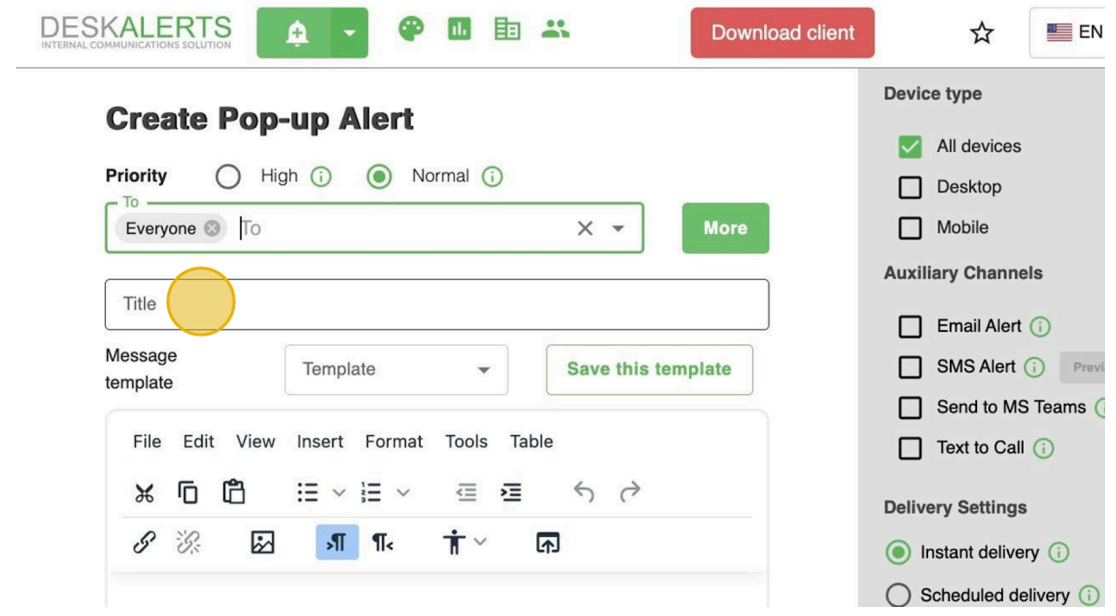
Create the message for the alert. Utilize the content editor toolbars to include images, tables, links, and more.
If desired, click 'Tools' to create an alert using HTML code.
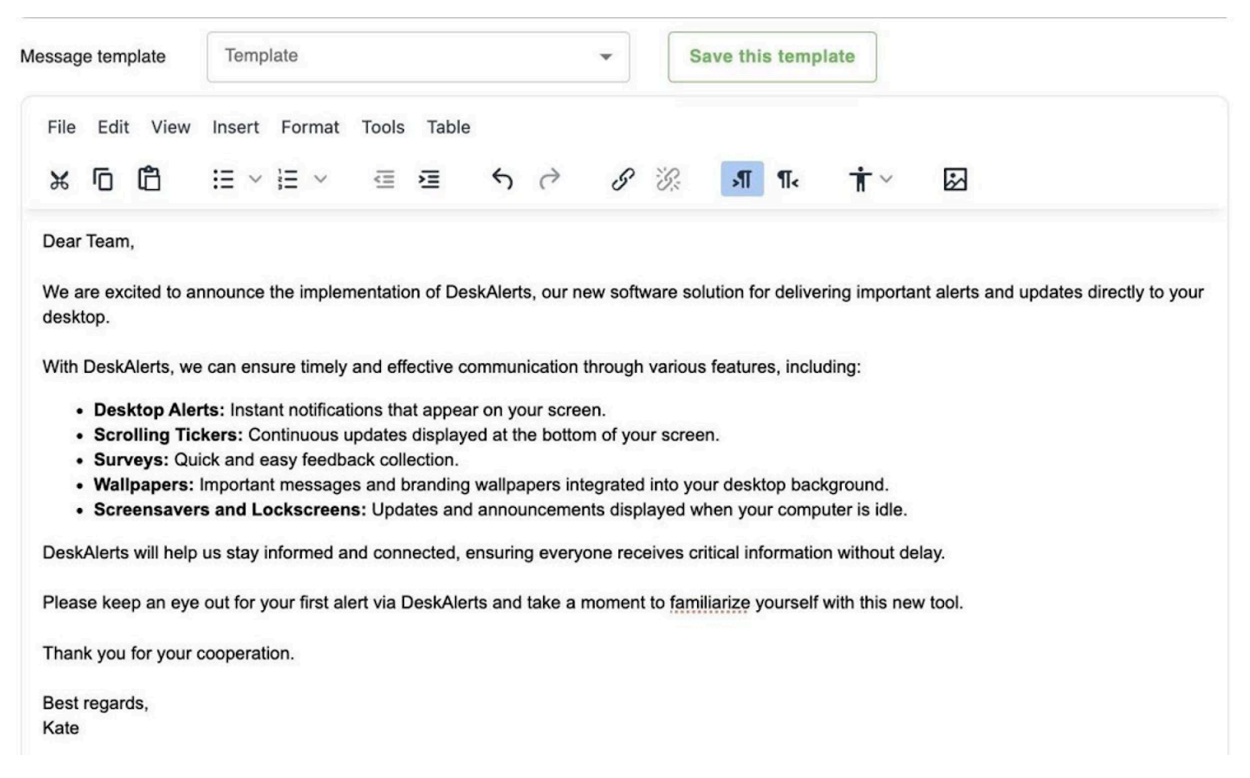
💡 Introduce DeskAlerts to your team sending your first alert!
Title: Introducing DeskAlerts: Our New Alert Delivery System
Dear Team,
We are excited to announce the implementation of DeskAlerts, our new software solution for delivering important alerts and updates directly to your desktop.
With DeskAlerts, we can ensure timely and effective communication through various features, including:
- Desktop Alerts: Instant notifications that appear on your screen.
- Scrolling Tickers: Continuous updates displayed at the bottom or top of your screen.
- Surveys: Quick and easy feedback collection tool.
- Wallpapers: Important messages and branding wallpapers integrated into your desktop background.
- Screensavers and Lockscreens: Updates and announcements displayed when your computer is idle.
DeskAlerts will help us stay informed and connected, ensuring everyone receives critical information without delay.
Please keep an eye out for your first alert via DeskAlerts and take a moment to familiarize yourself with this new tool.
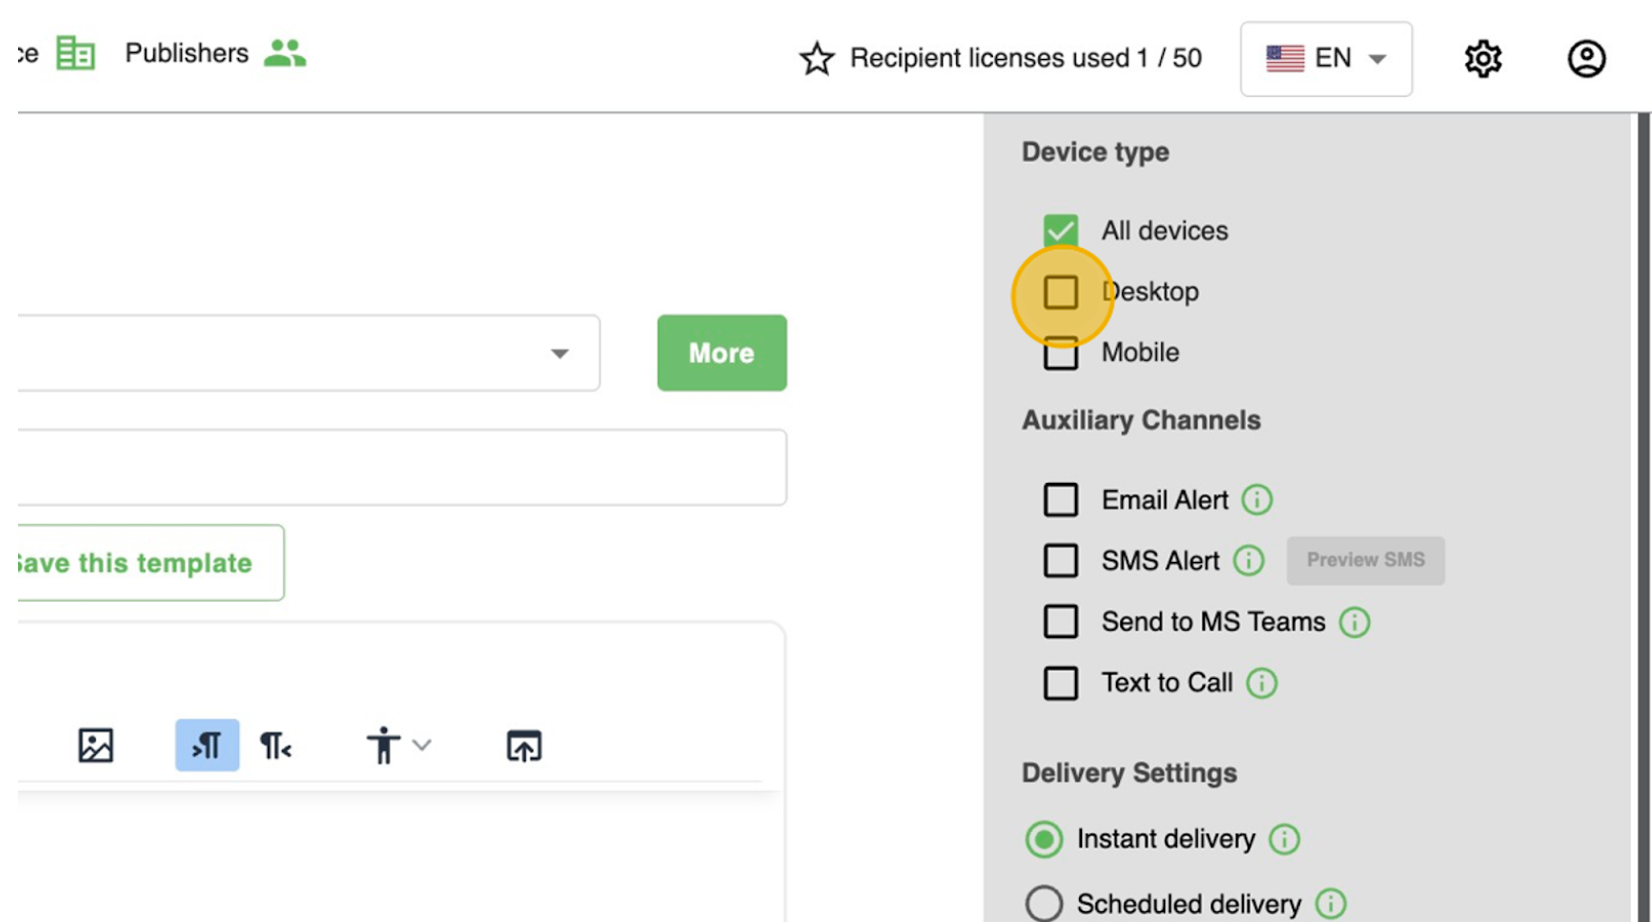
Choose the Communication Channels
Choose the device type and, if necessary, auxiliary channels for delivering the alert. The default option is 'All devices'.
Other options:
- Email Alert
- SMS Alert
- MS Teams bot
- Text-to-Call: the recipient is going to get a call with an alert pronounced.
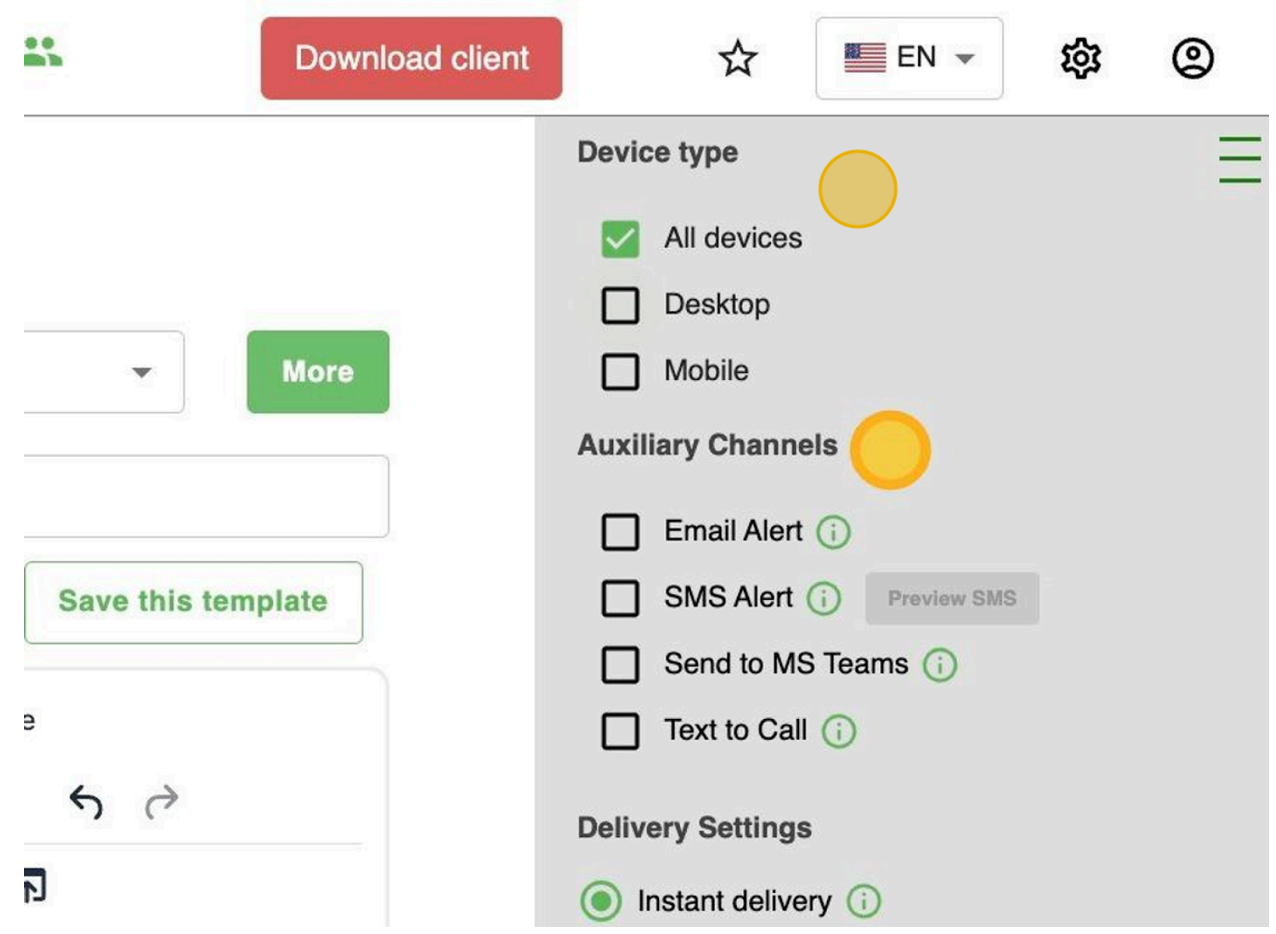
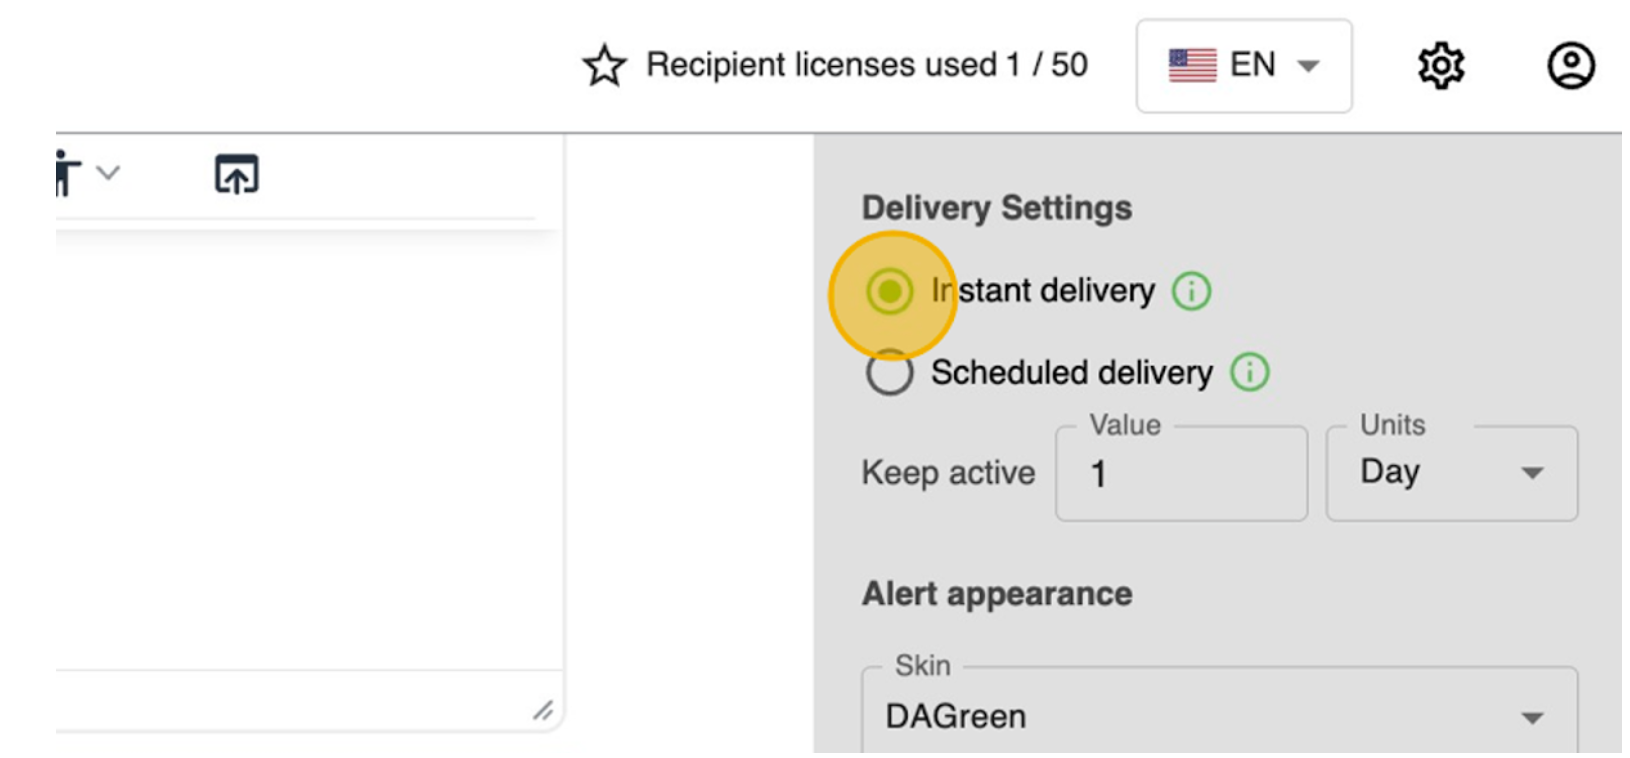
Set the Delivery Settings
These are the Delivery settings for the alert:
- Instant Delivery: Click on the "Instant delivery" field. The content will be distributed immediately after you click the "Send" button.
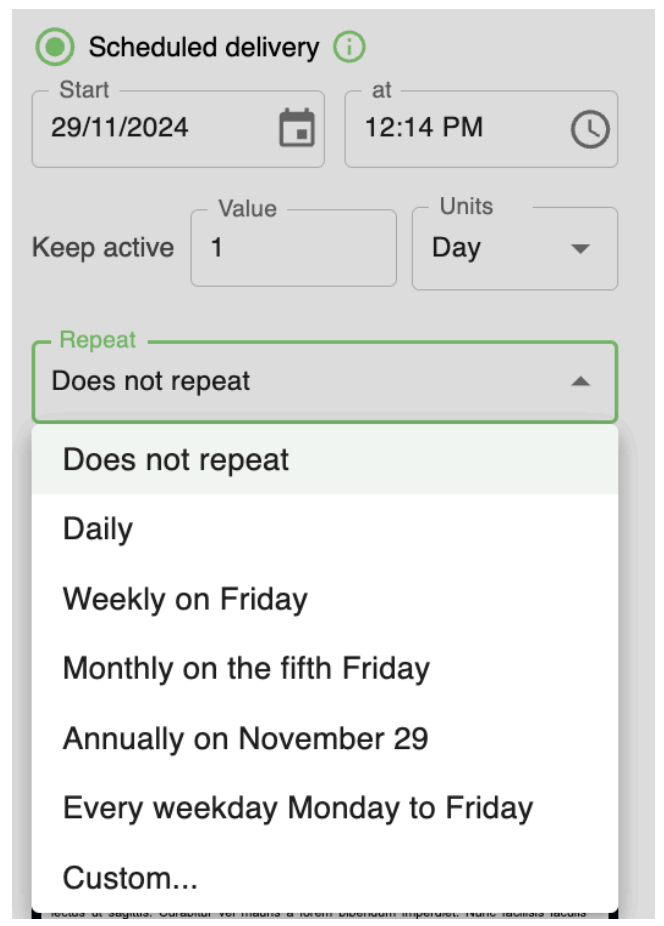
- Scheduled Delivery: Click on the "Scheduled delivery" field to set a specific date and time for the alert's delivery. You can schedule alerts to start and end at precise times and set them to repeat daily, weekly, monthly, or according to your preferred frequency.
- Keep Active: The "Keep active" setting specifies the period during which the alert will attempt to reach the target audience. If the recipient's device is offline when the alert is initially sent, the system will continue trying to deliver the alert for the duration of this period.

Scheduling Recurring Alerts
When scheduling a recurring alert, you can choose from the following repetition options:
- Does Not Repeat: The alert is sent only once at the specified time.
- Daily: The alert is sent every day.
- Weekly on [Day]: The alert is sent weekly on a specific day of the week (e.g., Friday).
- Monthly on [Occurrence and Day]: The alert is sent monthly on a specific occurrence of a day (e.g., the fifth Friday).
- Annually on [Date]: The alert is sent annually on the same date.
- Every Weekday (Monday to Friday): The alert is sent on all weekdays, excluding weekends.
- Custom: Allows you to define a custom recurrence schedule based on your specific needs:
- Repeat every N Minute / Hour / Day / Week / Month / Year
- End options: by date / after a number of occurrences / never ending.
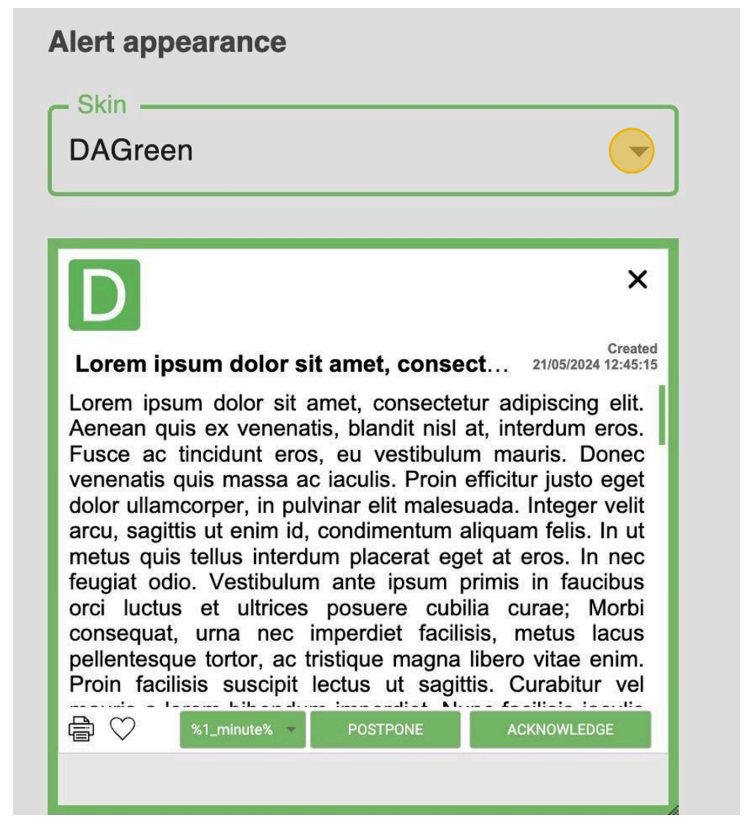
Select a Pop-up alert appearance
Select the alert’s skin among 4 default options: Green, Blue, Red, and Yellow.
💡If you would like to customize your alert's appearance, including logo replacement, please contact us to learn more about our additional Skin Editor module.
Select the pop-up type of the alert.
- A Fixed-size alert appears on the recipient's desktop screen with a predetermined size, preventing recipients from resizing it. The minimum values for width are 410 and for height are 300.
- A Resizable alert allows recipients to adjust its size, making it smaller or larger.
- A Fullscreen alert covers the entire screen.

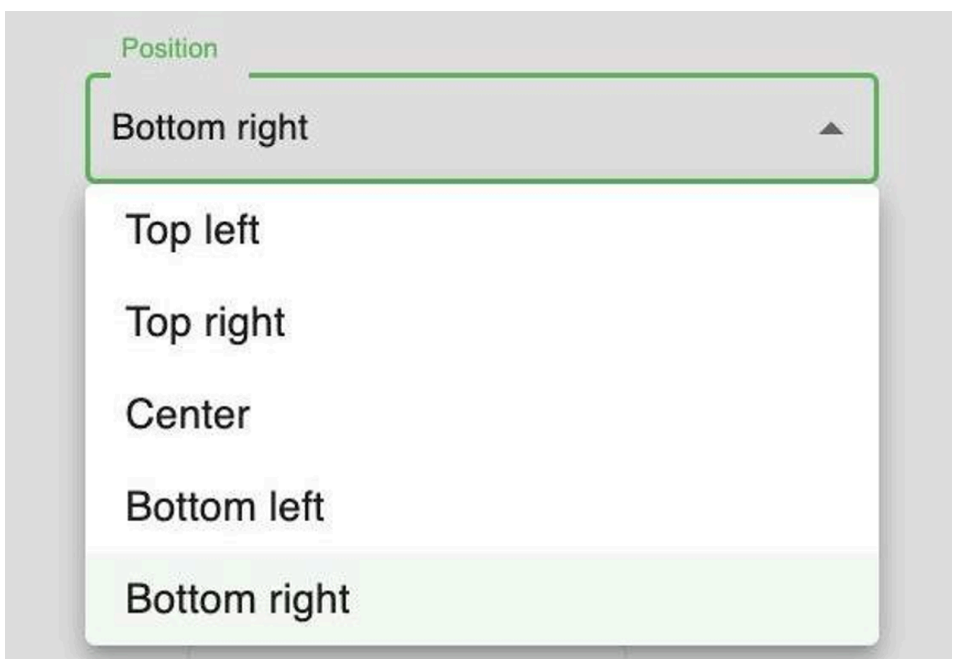
Select the position of the alert.
There are 5 available positioning options: Top left, Top right, Center, Bottom left, Bottom right. The default option is set to 'Bottom right'.
Set advanced settings
To explore the advanced settings and customize your alert functionalities, delve into the following options:
- Acknowledgement: Enable this feature to create an alert that requires a reading confirmation. When enabled, the alert's close button will be disabled, and recipients can only close it by confirming that it has been read using the Acknowledge button. Please note that the Auto-close option is not compatible with this feature and will not be active.
- Postpone Button for the Acknowledgement setting: This setting allows you to enable the postpone button, providing recipients with the option to postpone acknowledging the alert. When this option is disabled, the alert will remain on the recipient's screen until they acknowledge it.
- Self-destructing Alert: Enable this feature to create an alert that self-destructs upon closure, leaving no record in the agent application history. Please note that this feature is available on Windows and Android platforms only.
- Auto-close option: This feature automatically closes the alert after a specified duration once it's displayed on the screen. Please note that Auto-close is supported on Desktop platforms (Windows and Mac) only.
- Print Button: This functionality enables users to print content directly from the alert window. It is available on the Desktop (Windows, Mac) and iOS agent applications.
- Enable User Feedback: This feature allows you to collect user feedback using a 'Like' button displayed in the alert.
Preview the Alert
Click "Preview" button to review the alert.
The 'Preview' option allows publishers to preview how their alert will appear to recipients before sending it out. This feature helps ensure that the alert content, formatting, and settings are all correct and look as intended.

Send the Alert
You're all set to send the alert. If it's scheduled, clicking "Send" will assign it the 'Planned' status, and it will be delivered according to the schedule. For instant delivery alerts, they'll be distributed immediately after clicking "Send".
If you need to resume the alert creation later, simply use the 'Save' button to create a draft. You'll find this draft saved in your draft lists, ready for further editing or sending when you're ready.

How To Manage Alerts
Managing existing alerts is a crucial part of ensuring effective communication with your audience. In this section, you will learn how to perform key actions with alerts that have already been sent or scheduled. These actions are consistent across all modules, providing a unified approach to managing content within DeskAlerts.
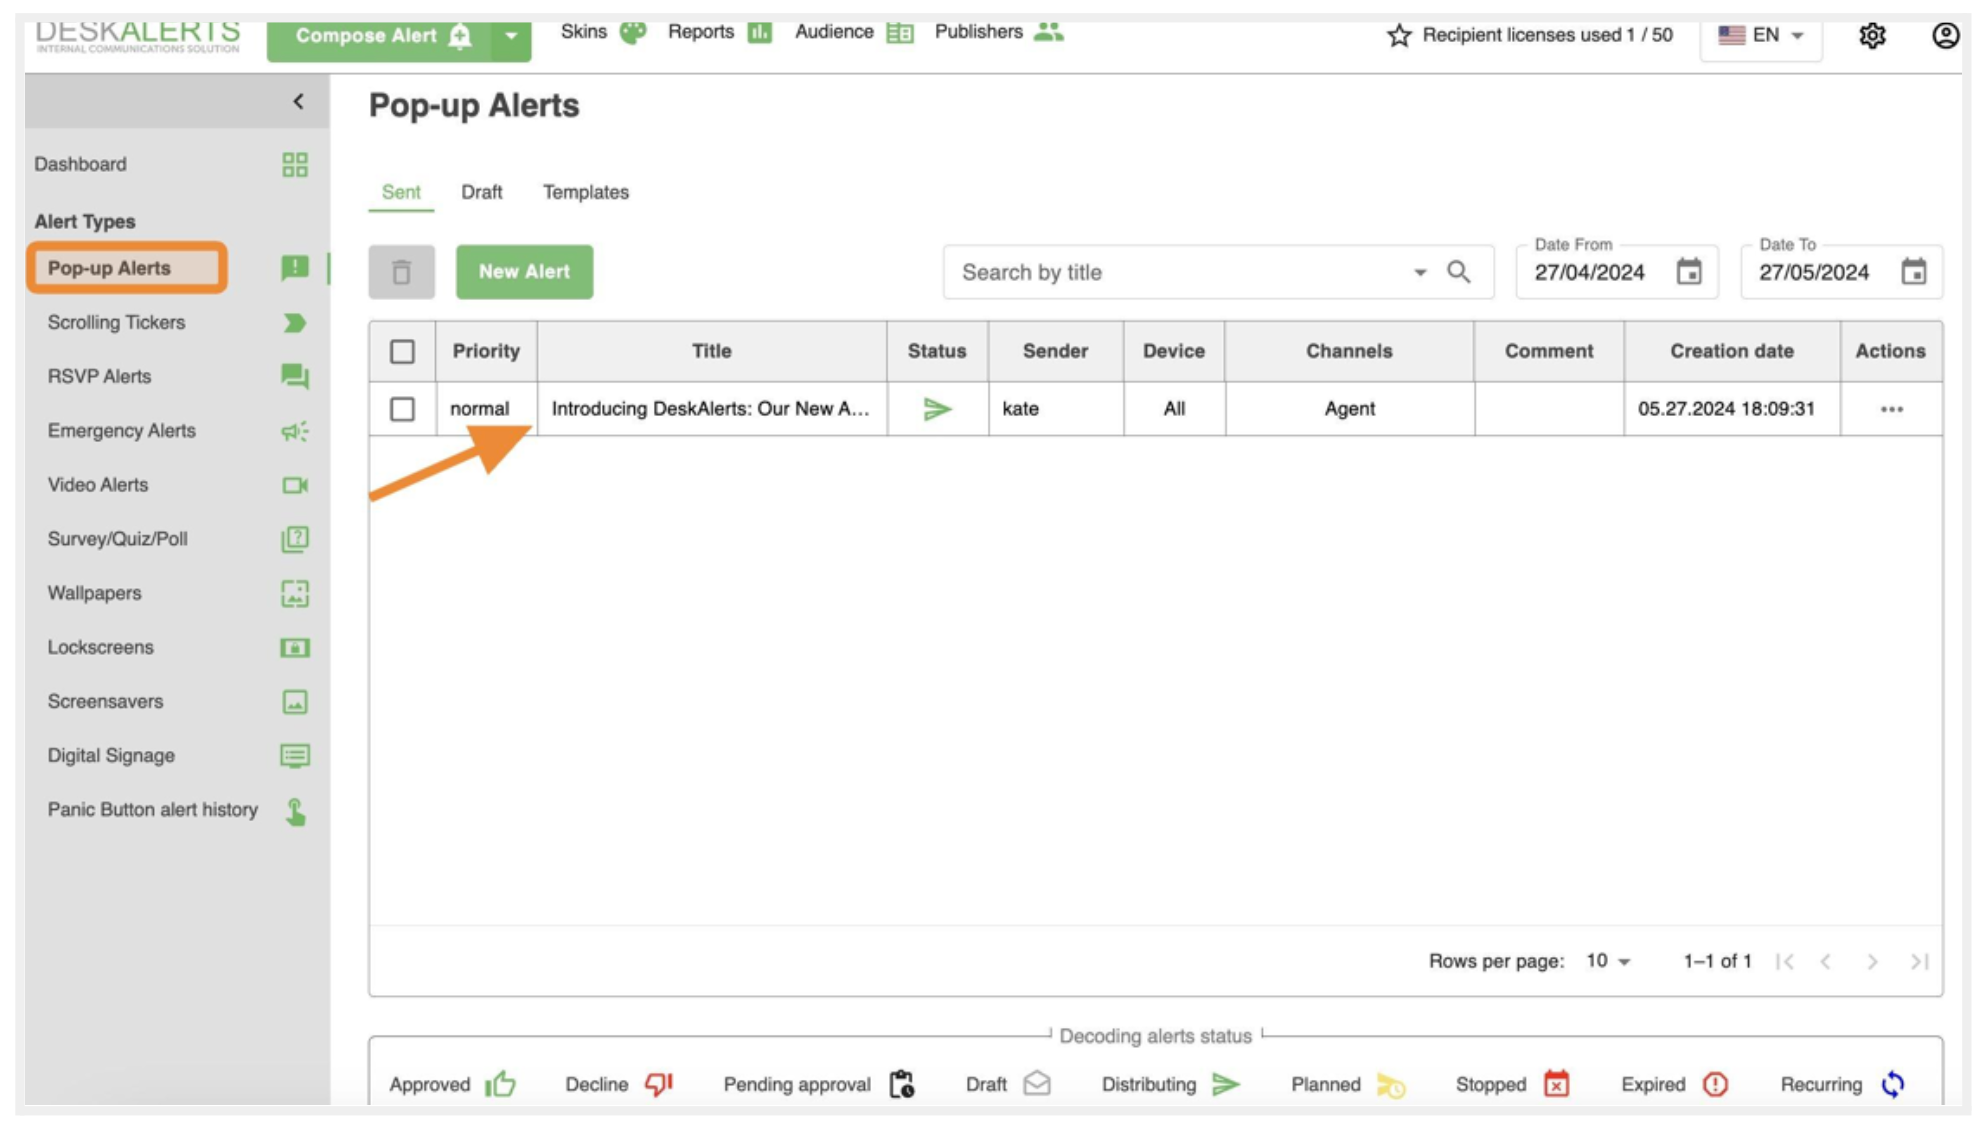
Pop-Up Alerts Page Overview
After sending an alert, it will appear on the Pop-up Alerts page, where you can view and manage all sent and scheduled alerts.
Under the Pop-Up Alerts heading, you’ll find three key sections to help you organize and manage your alerts:
- Sent: This is the main table where all created and sent alerts are displayed. From here, you can review, resend, or manage your alerts.
- Drafts: A dedicated area for managing saved drafts. Use this section to edit and send alerts you’ve previously saved but not yet distributed.
- Templates: This section allows you to create and manage pre-designed templates for pop-up alerts, making it easier to send consistent and professional notifications quickly.
The Pop-Up Alerts page is where you can manage and review all pop-up notifications. It provides an intuitive interface for searching, filtering, and tracking the alerts you’ve created or sent. Below is a breakdown of the key elements of this page:
-
Search Bar: Located at the top-right of the page, the search bar allows you to quickly find alerts by their title. Simply type the title or a keyword, and relevant alerts will appear in the table below.
-
Date Filters: Use the Date From and Date To fields to narrow down alerts by their sending or creation dates. It is useful for reviewing alerts sent over a specific time period.
-
Alerts Table: All alerts are displayed in a table format for easy access and management. The table contains the following columns:
- Priority: Shows the priority level of the alert (e.g., normal, high).
- Title: Displays the title of the alert for quick identification.
- Status: Indicates the current status of the alert (see legend below).
- Sender: Shows the name of the publisher who created the alert.
- Device: Specifies the target devices (e.g., "All" for all devices).
- Channels: Indicates the channel through which the alert was sent (e.g., Agent).
- Comment: Any comments or notes added to the alert.
- Creation Date: The exact date and time the alert was created.
- Actions: Access additional management options for each alert by clicking the three-dot menu.
-
Legend (Alert Statuses): At the bottom of the page, you’ll find a legend explaining the different alert statuses. These statuses help you understand the current state of each alert at a glance:
- Approved: The alert has been reviewed and approved (available if the optional approval workflow is enabled).
- Declined: The alert has been reviewed and declined (available if the optional approval workflow is enabled).
- Pending Approval: The alert is waiting for approval (available if the optional approval workflow is enabled).
- Draft: The alert has been saved as a draft and not yet sent.
- Distributing: The alert is currently being sent to recipients.
- Planned: The alert is scheduled to be sent at a later time.
- Stopped: The alert distribution has been stopped.
- Expired: The alert’s validity (keep active) period has ended.
- Recurring: The alert is set to be sent periodically based on a defined schedule.
This page provides all the tools needed to manage your pop-up alerts efficiently, offering visibility into their statuses and the ability to refine searches for effective communication.
Actions for Alerts
Once your alerts have been sent or scheduled, DeskAlerts provides a variety of tools to help you effectively manage and optimize your content. In this section, we’ll explore the actions you can take with your sent and scheduled alerts, ensuring that your messages reach their audience as intended.
When an alert is in the Distributing status, users can perform the following actions to manage it effectively:
Resend Alert
The Resend Alert action allows you to send the alert again to ensure it reaches your audience effectively. When you select this option, you’ll be presented with the following choices:
-
Resend to All
- Sends the alert again to the entire original audience, regardless of whether they have already received or acknowledged it.
-
Resend to Those Who Haven’t Received It Yet
- Targets only users who didn’t receive the alert during the initial distribution.
-
Resend to Unacknowledged Recipients
- Sends the alert only to users who haven’t acknowledged it yet, prompting them to confirm receipt of the message.
After selecting the appropriate option, simply click Resend to initiate the action. This flexibility ensures that you can tailor the resend process to your communication needs without spamming recipients unnecessarily.
Duplicate Alert
Creates a copy of the existing alert and opens the Create Alert page with all the original settings pre-filled.
⚠️ Pay close attention to the scheduling settings to ensure the duplicate alert has the correct timing and recurrence. This action is useful for quickly replicating alerts with similar content while customizing delivery as needed.
View Schedule
Displays the alert's delivery schedule, showing details about when it is set to be distributed and its scheduling settings. This helps ensure the alert is sent at the correct time to the intended audience.
Stop Alert
Immediately halts the distribution or scheduling of the alert. After stopping, a Start action will appear, allowing you to resume the alert’s delivery if needed.
💡 If the alert's Lifetime (Keep Active) expires while it is stopped, the alert will automatically transition to the Expired status. To resend an expired alert, you will need to use the Duplicate Alert action.
Preview Alert
Allows you to see a preview of how the alert looks to recipients.
View Graph
Takes you to the alert's detailed distribution statistics. Metrics available include:
- Received: The number of users who successfully received the alert.
- Not Received: The number of users who didn’t receive the alert.
- Acknowledged: Users who have actively confirmed they’ve seen the alert.
- Liked: Users who have interacted with the alert positively (if applicable).
You can also export the report in CSV or XLSX format for further analysis or record-keeping.
Delete Alert
If you want to delete an alert, simply select the checkbox next to the alert in the table. A Delete button will appear at the top of the table.
⚠️ Make sure you’ve selected the correct alert before proceeding, as the record of the alert will be permanently removed from the system. This action cannot be undone.
These actions ensure you have complete control over your alerts, enabling adjustments, monitoring, and re-distribution as necessary to meet your communication goals.
Skin Editor Module
This guide provides step-by-step instructions on how to create a custom alert skin design using the Skin Editor in DeskAlerts. By following these steps, users can tailor the appearance of their alert skins, including the name, fonts, colors, and logos, to effectively broadcast their company's branding. This guide is invaluable for anyone looking to personalize their company's alert skins and enhance their visual impact.
-
Navigate to your company's DeskAlerts console.
-
To access skins management, click Skins in the header.
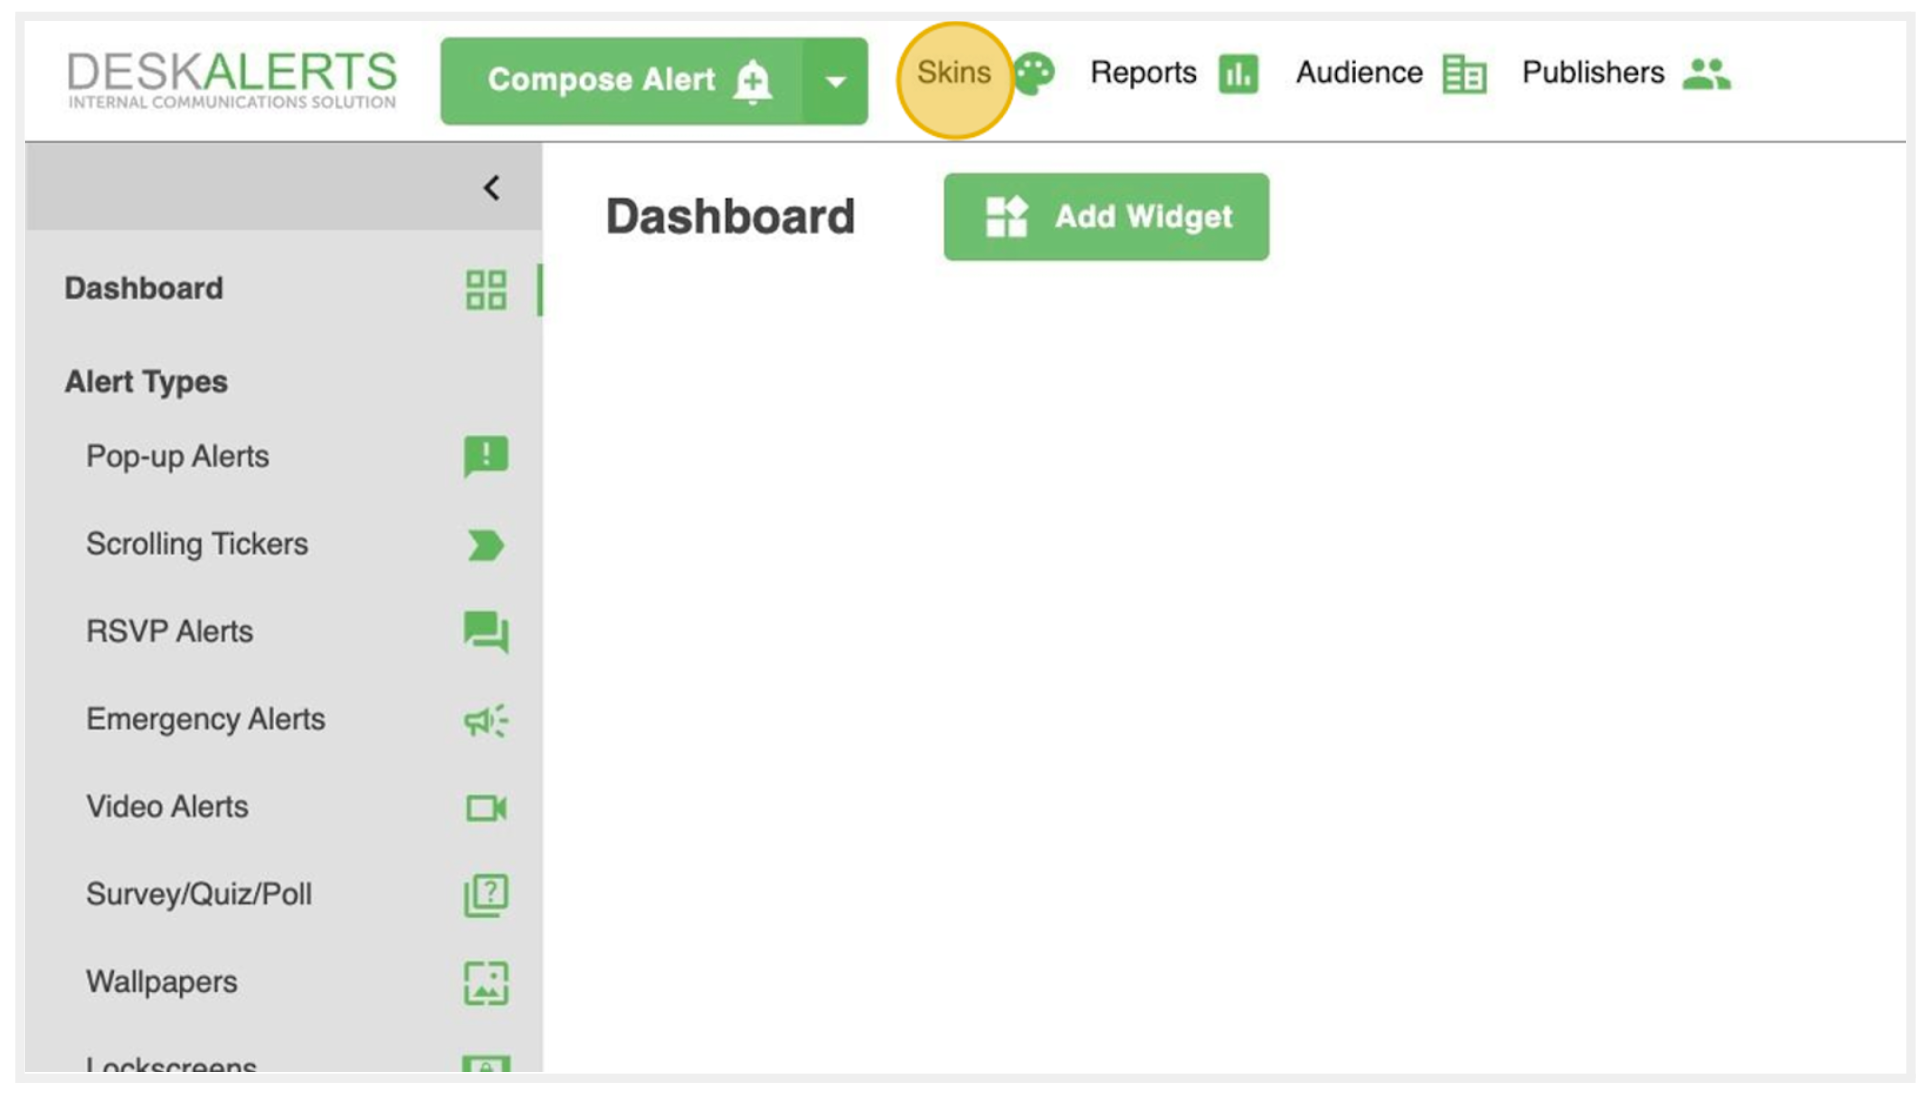
Create a New Alert Skin
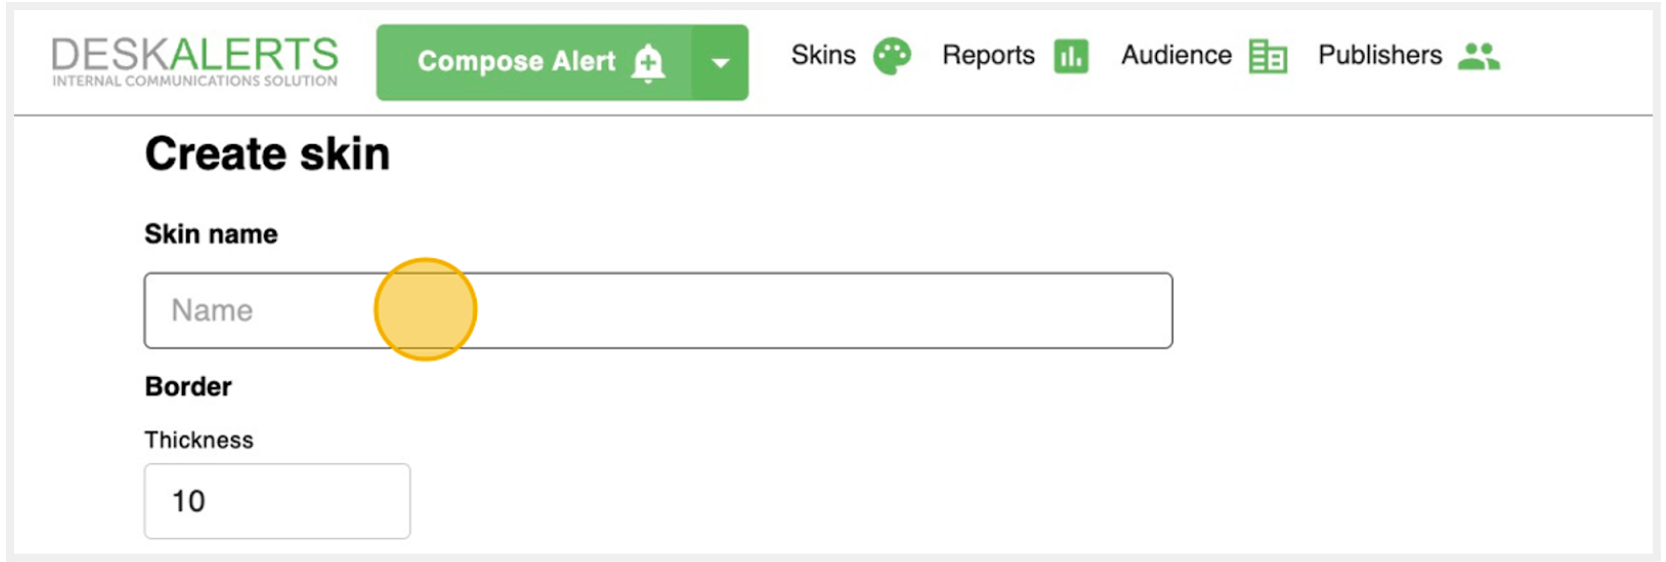
Click the New Alert Skin button.

Name the Skin
Name the skin so that your publishers from different teams can easily select the correct one.
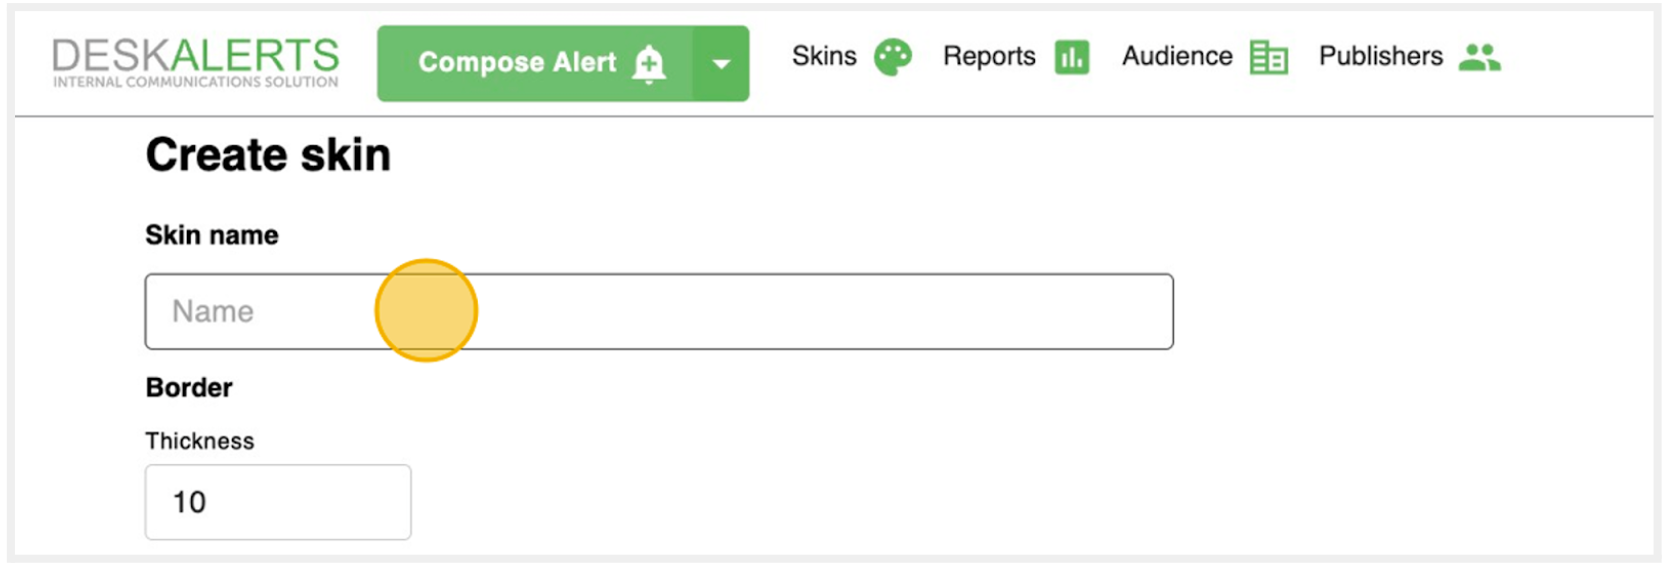
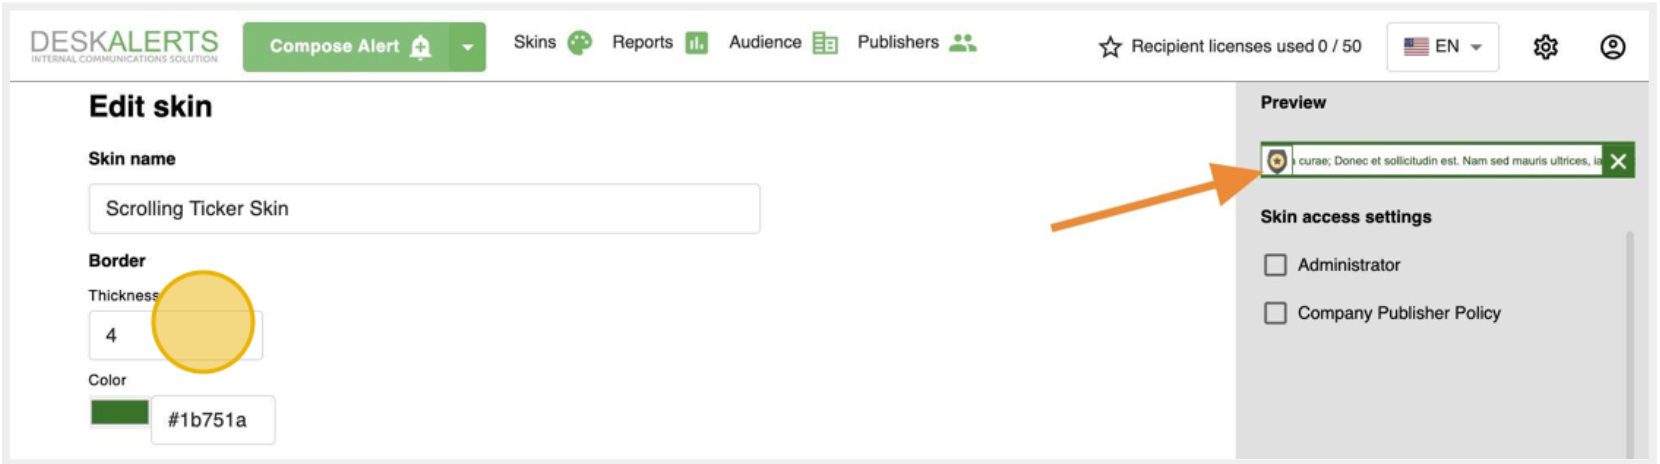
Define the Border Style
Specify the thickness of the skin's border and choose a color that aligns with your company's branding.
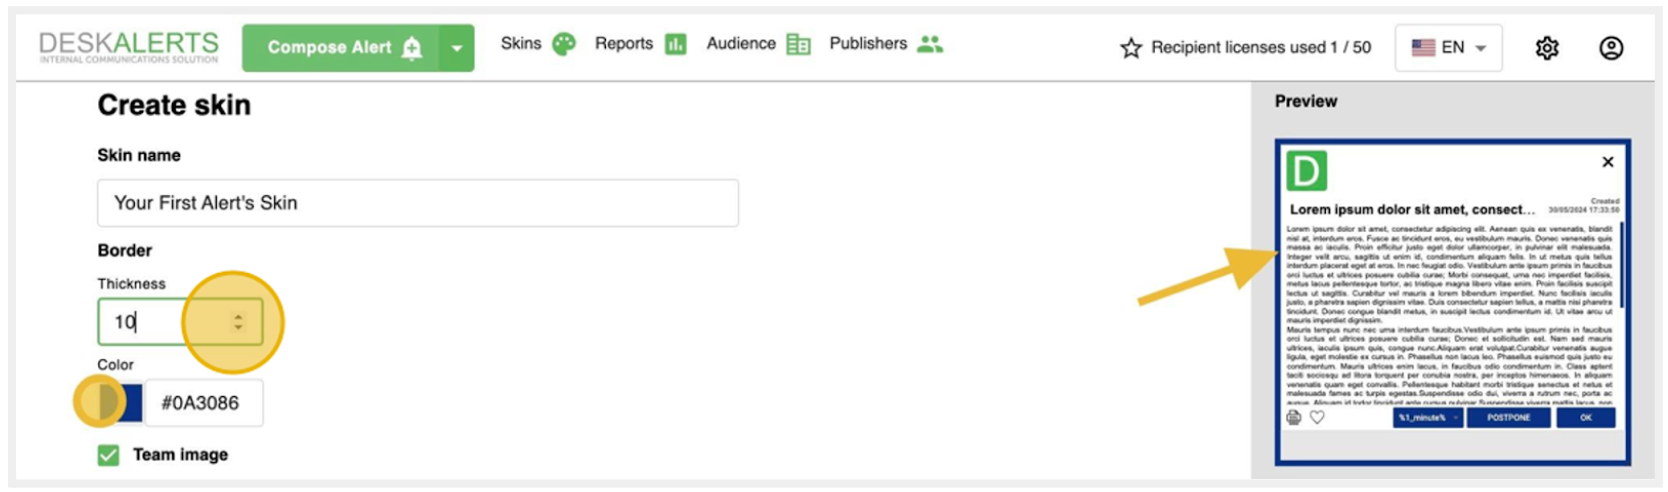
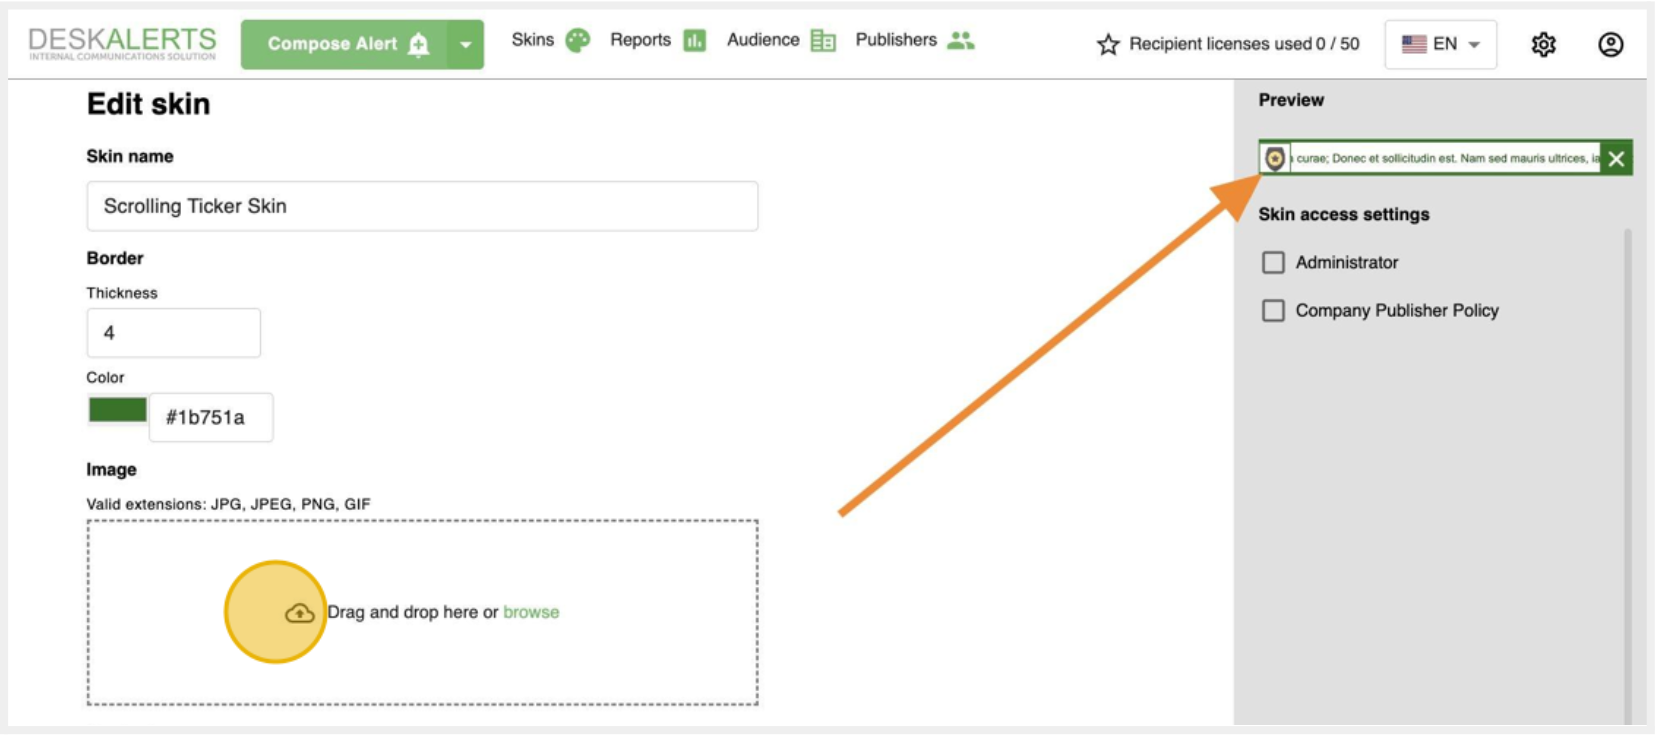
Upload Your Company's Logo
Align and upload your company's logo or any other custom image to appear in the header of the skin. The image must be in JPG, JPEG, PNG, or GIF format. You also have the option to remove the image from the header if needed.

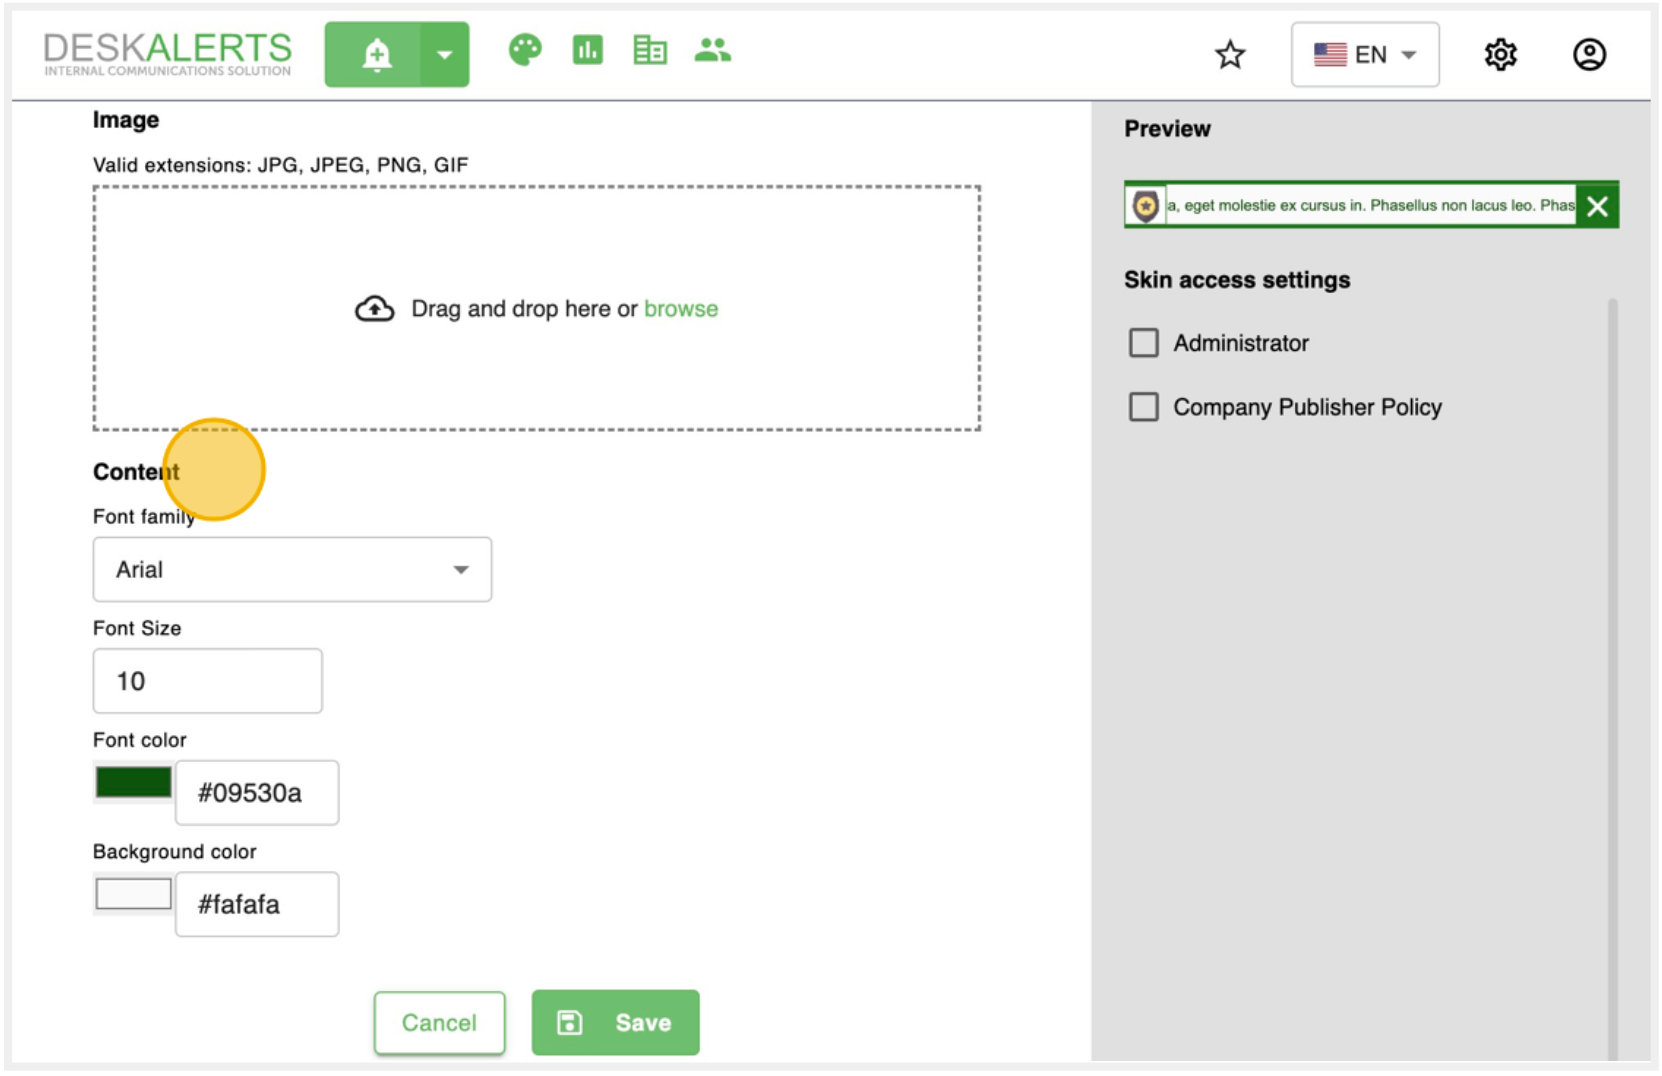
Select Appearance of the Alert's Title and Body
You can choose the font, its size, and color for the title and main text body.
Additionally, you have the option to remove the alert's title entirely.

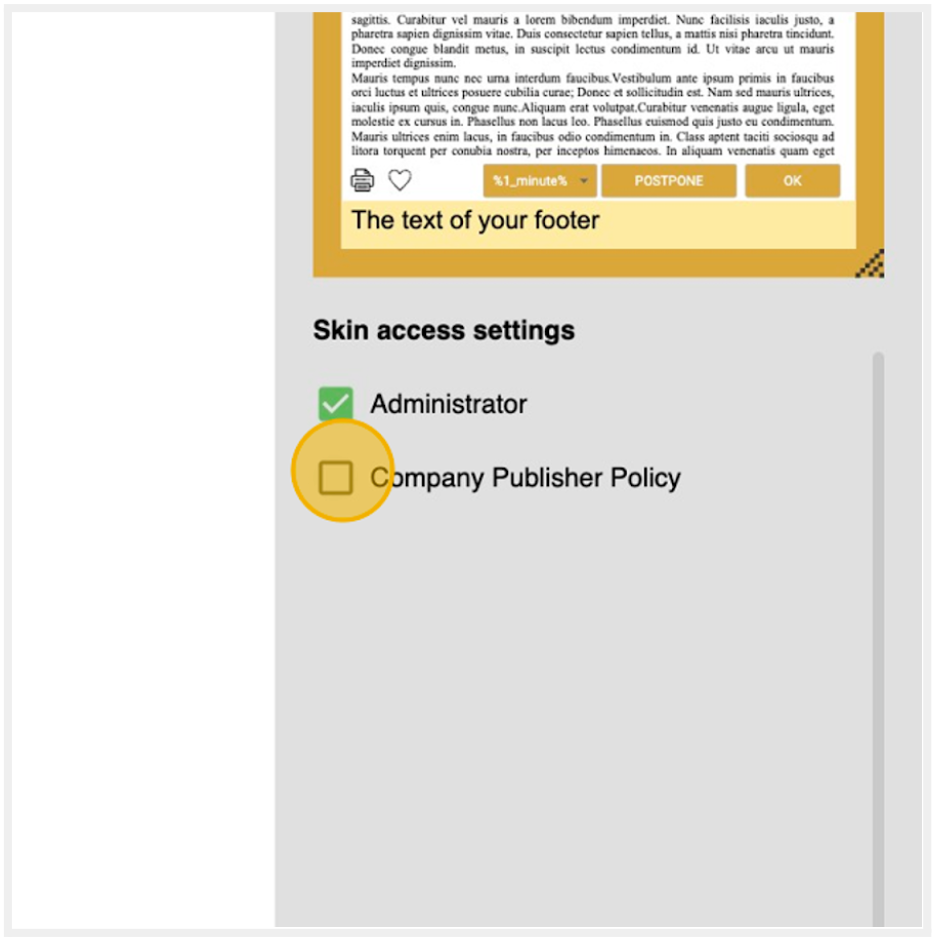
Create Footer of the Skin
You can choose the font, size, and color of the footer's text, as well as the background color. Additionally, you have the option to remove the alert's footer entirely.
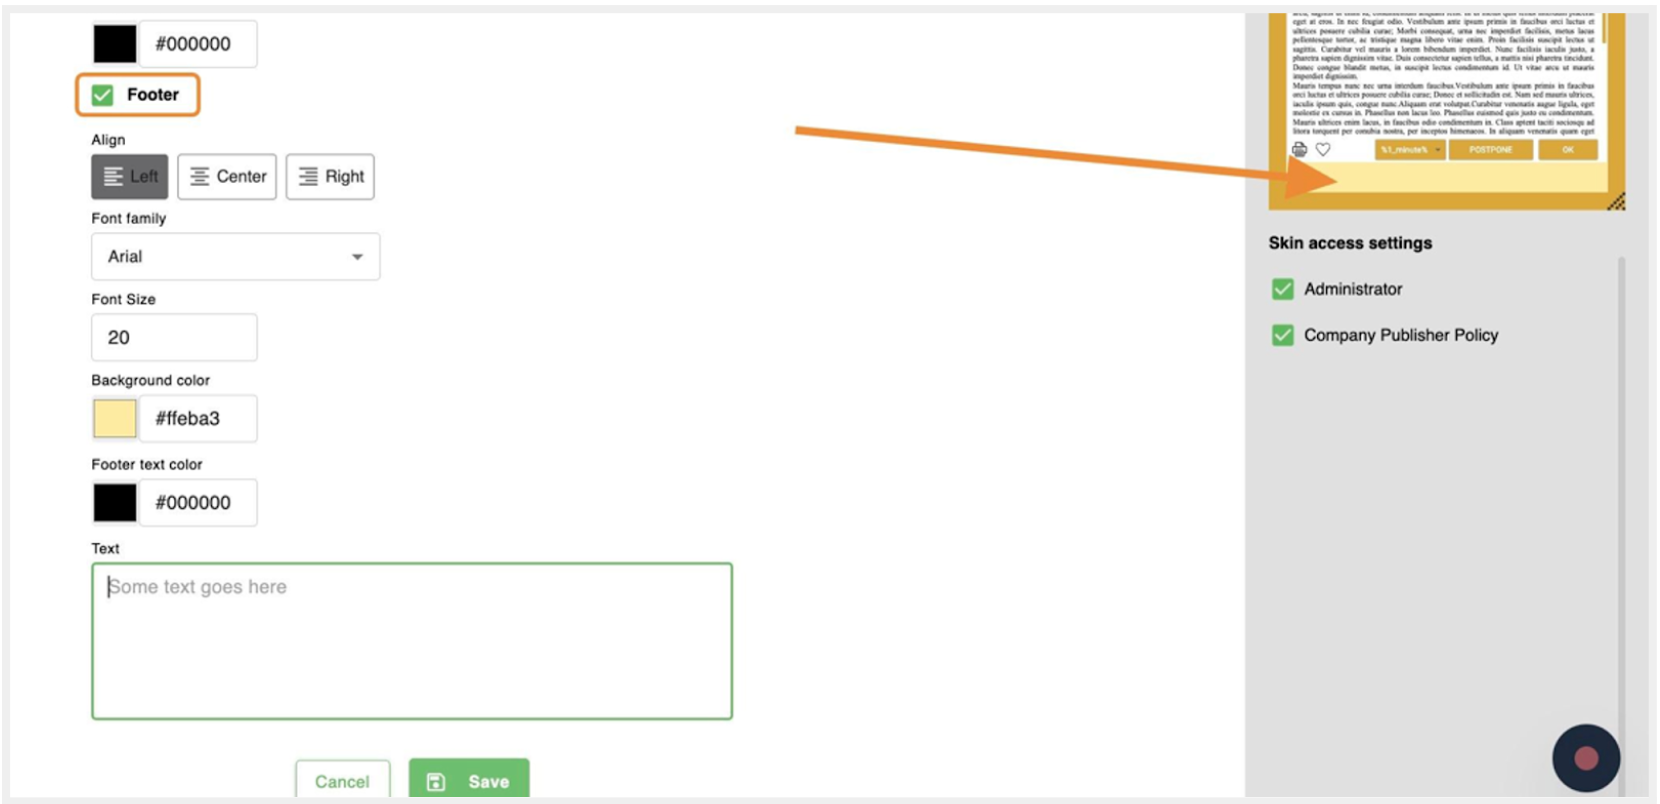
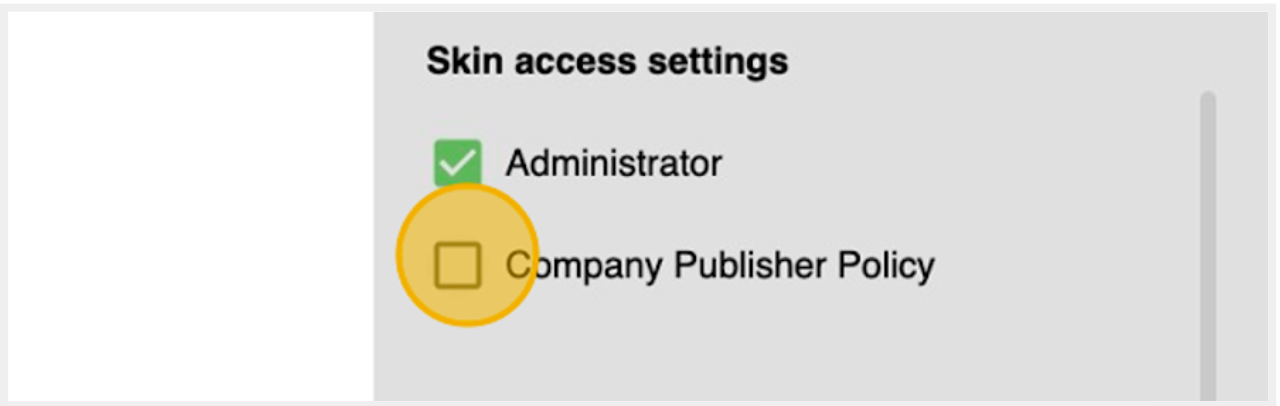
Set Access Settings
When selecting a policy in the access settings, an admin or publisher with the appropriate rights can define which skin will be available exclusively to users with the selected policies. You can use this feature to assign specific skins to different teams, for example, IT, factory, management, HR, marketing, etc.
Save the Skin
Click Save once the skin for the alert is ready.
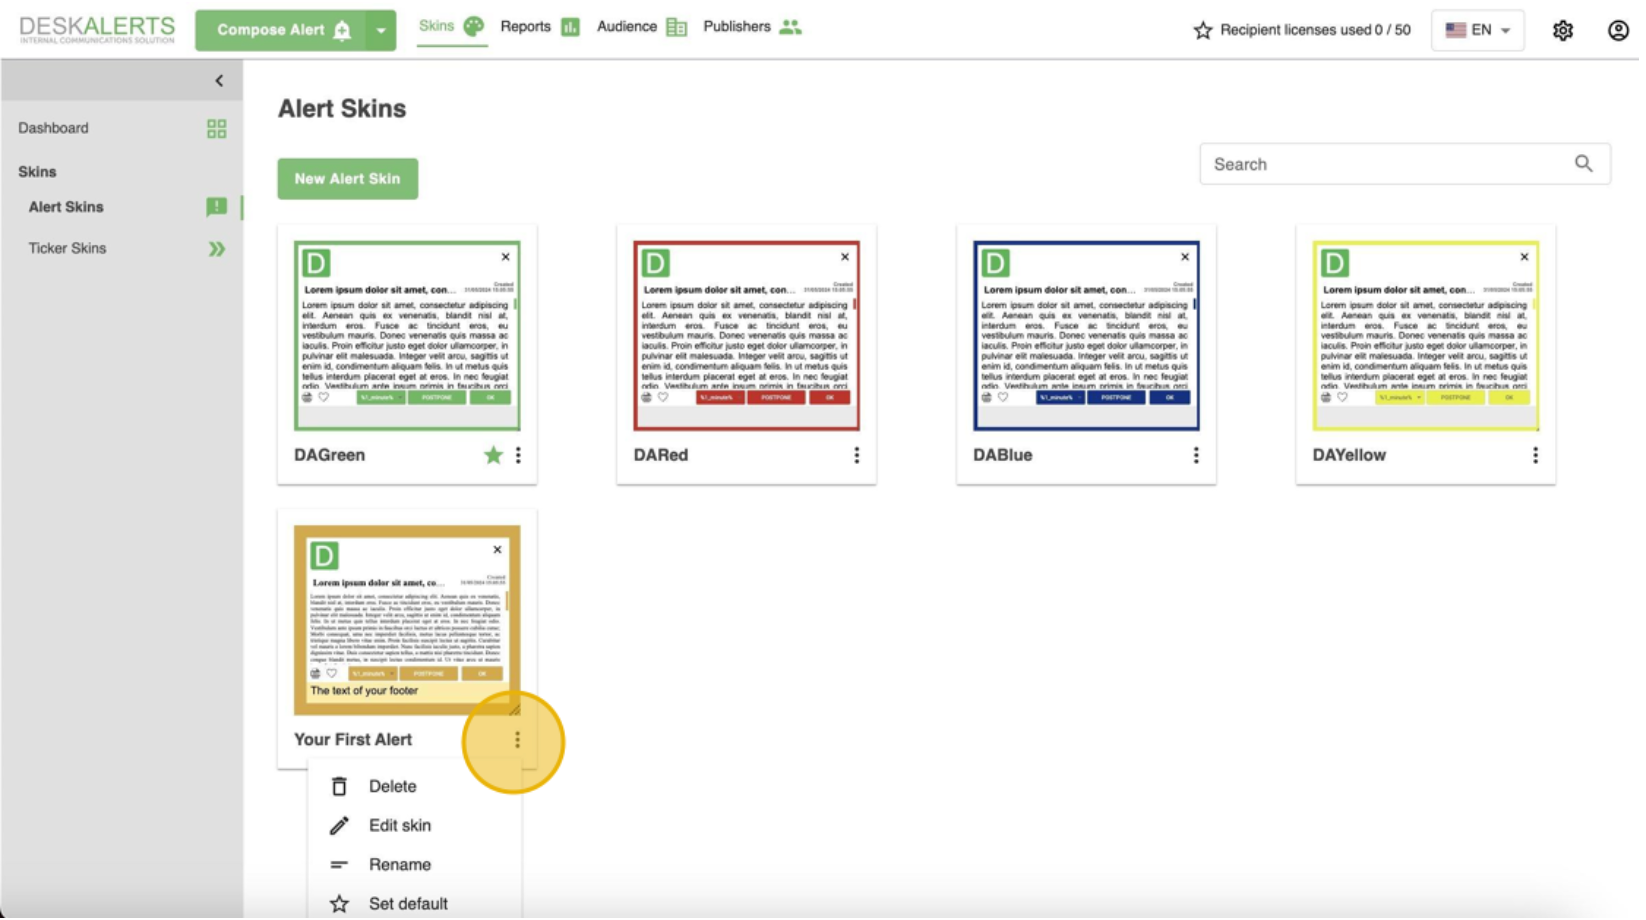
Review and Manage Skins
After saving the skin, it will appear on the Skins page, where you can view and manage all created skins.
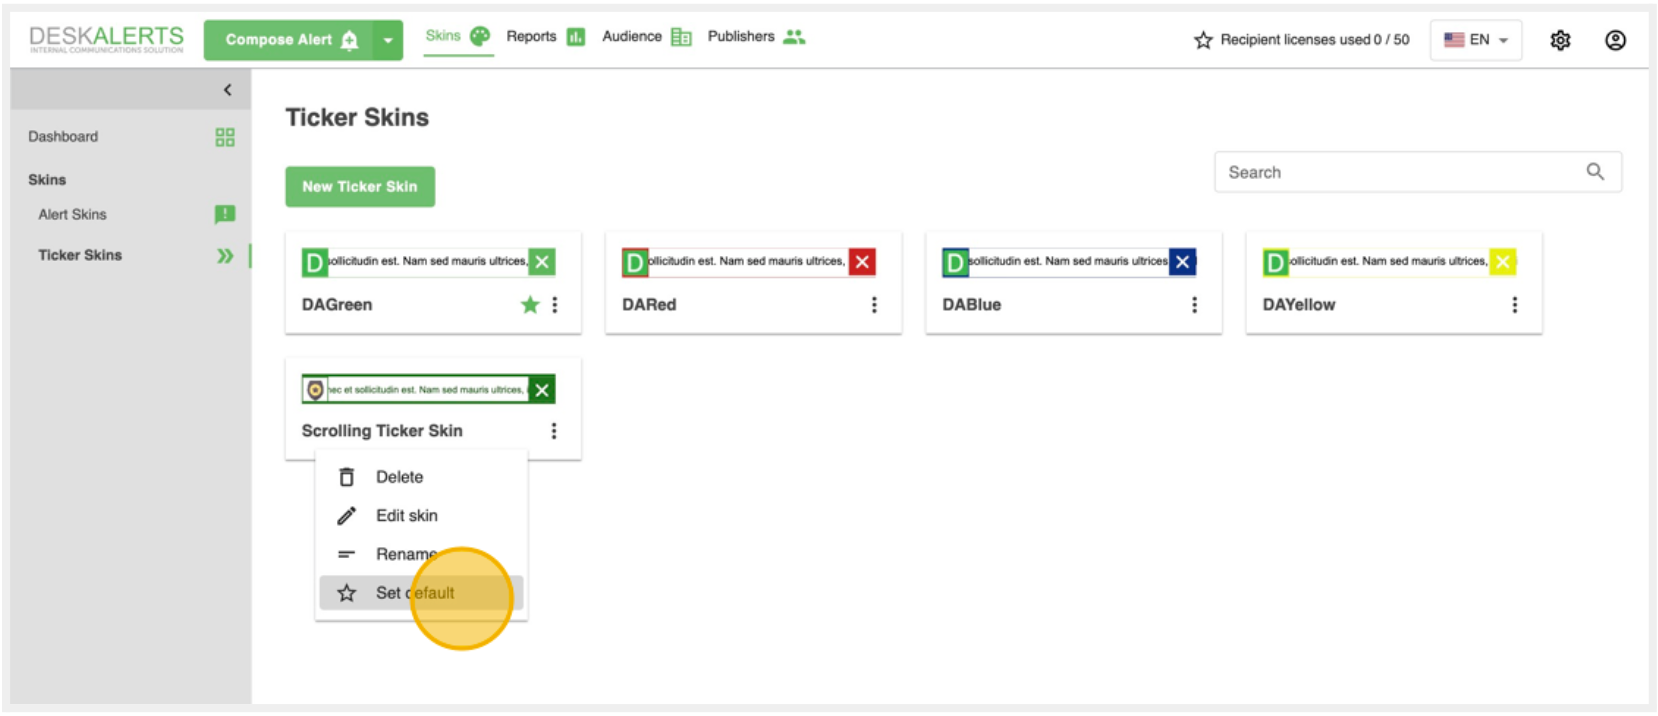
Delete, Edit, Rename or Set the Skin as Default
If the skin is set as default, it will be marked with a green star and primarily shown and used while composing the alert.
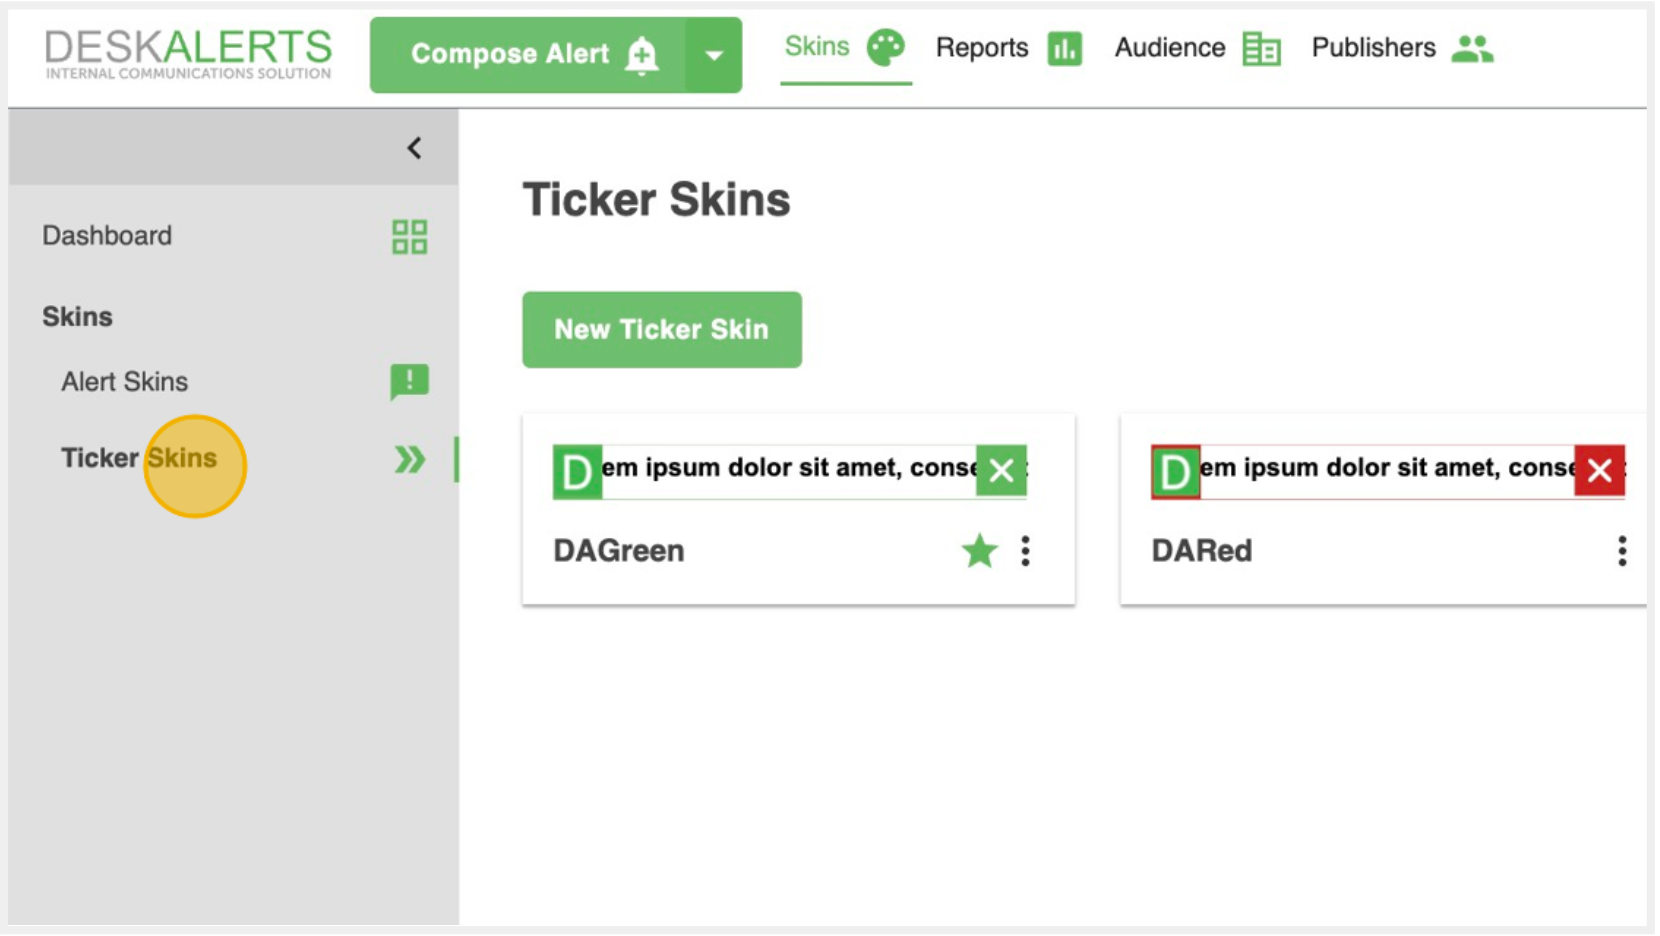
Create a New Scrolling Ticker Skin
Click the Ticker Skins tab, then click the New Ticker Skin button.
Name the Skin
Name the skin so that your publishers from different teams can easily select the correct one.
Define the Border Style
Specify the thickness of the skin's border and choose a color that aligns with your company's branding.
Upload Your Company's Logo
Upload your company's logo or any other custom image to appear on the left side of the skin. The image must be in JPG, JPEG, PNG, or GIF format.
Select Appearance of the Scrolling Ticker's Title and Body
You can choose background color, the font, its size, and color for the title and main text body.
Set Access Settings
When selecting a policy in the access settings, an admin or publisher with the appropriate rights can define which skin will be available exclusively to users with the selected policies. You can use this feature to assign specific skins to different teams, for example, IT, factory, management, HR, marketing, etc.
Save the Skin
Click Save once the skin for the Scrolling Ticker is ready.

Review and Manage Skins
After saving the skin, it will appear on the Skins page, where you can view and manage all created skins for Scrolling Tickers.
Delete, Edit, Rename or Set the Skin as Default
If the skin is set as default, it will be marked with a green star and primarily shown and used while composing the Scrolling Ticker.
💡 If you have any suggestions to improve the Skin Editor aligned with your company's needs, please contact us at support@deskalerts.com
Scrolling Ticker Module
Create and Send Scrolling Ticker Alert
Navigate to your company's DeskAlerts console → Click the dropdown button.
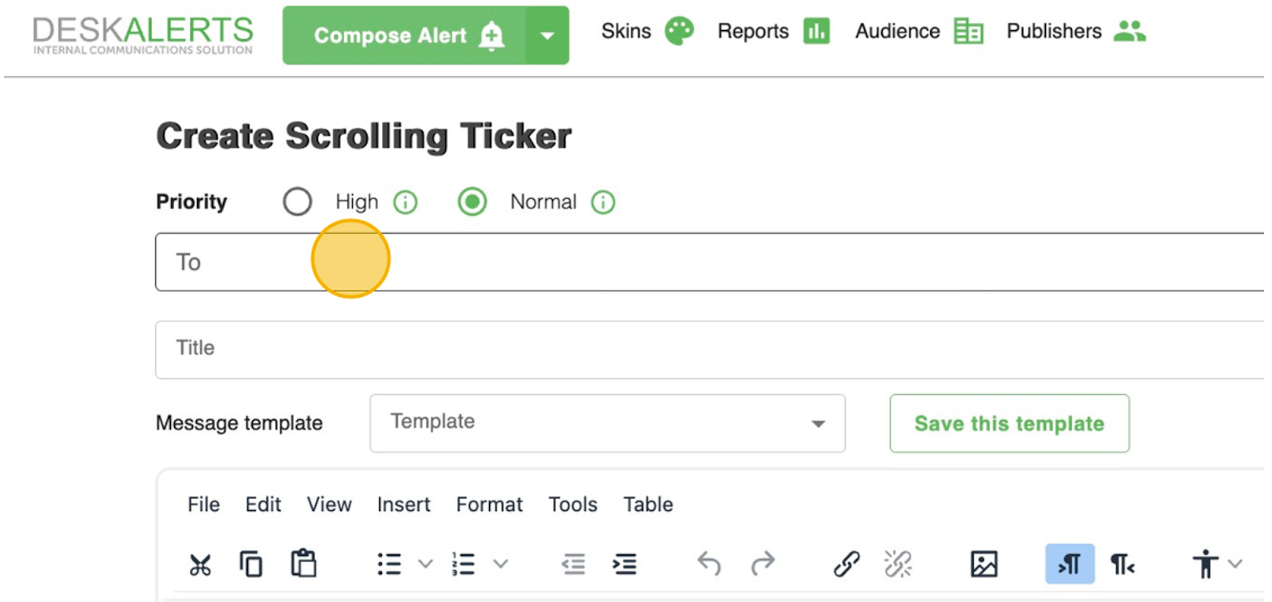
Determine the Urgency of the Ticker
Depending on whether the alert is critical or informational, select the appropriate urgency level:
- High-priority scrolling tickers always appear on top of other windows of the recipient, even if a Do Not Disturb mode is enabled. High-priority mobile scrolling tickers appear as text alerts in standard format.
- Normal-priority alerts will appear on the recipient's desktop unless Do Not Disturb mode is active. Normal priority is the default behavior.
Select the Ticker's Audience
Continue by selecting the ticker’s audience. Click the To field to enter the names of the ticker recipients.
Click the More button to open an advanced menu for selecting recipients. Publishers can navigate through users, groups, machines, IP groups, and organizational units.
Publishers can also choose the Everyone option to send a broadcast message.
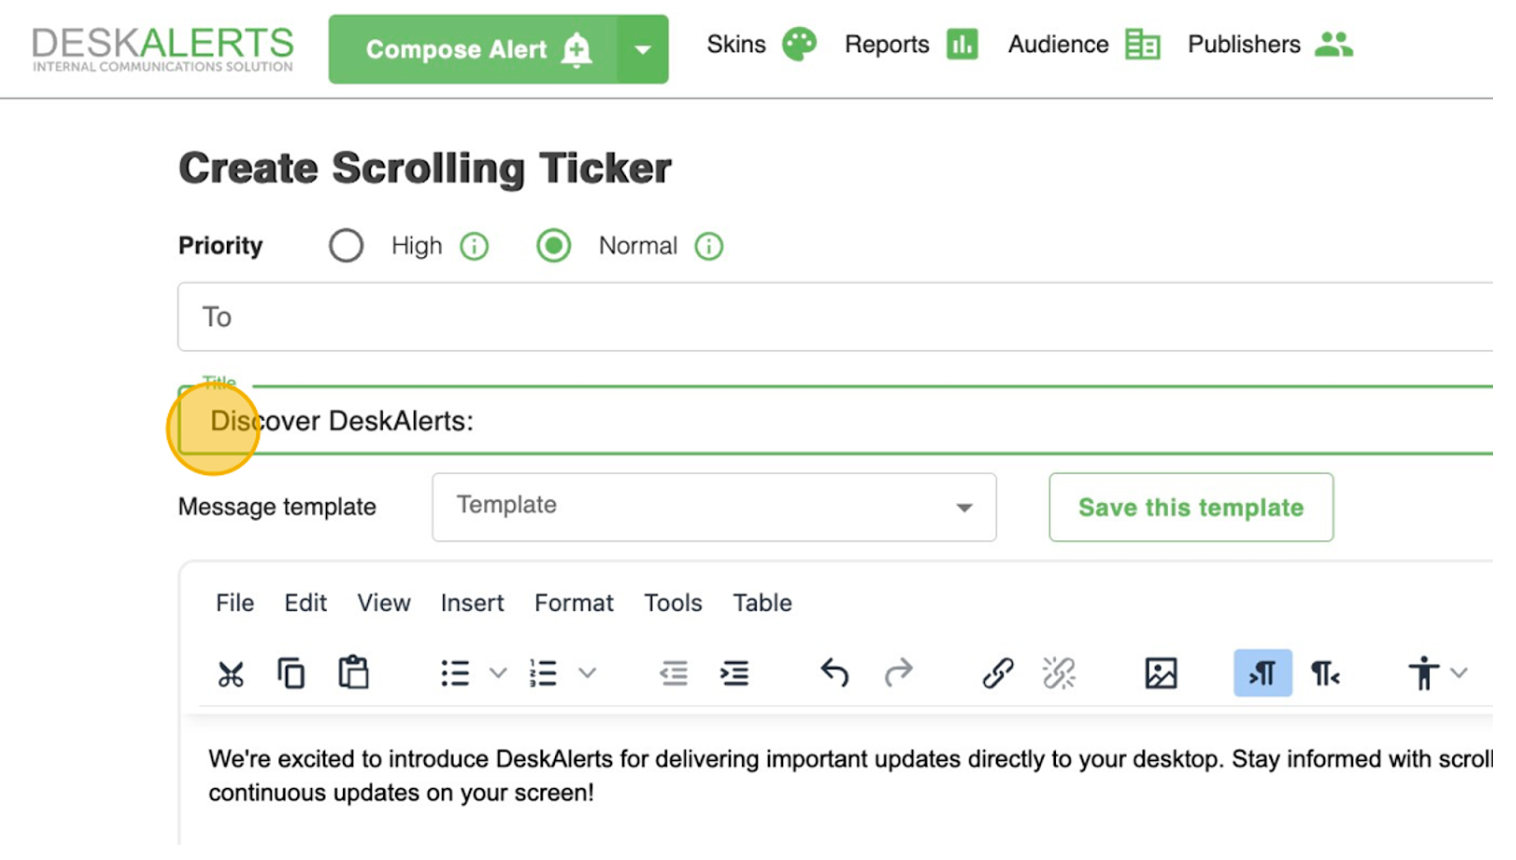
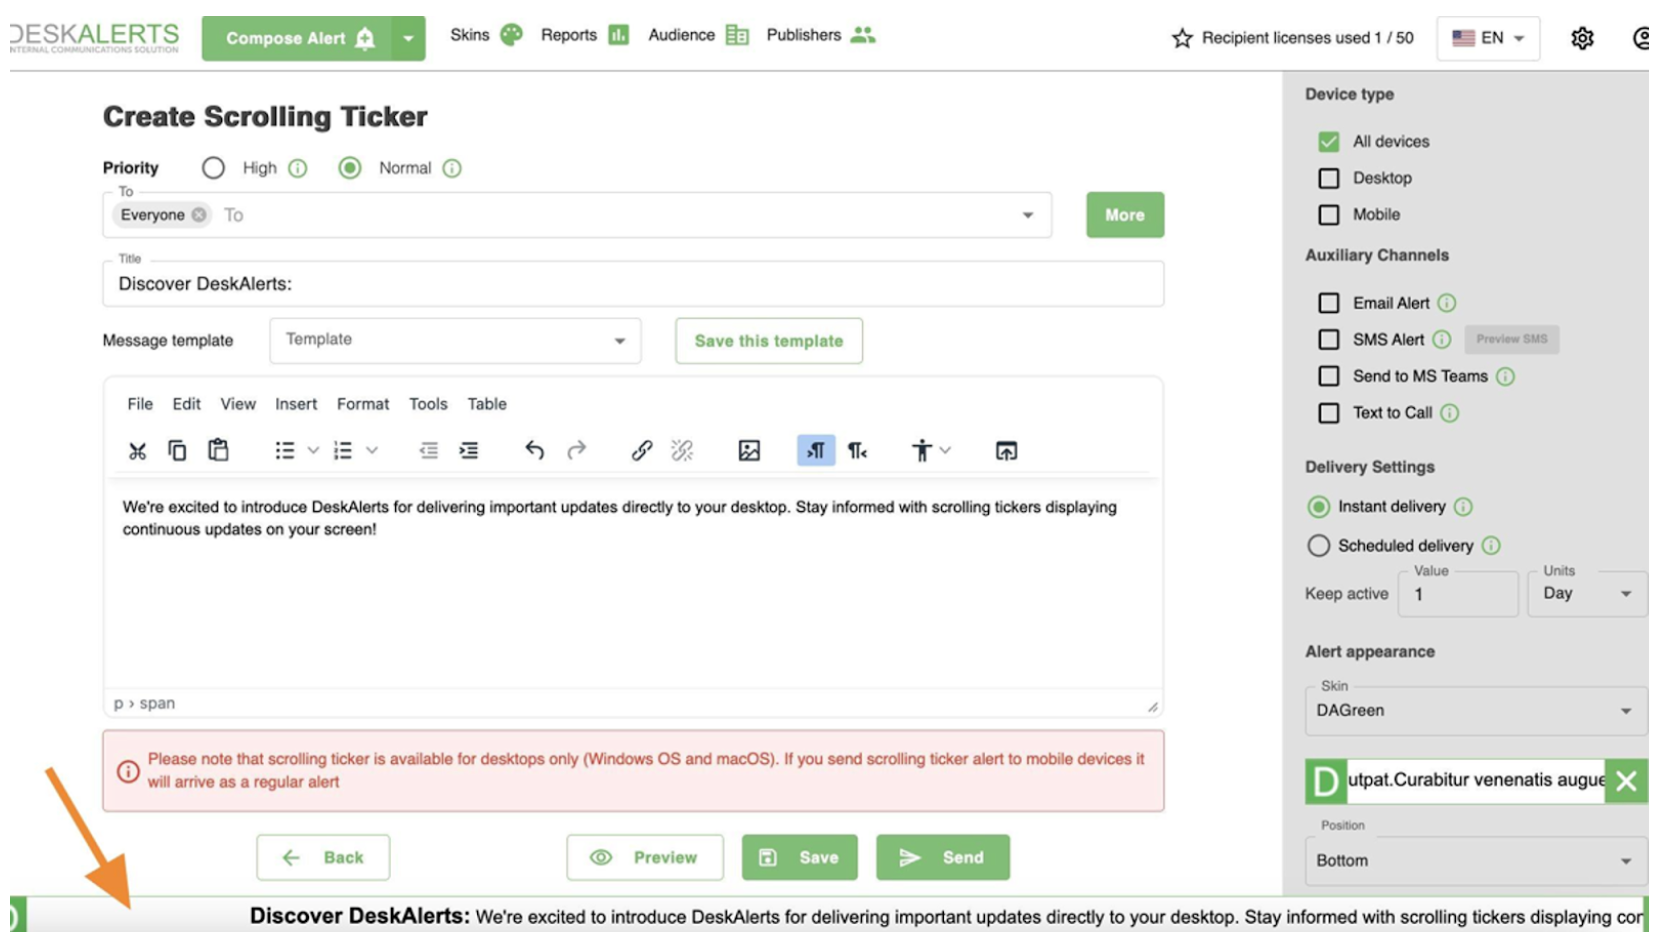
Compose the Ticker's Message
Next, compose the message for the scrolling ticker. Enter a title for the ticker, for example: Discover DeskAlerts:, and the body text.
💡 Introduce DeskAlerts to your team by sending your first scrolling ticker!
Title: Discover DeskAlerts:
Body: We're excited to introduce DeskAlerts for delivering important updates directly to your desktop. Stay informed with scrolling tickers displaying continuous updates on your screen!
Choose the Communication Channels
Choose the device type and, if necessary, auxiliary channels for delivering the alert.
⚠️ Scrolling tickers are available for desktops only (Windows OS and macOS).
If sent to mobile devices, they will arrive as regular text alerts. The same applies to auxiliary channels: email, SMS, and MS Teams will receive the text of the scrolling ticker as a regular text alert. The default option is All devices.
Set the Delivery Settings
These are the Delivery settings for the scrolling ticker:
- Instant Delivery: Distributes the scrolling ticker immediately after clicking the Send button.
- Scheduled Delivery: Allows you to set a specific date and time for the ticker's delivery. You can schedule scrolling tickers to start and end at precise times and repeat them based on a custom frequency.
- Keep Active: Specifies the duration during which the system will continue attempting to deliver the scrolling ticker to offline devices.
Select a Scrolling Ticker Appearance
Select the scrolling ticker’s skin from four default options: Green, Blue, Red, and Yellow.
💡 If you would like to customize your scrolling ticker's appearance, including logo replacement, please contact us to learn more about the optional Skin Editor module.
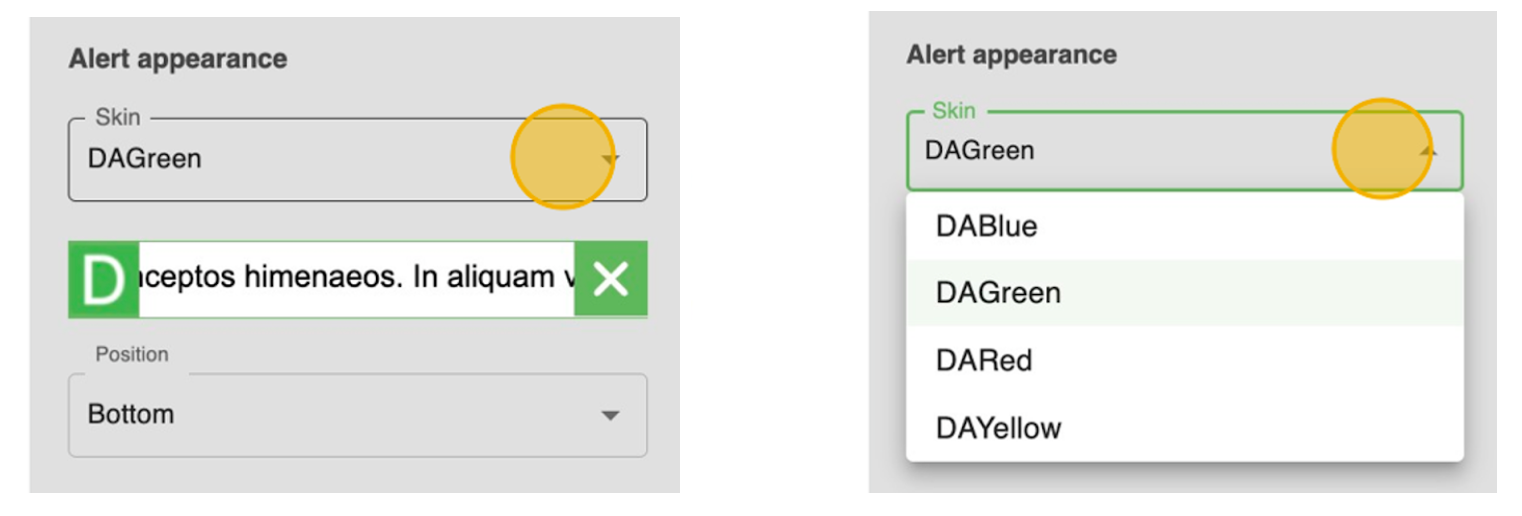
Select the Position of the Scrolling Ticker
There are two available positioning options: Top and Bottom of the recipient’s screen.
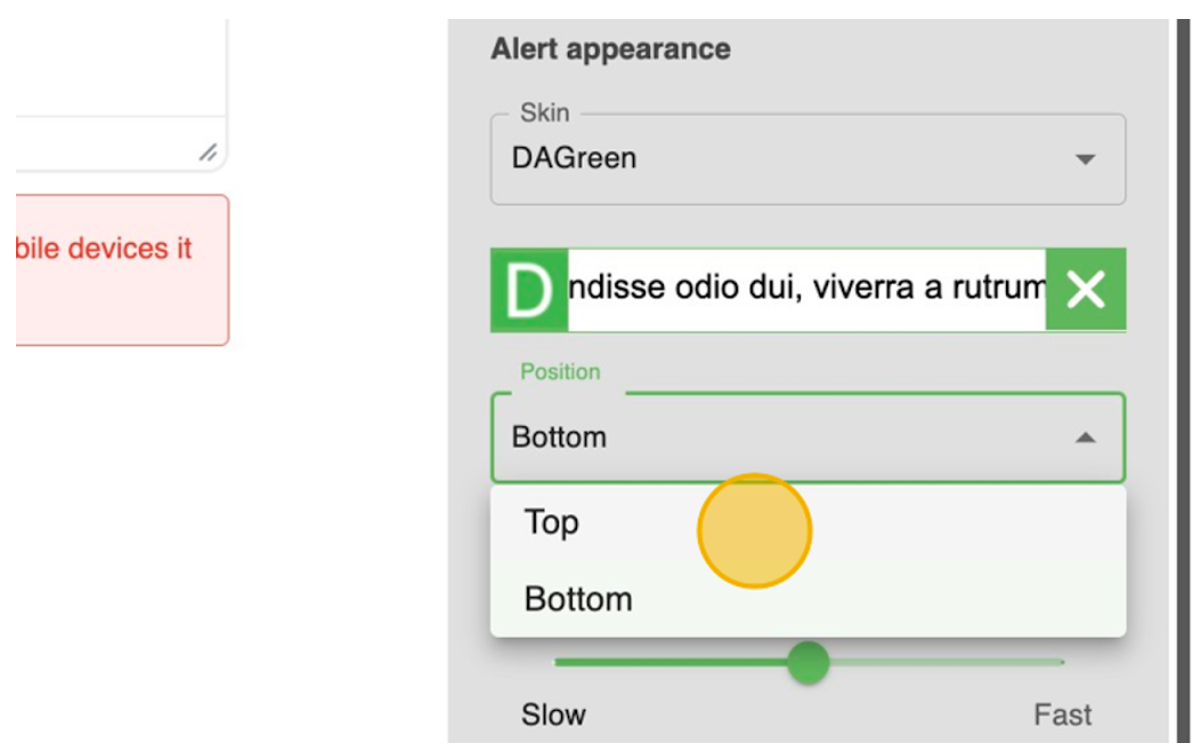
Use the slider control to customize the speed of your scrolling ticker text for optimal readability and user preference.
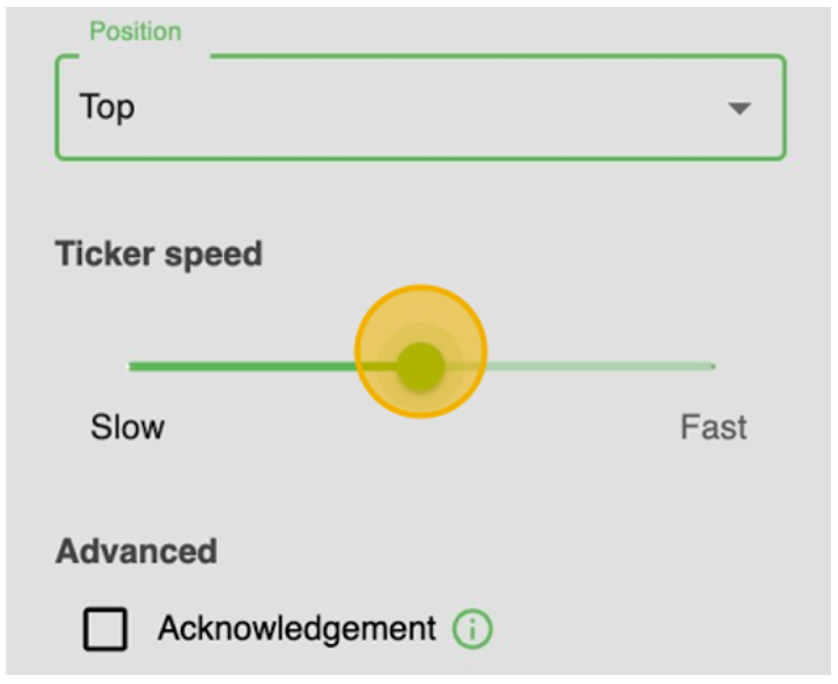
Set Advanced Settings
To explore advanced settings and customize your scrolling ticker functionality, use the following options:
- Acknowledgement: Requires users to acknowledge the ticker before closing it. This replaces the close button with an Acknowledge button. (Incompatible with Auto-close.)
- Self-destructing Scrolling Ticker: Removes the ticker from the agent history after closure. Available on Windows only.
- Auto-close Option: Automatically closes the ticker after a specified duration. Supported on Windows and macOS.
- Enable User Feedback: Adds a Like button to collect user feedback on the ticker.

Preview the Scrolling Ticker
Click the Preview button to see how your ticker will appear to recipients.
Send the Scrolling Ticker
Click Send to distribute the ticker. If scheduled, it will be assigned the Planned status and delivered at the specified time. For instant delivery, the ticker will be sent immediately.
To resume editing later, click Save to store the ticker as a draft.

Review and Manage Scrolling Tickers
After sending, your scrolling ticker will appear on the Scrolling Tickers page, where you can view and manage all sent and scheduled tickers.
Panic Button Module (Default)
The Panic Button Module is a core feature included in the default DeskAlerts package.
This critical tool allows employees to notify a designated Response Team instantly in the event of a dangerous or emergency situation.
How the Panic Button Works

Activation:
- Users can press the Panic Button via the DeskAlerts agent application on their desktop or mobile device.
- On mobile devices, the Panic Button is located in the Emergency section of the app.
Alert Delivery:
- When the Panic Button is activated, an informational alert is immediately sent to the pre-configured Response Team.
- The alert body includes:
- User Name
- User Phone Number
- User Email Address
- A Google Maps link to the user’s geolocation (available for mobile Panic Button only).
Response Team Notifications:
-
The Response Team receives:
- A pop-up alert on their devices.
- SMS and email notifications (if enabled).
-
The alert title reads “Panic Button Activated”, signaling the urgency of the situation.
Confirmation:
- The user who activated the Panic Button also receives a confirmation alert, ensuring the request was sent successfully.
Panic Button History
The Panic Button History page allows publishers to manage and review the log of Panic Button alerts received by the organization.
On the Panic Button History page, publishers can:
-
Send an Alert Directly to the User in Danger: Click the Bell icon, and the user's information will automatically be added as the recipient of your alert. This streamlined process eliminates the need to manually search for the user, saving valuable time in critical situations.
-
View Alert Details: Access all information about the Panic Button alerts, including:
- The name of the user who activated the alert.
- The time and date of activation.
- The user’s contact details and geolocation link (for mobile activations).
-
Filter Alerts: Use search and filtering tools to locate specific alerts or view alerts within a particular time frame.

Configuration of the Response Team
The Response Team is configured by administrators in the DeskAlerts web application settings.
It consists of users with access to the DeskAlerts desktop and mobile applications who are responsible for addressing emergency situations within the organization.
The Panic Button Module and its history management feature provide organizations with a reliable, traceable, and actionable emergency communication system.
RSVP Alert Module
The RSVP Alert Module is a straightforward yet highly effective tool for gathering quick responses from your audience. It enables you to send alerts with two response options, while also allowing an optional open-ended follow-up question for more detailed feedback.
Key Features of RSVP Alerts
- Two-Choice Responses: Easily configure alerts that ask recipients to choose between two predefined options (e.g., "Yes" or "No").
- Optional Open-Ended Question: Add a secondary question that allows recipients to provide free-text answers for additional context or details.
- Customizable Appearance: Tailor the look of your alert with predefined skins, adjustable dimensions, and flexible positioning on users’ screens.
- Delivery Across Channels:
- Send alerts to both desktop and mobile devices.
- Extend reach via auxiliary channels like Email, SMS, MS Teams, or Text-to-Call.
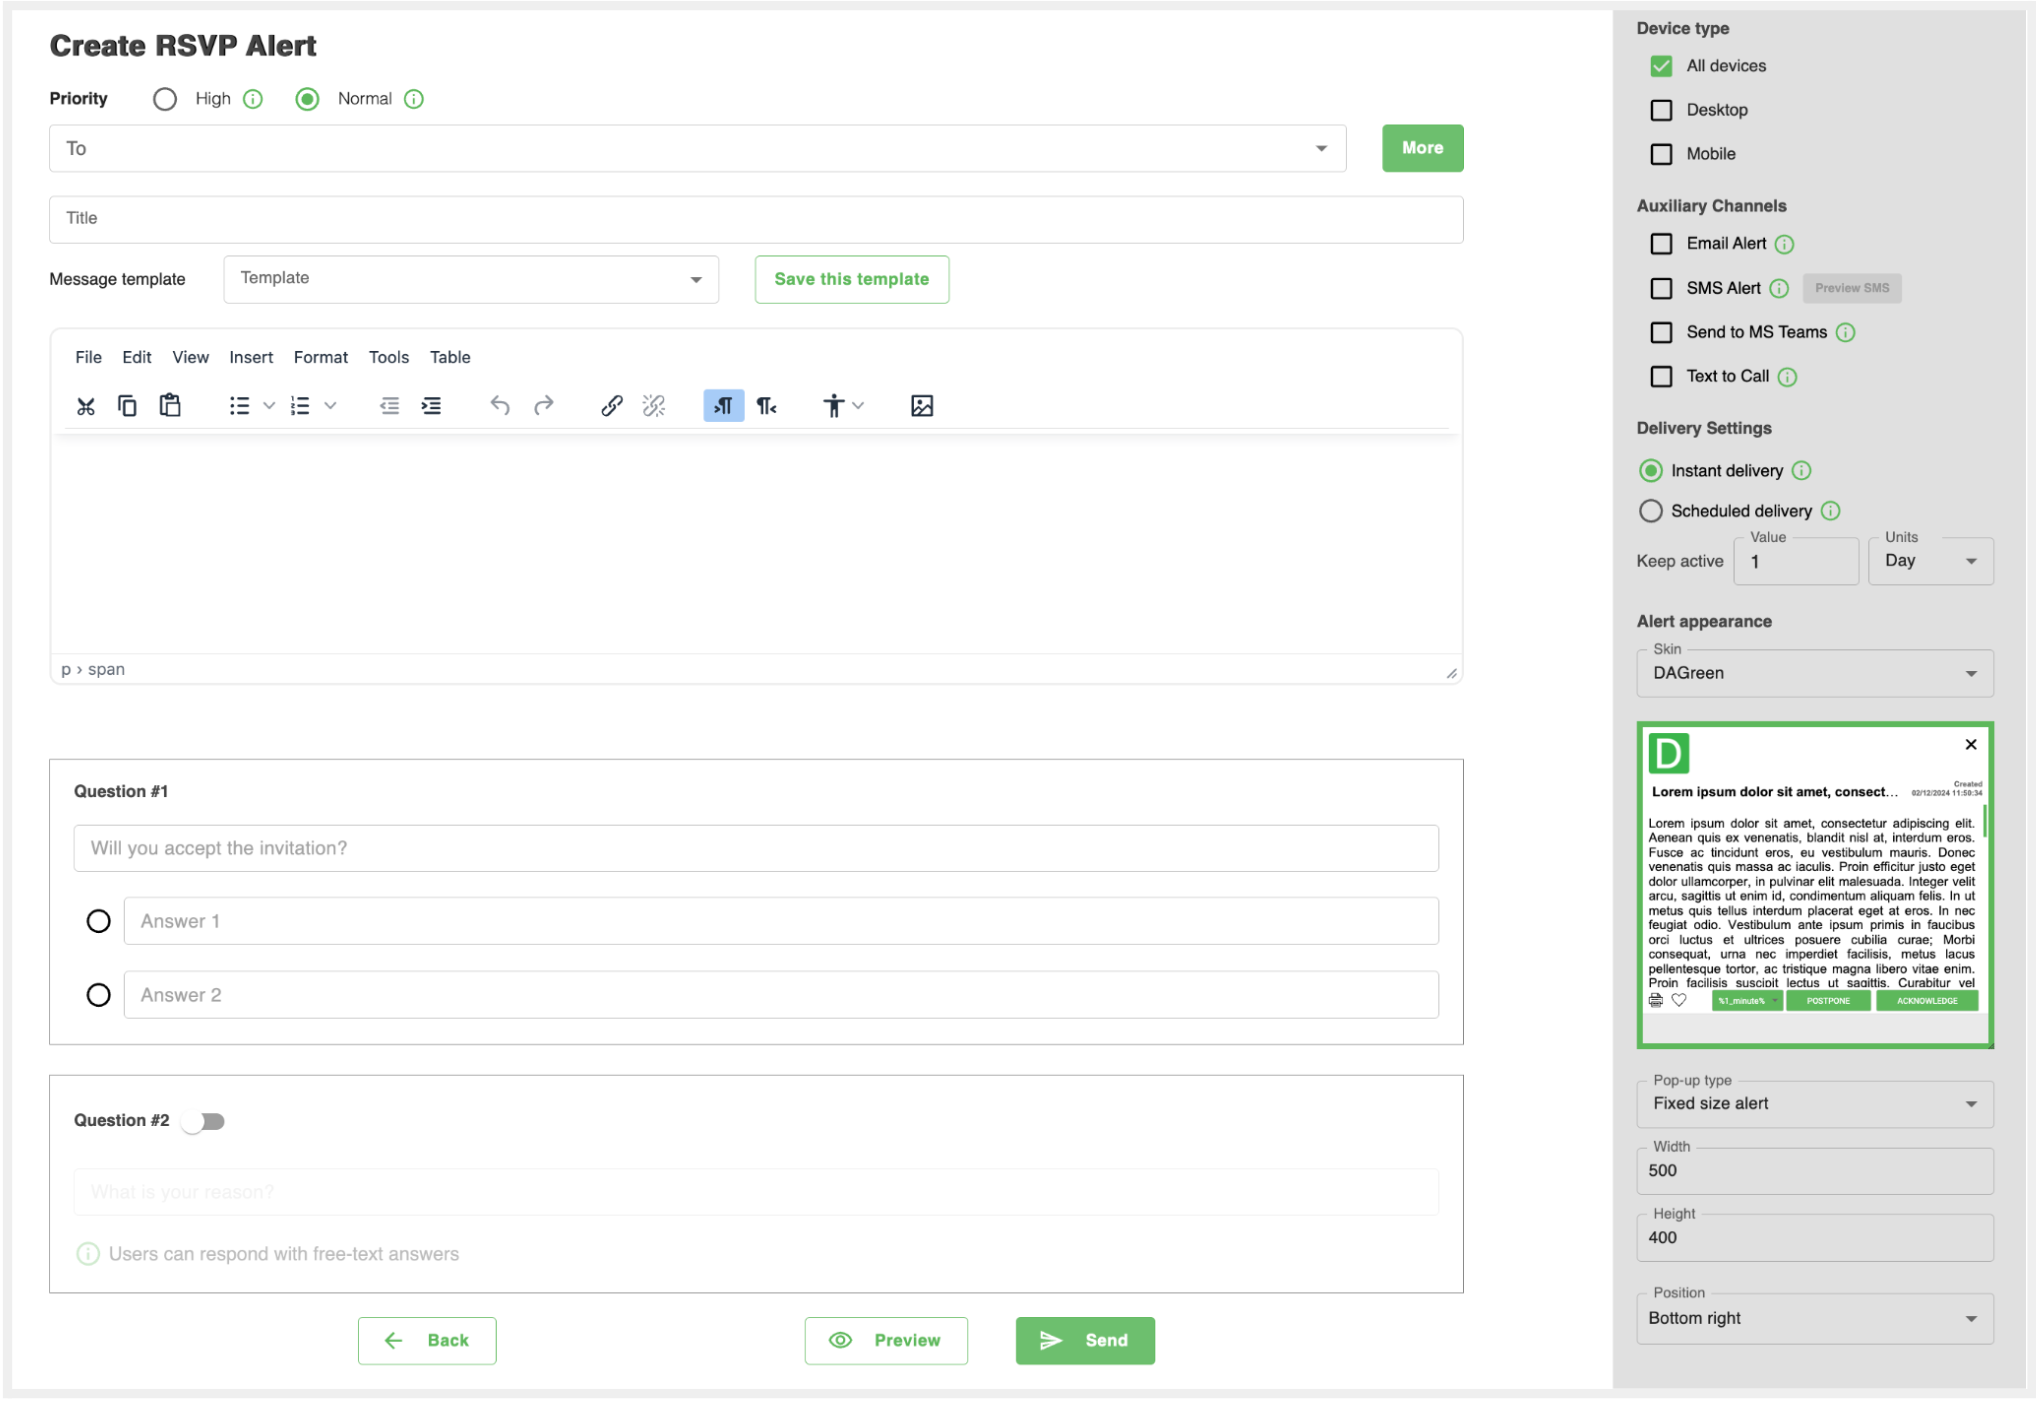
How to Create an RSVP Alert
Set Priority
Choose between High or Normal priority to determine how prominently the alert appears on users' screens.
Define Your Audience
Select your target recipients by entering audience details in the To field.
Compose the Message
- Write your message in the editor, or use a pre-saved Template.
- Customize the alert appearance by choosing a skin, setting the dimensions, and selecting its position on the screen.
Configure the Questions
- Question 1: Add your primary question and define two response options.
- Question 2 (optional): Toggle the secondary question if you'd like to collect free-text responses from recipients.
Select Delivery Settings
- Choose between Instant Delivery for immediate distribution or Scheduled Delivery for a later time.
- Define how long the alert remains active using the Keep Active option.
Preview and Send
- Click Preview to review the final design and functionality of your RSVP alert.
- Once satisfied, click Send to deliver the alert to your selected audience.
Managing RSVP Alerts
The RSVP Alerts Management Page allows publishers to view, edit, and manage all RSVP alerts in one centralized location. It provides a comprehensive overview of the alerts, including their current status, audience engagement, and delivery statistics.
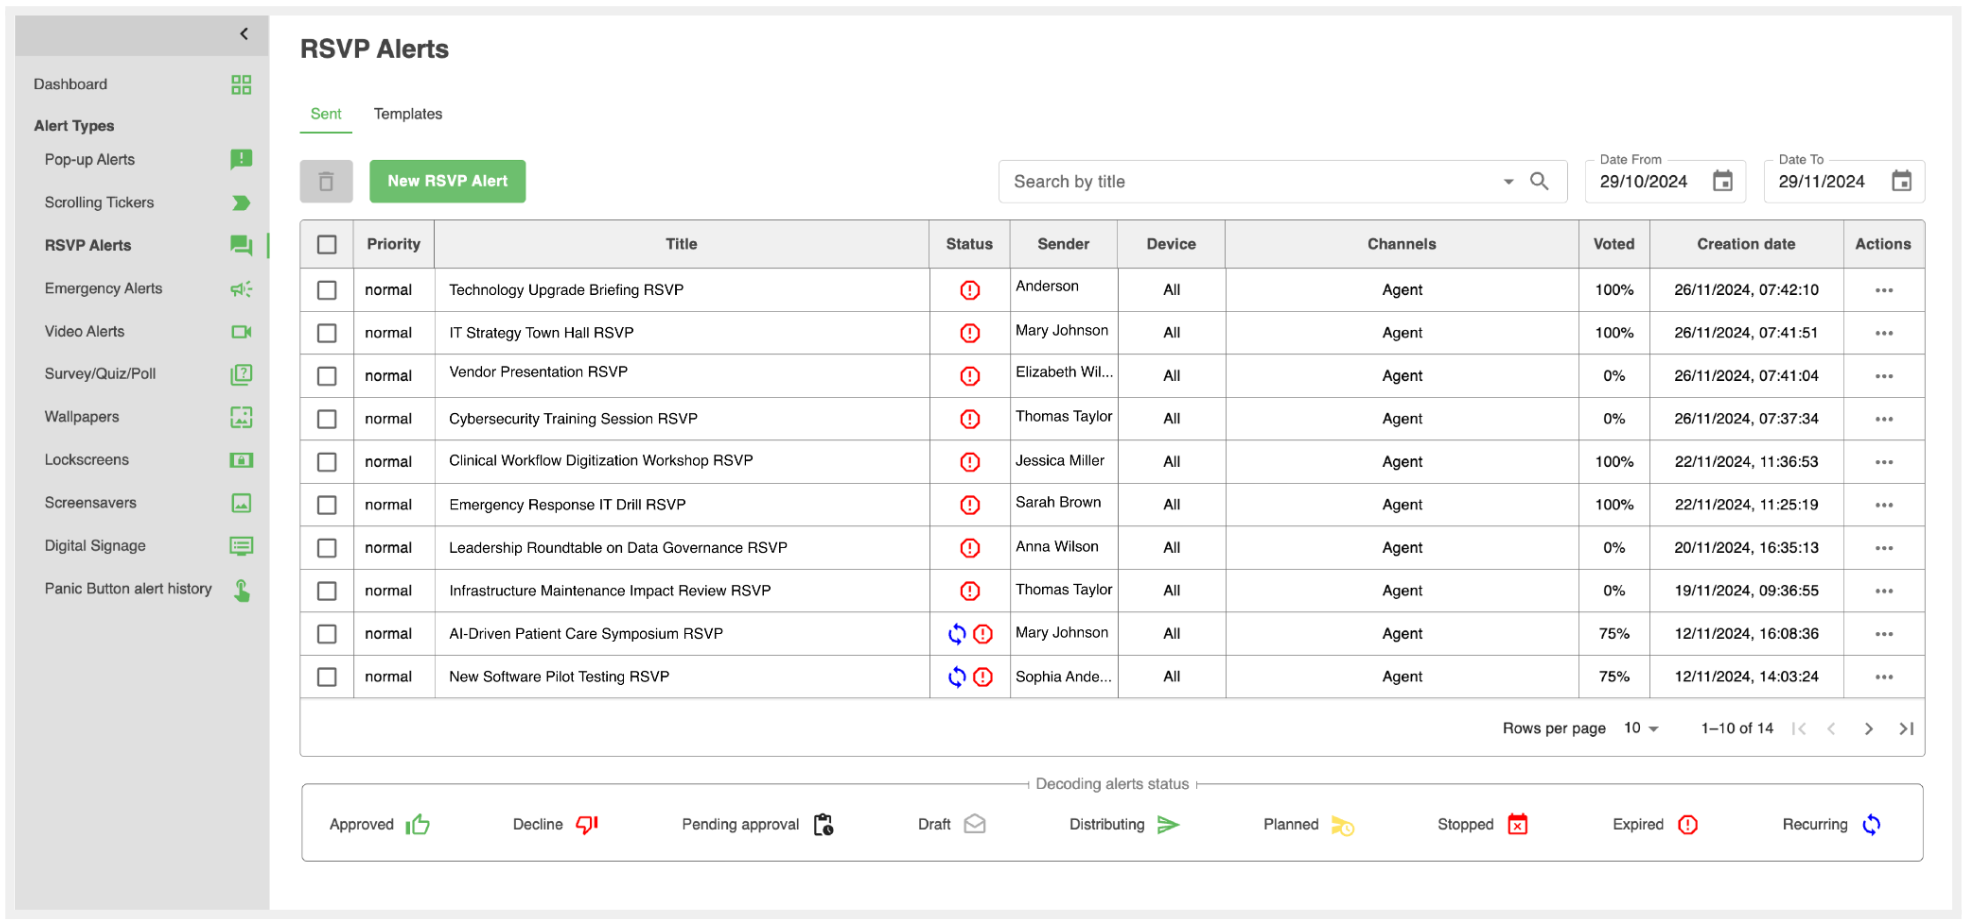
For each alert, the Actions menu provides the following options:
- Preview: View the alert’s design and functionality exactly as recipients will see it.
- Duplicate Alert: Create a copy of the RSVP alert with all settings prefilled. Modify as needed before sending.
- View Schedule: Review the planned start and end times for the RSVP alert.
- View Graph: Access detailed statistics about the RSVP alert’s performance and recipient engagement (see details below).
- Edit: Make changes to alerts that are in Draft or Planned status.
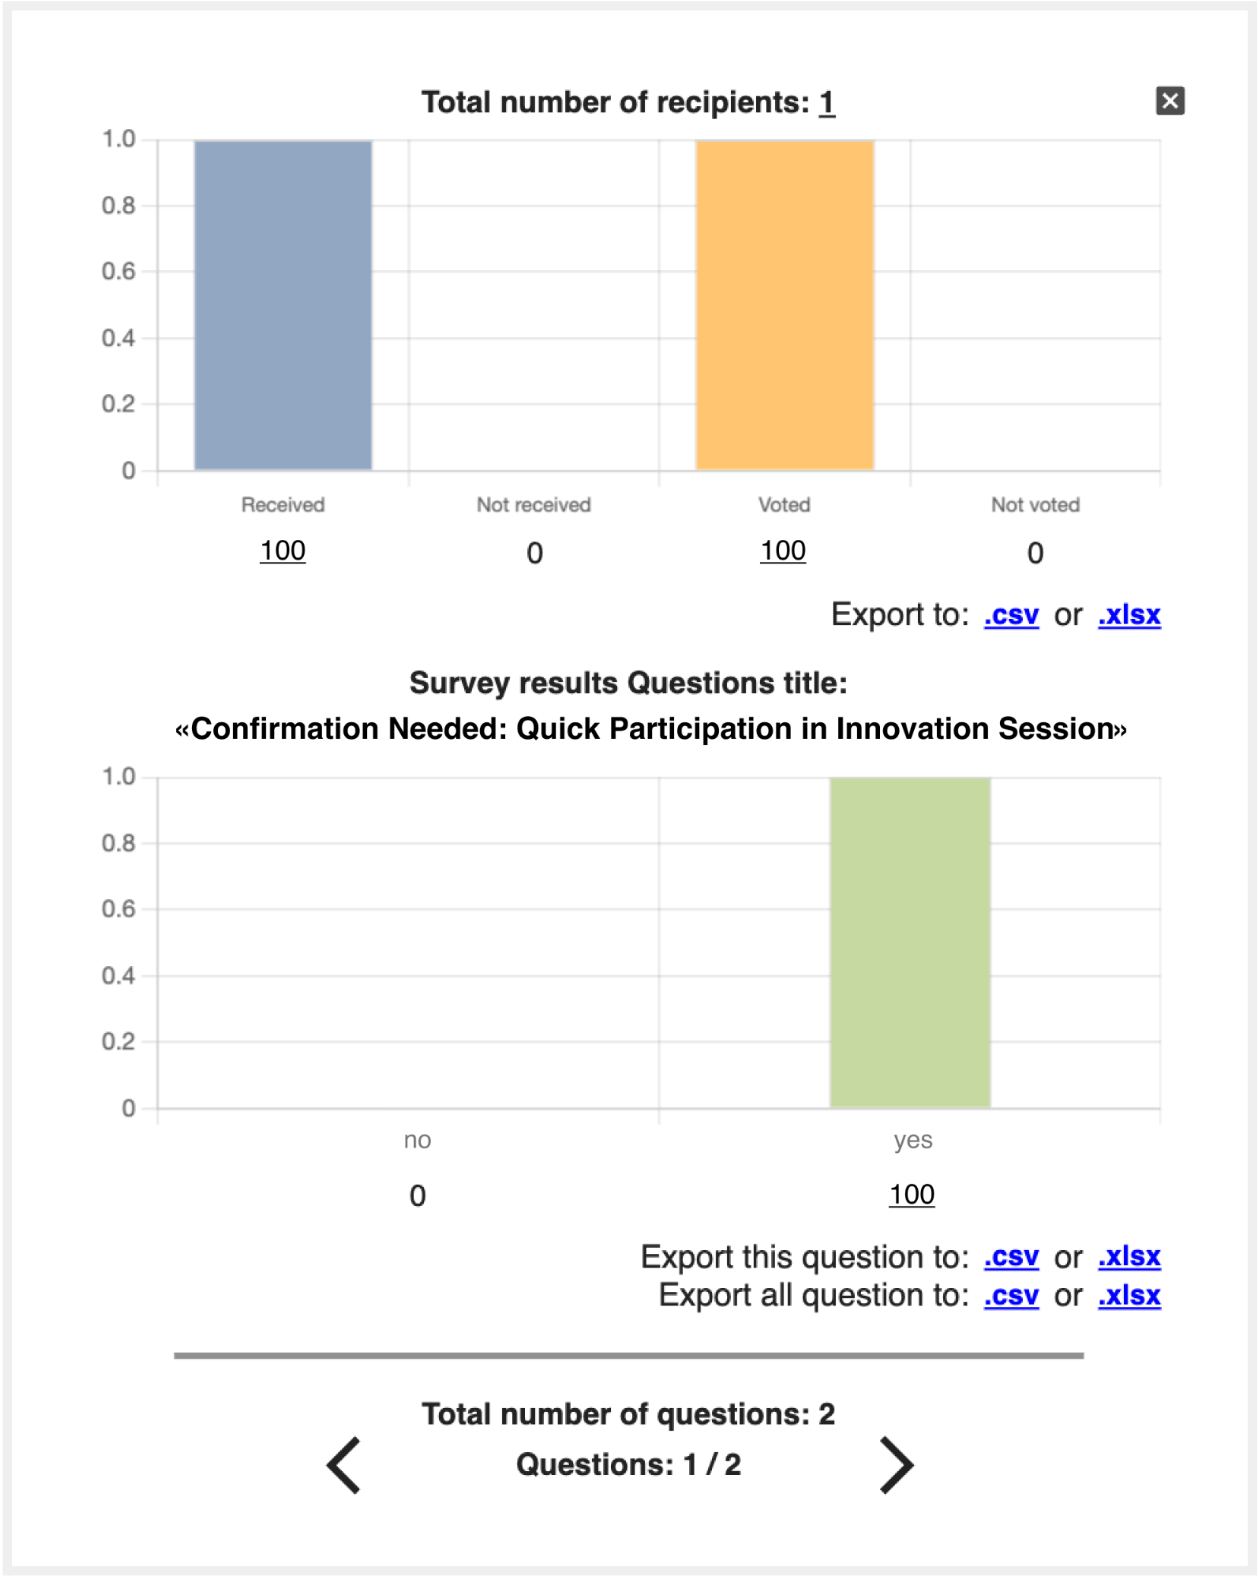
Analyzing RSVP Results with View Graph
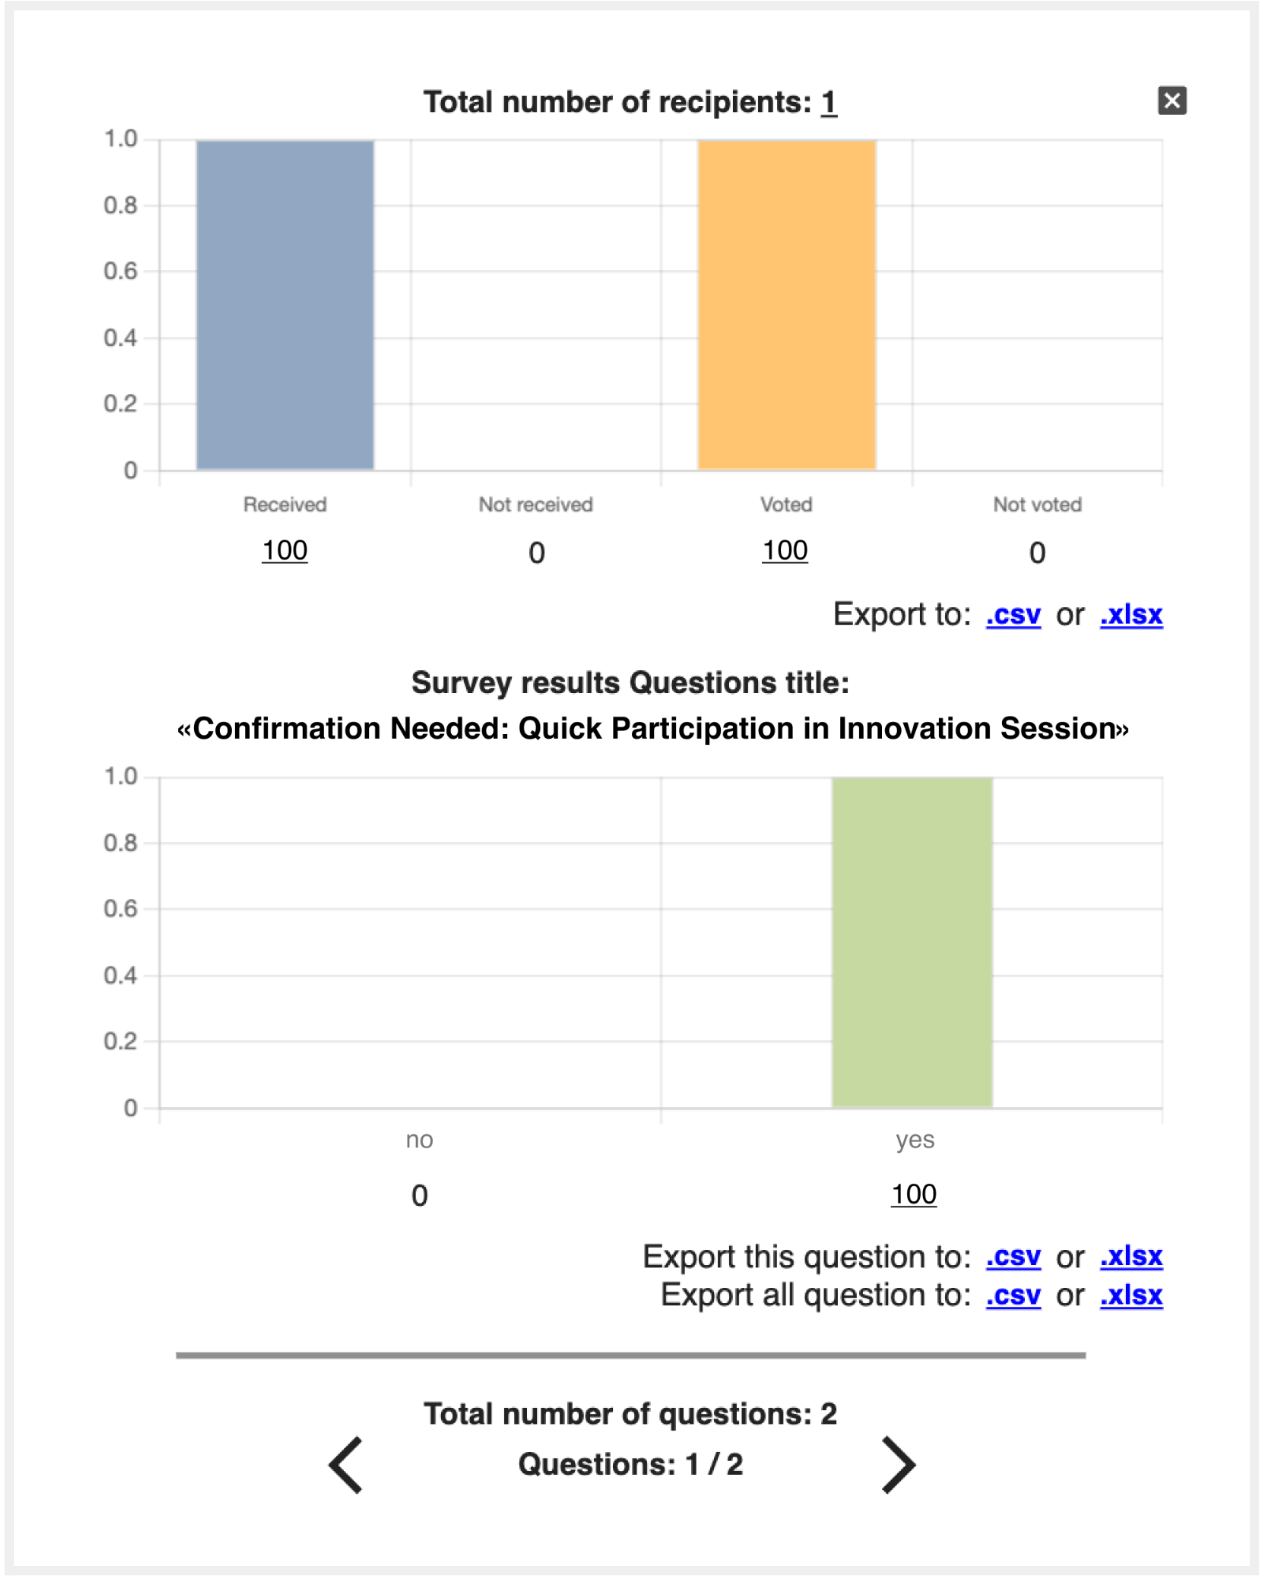
When selecting View Graph in the Actions menu, a detailed results dashboard opens, allowing publishers to analyze the performance of their RSVP alert.
Performance Metrics
- Received: Number of recipients who successfully received the alert.
- Not Received: Number of recipients who didn’t receive the alert.
- Voted: Percentage and number of recipients who responded to the RSVP.
- Not Voted: Recipients who haven’t interacted with the alert.
Survey Question Breakdown
- View results for each RSVP question in a visual format, showing how many recipients selected each response.
- For open-ended questions, responses are displayed in text form.
Export Options
Export results in CSV or Excel (XLSX) format for deeper analysis or sharing with stakeholders.
Survey, Quiz, and Poll Module
The Survey, Quiz, and Poll Module is designed to collect valuable feedback, assess knowledge, or engage with your audience interactively. Whether you’re conducting a detailed survey, creating a fun quiz, or running a quick poll, this module offers the tools you need to gather responses effectively.
Classic Survey
The Classic Survey is the most advanced option in this module. It supports a variety of question types, making it highly customizable for comprehensive feedback collection.
Use this if you do not require additional features like scoring or real-time polling.
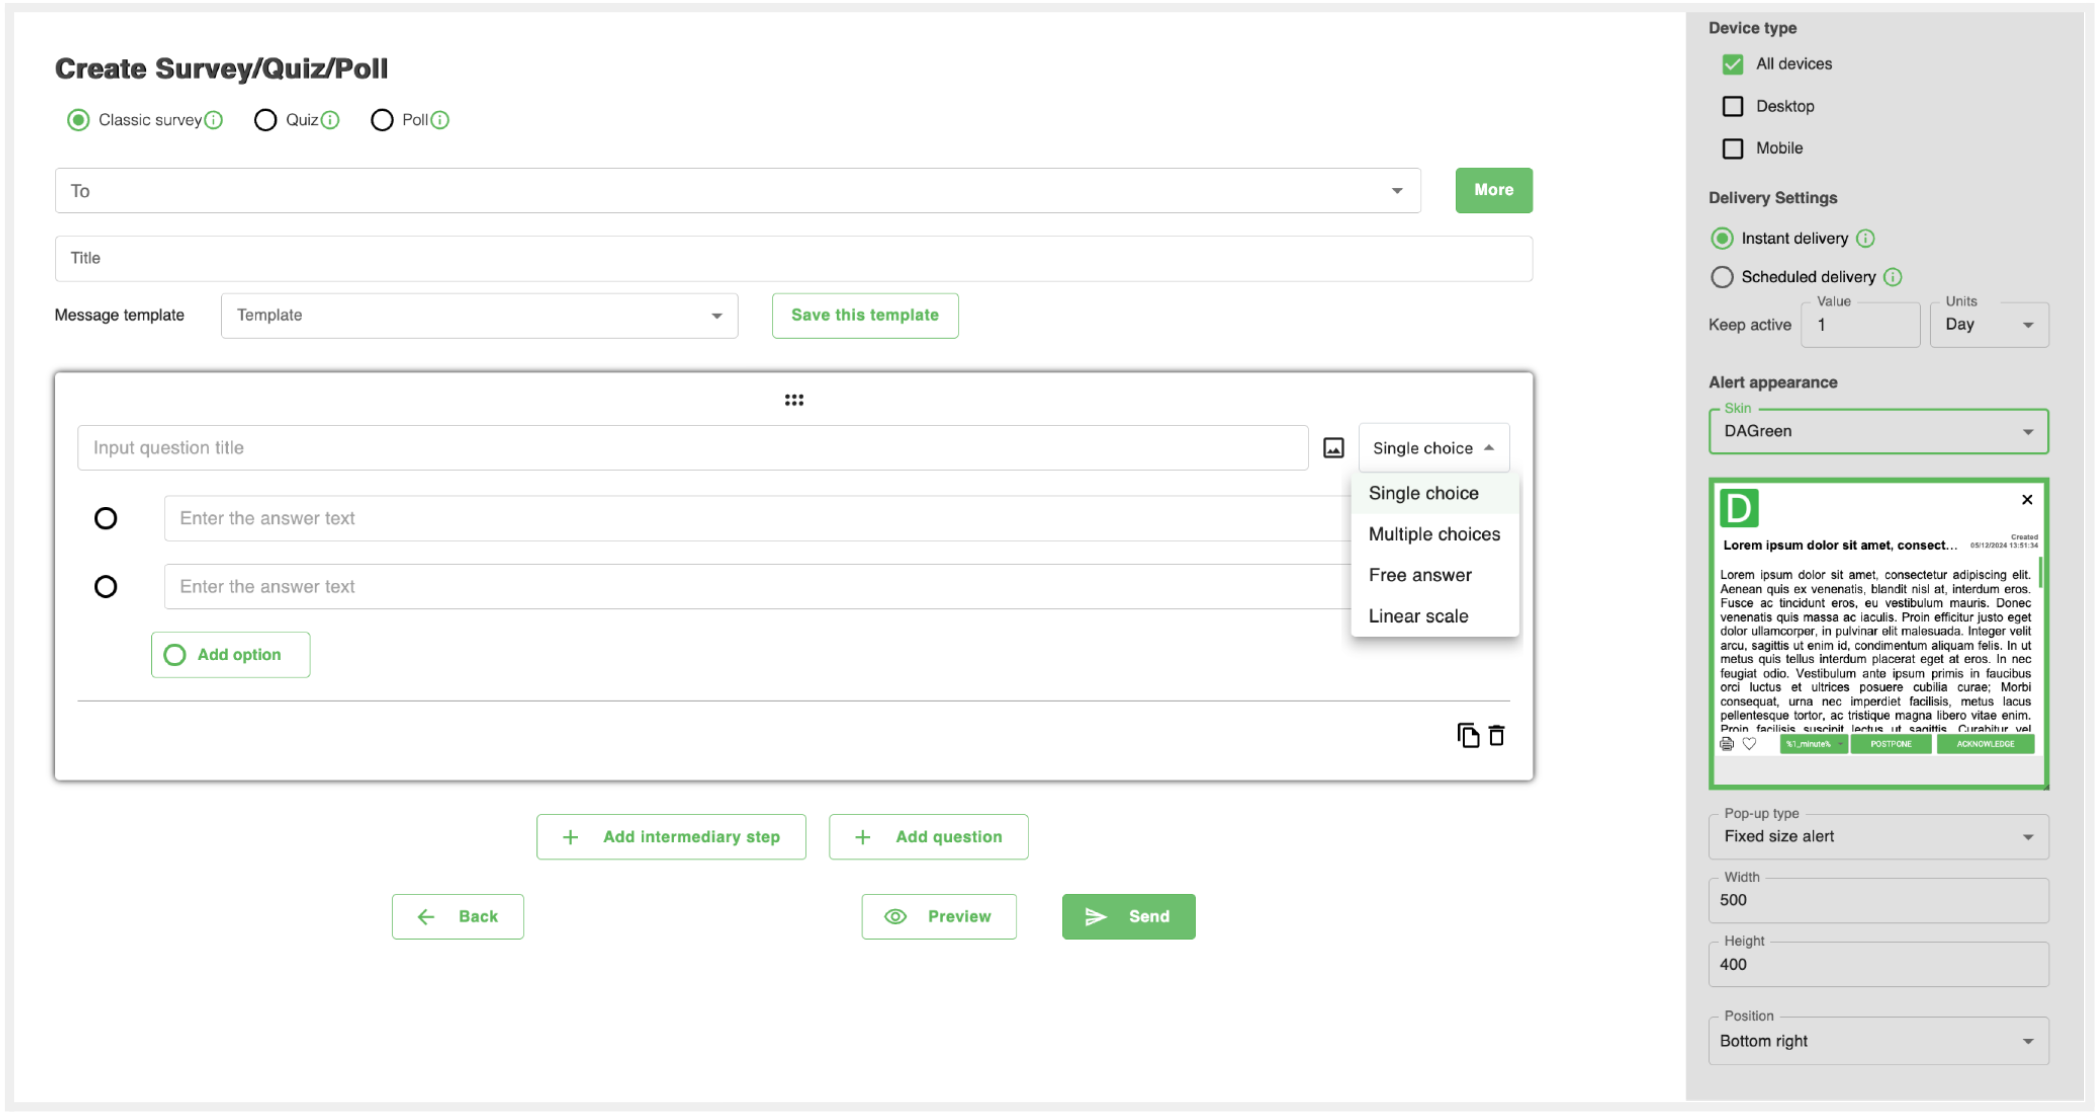
How to Create a Classic Survey
Creating a survey is straightforward and follows the familiar alert creation process:
-
Select Audience
Choose your recipients and the delivery channels for your survey (desktop, mobile, email, etc.). -
Schedule Delivery
Decide whether to send your survey instantly or at a scheduled time. -
Design Appearance
Customize the survey's appearance by selecting a skin, dimensions, and positioning on the recipient's screen. -
Add Features
Include options like acknowledgment requests or self-destructing alerts to tailor the survey to your needs.
Building Your Survey Content
-
Title: Provide a clear and concise name for your survey.
-
Questions: Add questions one at a time, selecting the appropriate type for each:
- Single Choice: Allow the respondent to select one answer.
- Multiple Choice: Let respondents choose multiple answers.
- Free Answer: Collect open-ended responses.
- Linear Scale: Ask participants to rate on a defined scale.
-
Intermediary Steps: Add intermediary pages to break up the survey into logical sections or provide instructions.
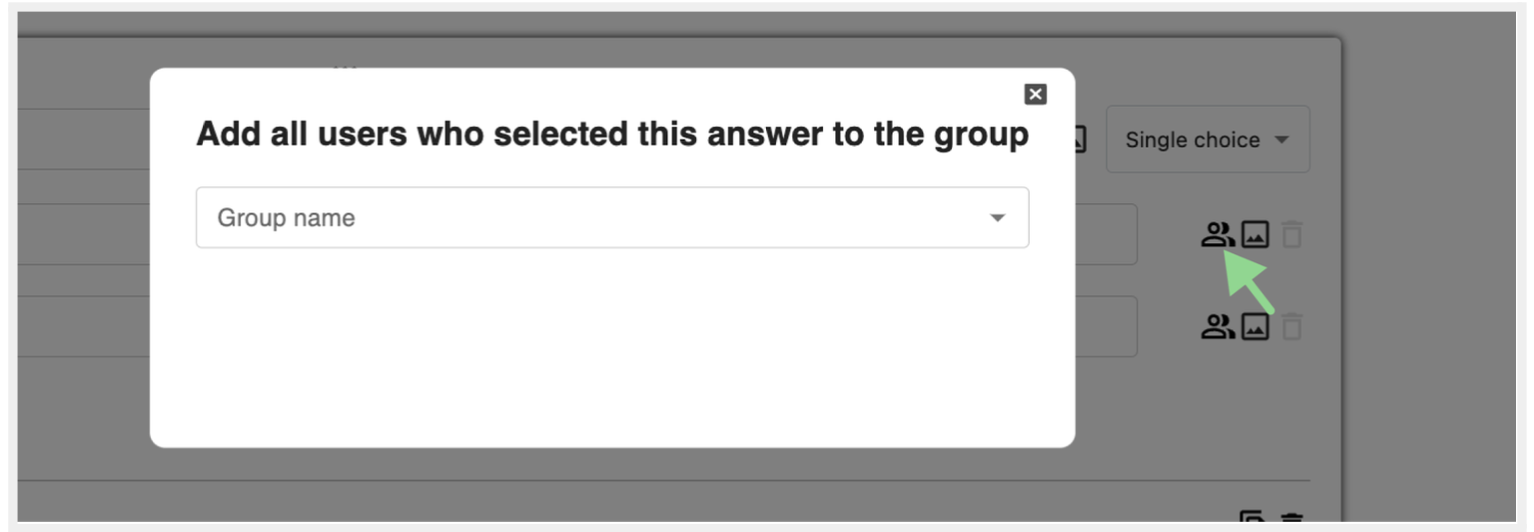
You can also pre-create a user group and link it directly to a specific answer option. This way, users selecting that option are automatically added to the group, allowing you to target follow-up surveys or other content to this audience without the need to manually compile recipients. This feature streamlines your workflow by combining response collection and audience segmentation in one step.
Quiz
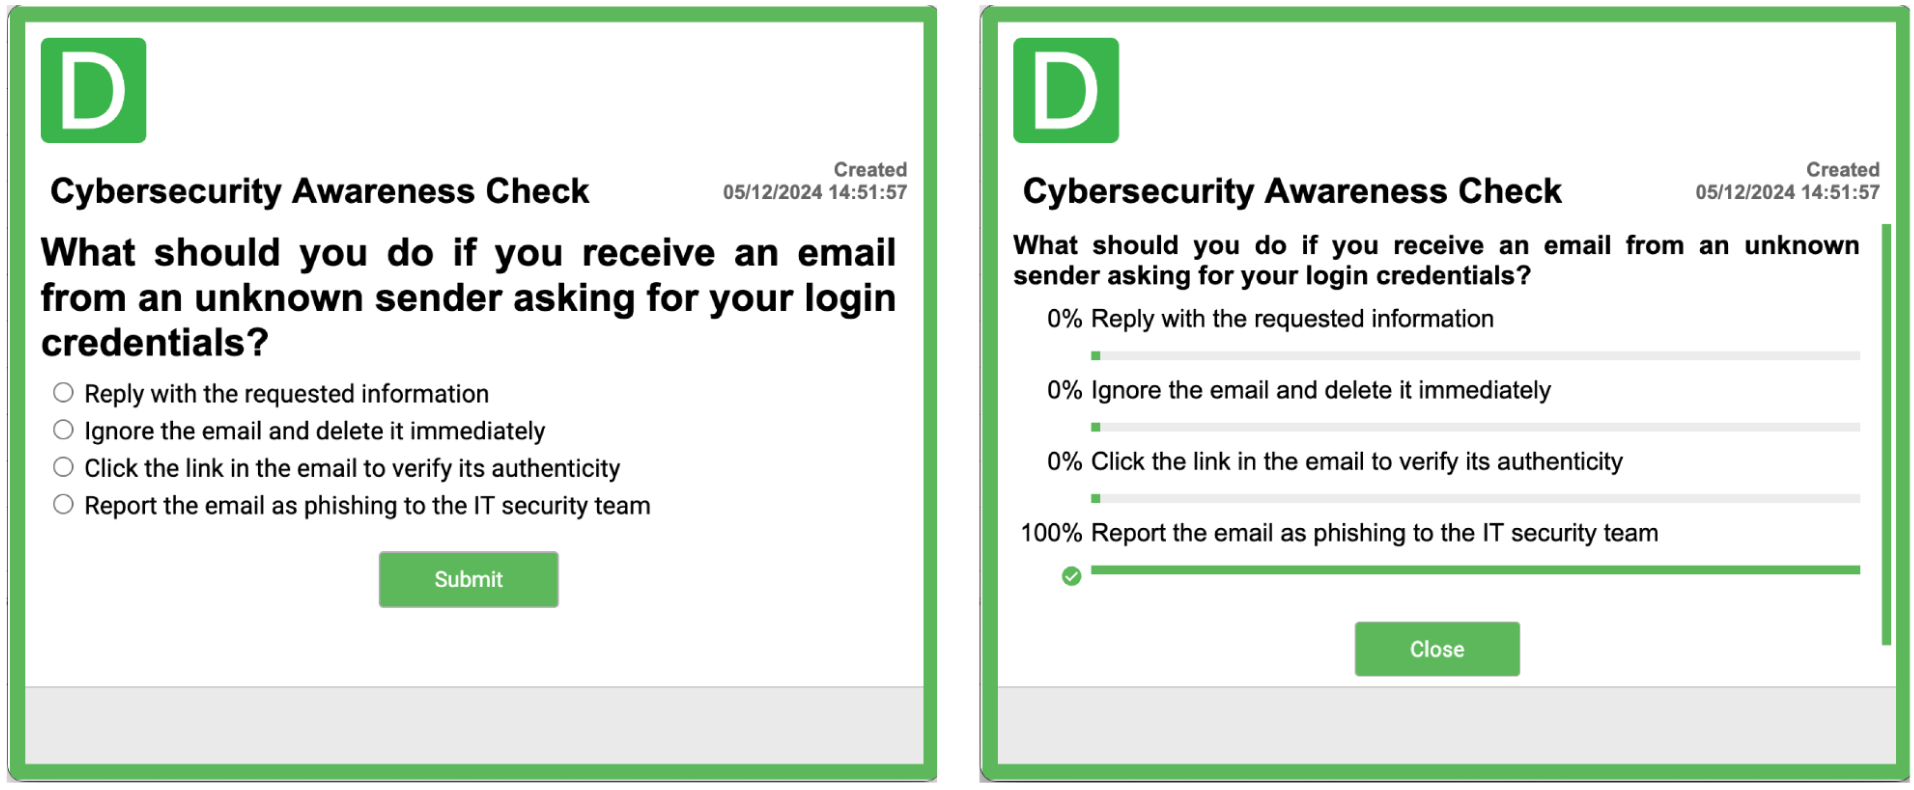
The Quiz Module adds an interactive layer to your alerts, allowing you to test your audience’s knowledge and provide instant feedback. The key feature of quizzes is the ability to define correct answers, enabling participants to see their results upon completion. This makes quizzes an ideal tool for training, assessments, or simply engaging your audience in a fun and informative way.

Here’s an example of how a quiz might appear to the recipient:
Difference Between Quiz and Poll
The Quiz and Poll modules serve different purposes, offering unique ways to engage your audience. Here’s how they differ:
- Quiz: Designed for assessing knowledge or understanding. Publishers can define correct and incorrect answers, and users will see their results at the end. Ideal for training, testing, or educational purposes.
- Poll: Meant to collect opinions, preferences, or audience sentiment. There are no right or wrong answers. After responding, users can view collective results. Perfect for gathering feedback or gauging attitudes.
In summary, quizzes focus on knowledge evaluation, while polls are designed for opinion gathering and sharing results with the audience. Both are versatile tools to keep your audience engaged and informed.
Analyzing Survey, Quiz, and Poll Results with View Graph
When selecting View Graph in the Actions menu, a detailed results dashboard opens, allowing publishers to analyze the performance of the alert.
Performance Metrics
- Received: Number of recipients who successfully received the alert.
- Not Received: Number of recipients who didn’t receive the alert.
- Voted: Percentage and number of recipients who responded.
- Not Voted: Recipients who haven’t interacted with the alert.
Survey Question Breakdown
- View results for each question in a visual format, showing how many recipients selected each response.
- For open-ended questions, responses are displayed in text form.
Export Options
- Export results in CSV or Excel (XLSX) format for deeper analysis or sharing with stakeholders.
Video Alert Module
The Video Alerts Module allows users to create and send video-based notifications to their audience. This feature is ideal for delivering more engaging and visually compelling messages, ensuring your alerts stand out and effectively convey important information.
Key Features of Video Alerts
-
Flexible Video Options:
- Upload a video via drag-and-drop or select from the server.
- Record a video message directly within the platform for a personal touch.
-
Customizable Settings:
- Mute – Disable audio for the video.
- Controls – Enable playback controls such as play/pause for the audience.
- Loop – Set the video to replay automatically after finishing.
- Autoplay – Ensure the video starts playing automatically when the alert opens.
-
Standard Alert Features:
- Choose from available skins to customize the appearance.
- Enable Acknowledgement to require recipients to confirm they’ve viewed the alert.
- Set Delivery Settings, such as Instant or Scheduled Delivery.
-
Preview Your Alert:
- Use the Preview option to check the video alert’s appearance.
- Adjust size and layout as needed to ensure the video displays correctly.
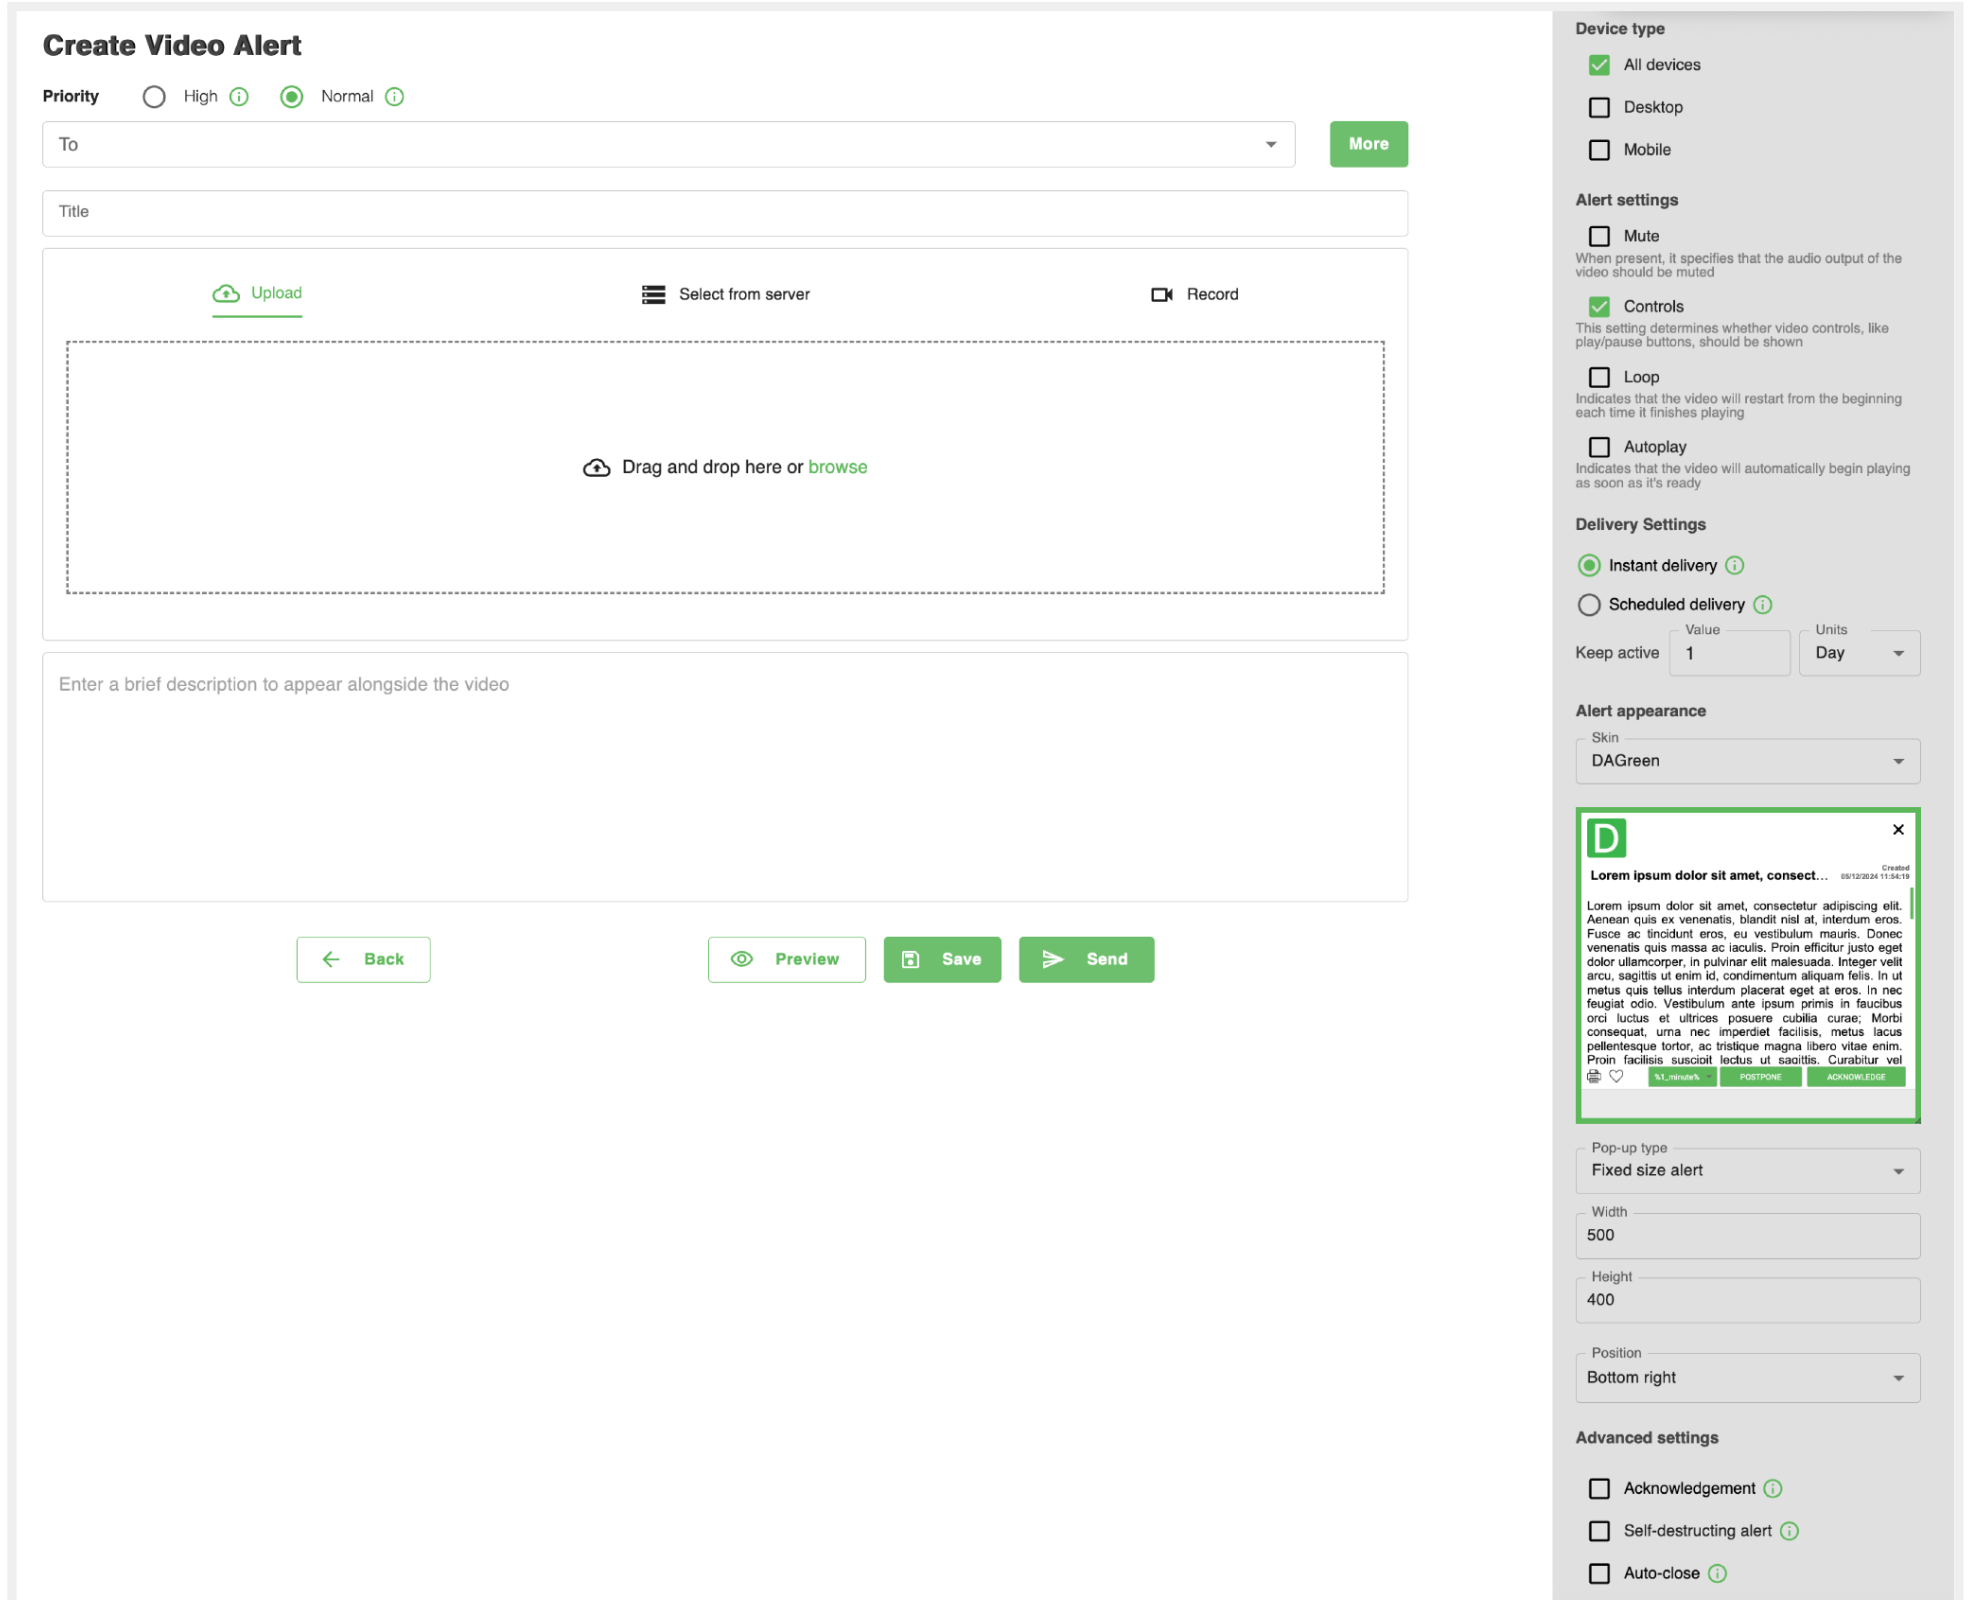
How to Create a Video Alert
-
Set Priority
Choose between High or Normal priority for visibility. -
Define the Audience
Enter the recipients in the To field. -
Add Video Content
- Upload a pre-recorded video, drag-and-drop files, or record a new video directly in the platform.
- Provide a brief description to accompany the video.
-
Configure Alert Settings
Select from Mute, Controls, Loop, or Autoplay options depending on how the video should behave. -
Customize the Alert
- Choose a skin for the alert’s appearance.
- Adjust dimensions and position for optimal display.
-
Set Delivery Options
- Choose Instant Delivery or schedule for later.
- Use Keep Active to define how long the alert stays visible.
-
Preview and Send
- Click Preview to verify formatting and playback.
- Once confirmed, click Send to deliver the alert.
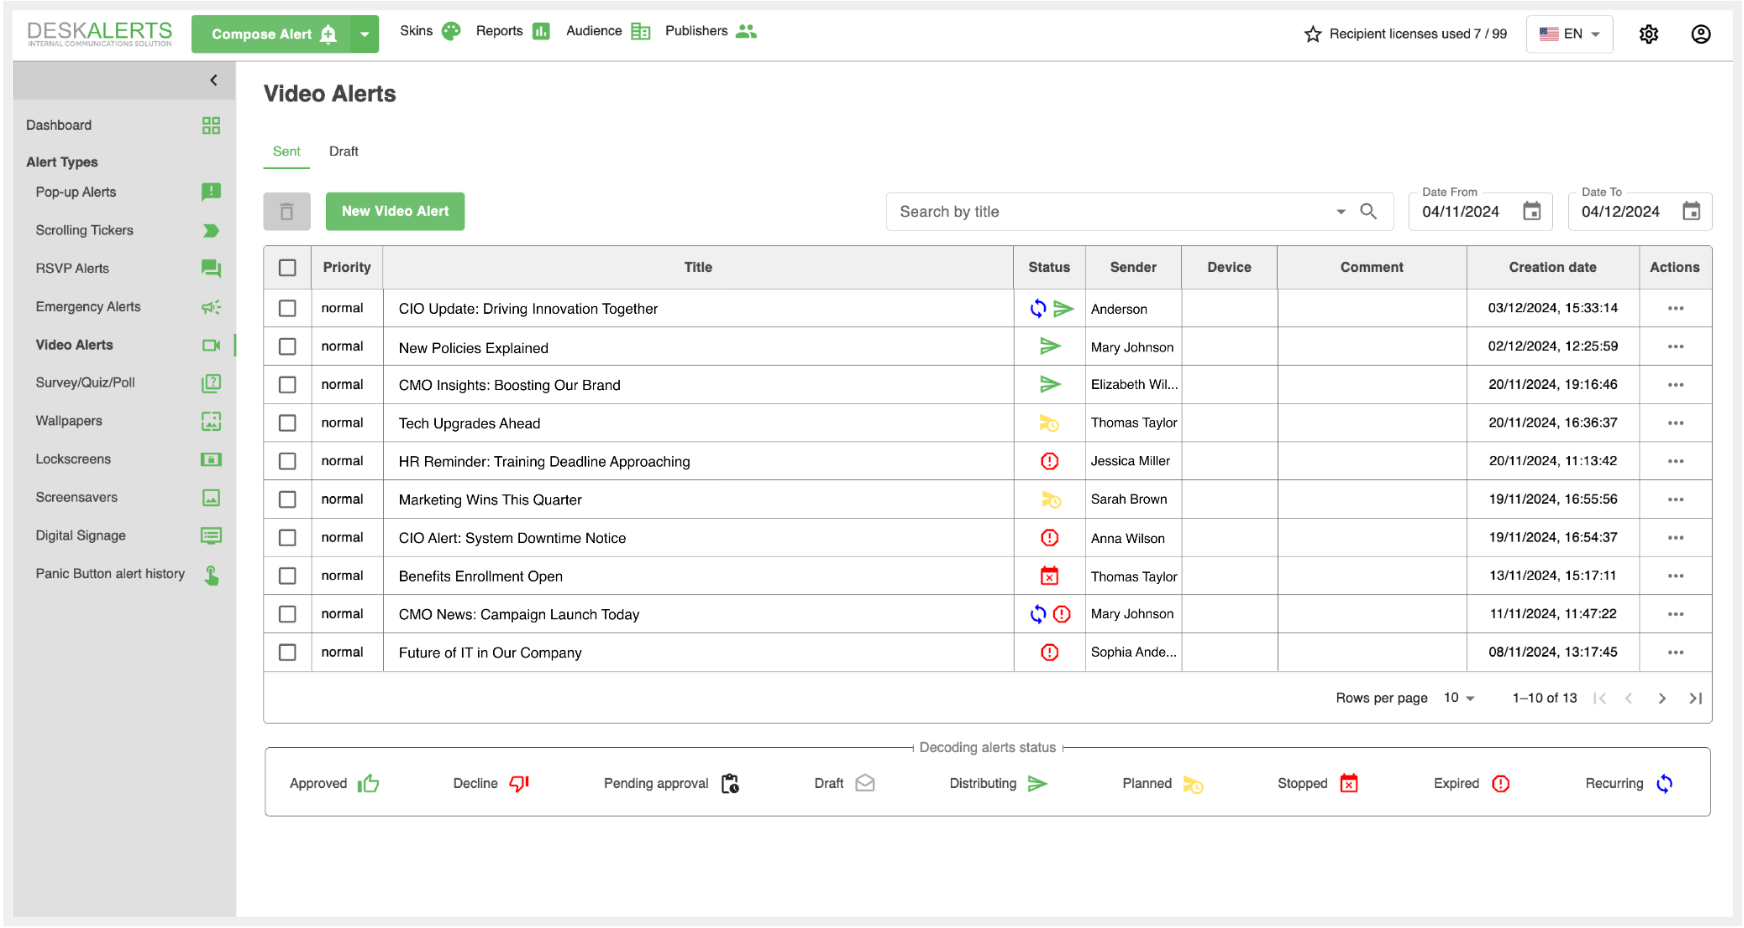
Managing Video Alerts
The Video Alerts Management Page provides an organized view of all sent and draft alerts. You can:
- Preview alerts to see how they appear to recipients.
- Duplicate Alert to reuse content for a new audience.
- View Schedule to check delivery timing.
- Analyze Engagement using View Graph.
- Edit drafts or planned alerts before sending.
Wallpapers Module
The Wallpapers module is designed to manage desktop wallpapers on Windows devices where the DeskAlerts Desktop Agent is installed.
This feature allows publishers to send images in .jpg, .png, or .bmp formats directly to users' desktops, overriding their current wallpaper settings.
Once a wallpaper is delivered, the image sent via DeskAlerts will replace the existing desktop wallpaper, ensuring consistent branding or communication across all targeted devices.
Position Settings
When sending wallpapers, you can choose how the image is displayed on the desktop using the Position settings:
- Center
- Stretch
- Fit
- Fill
- Tile
- Span
Select the option that best suits your image format and desired appearance.
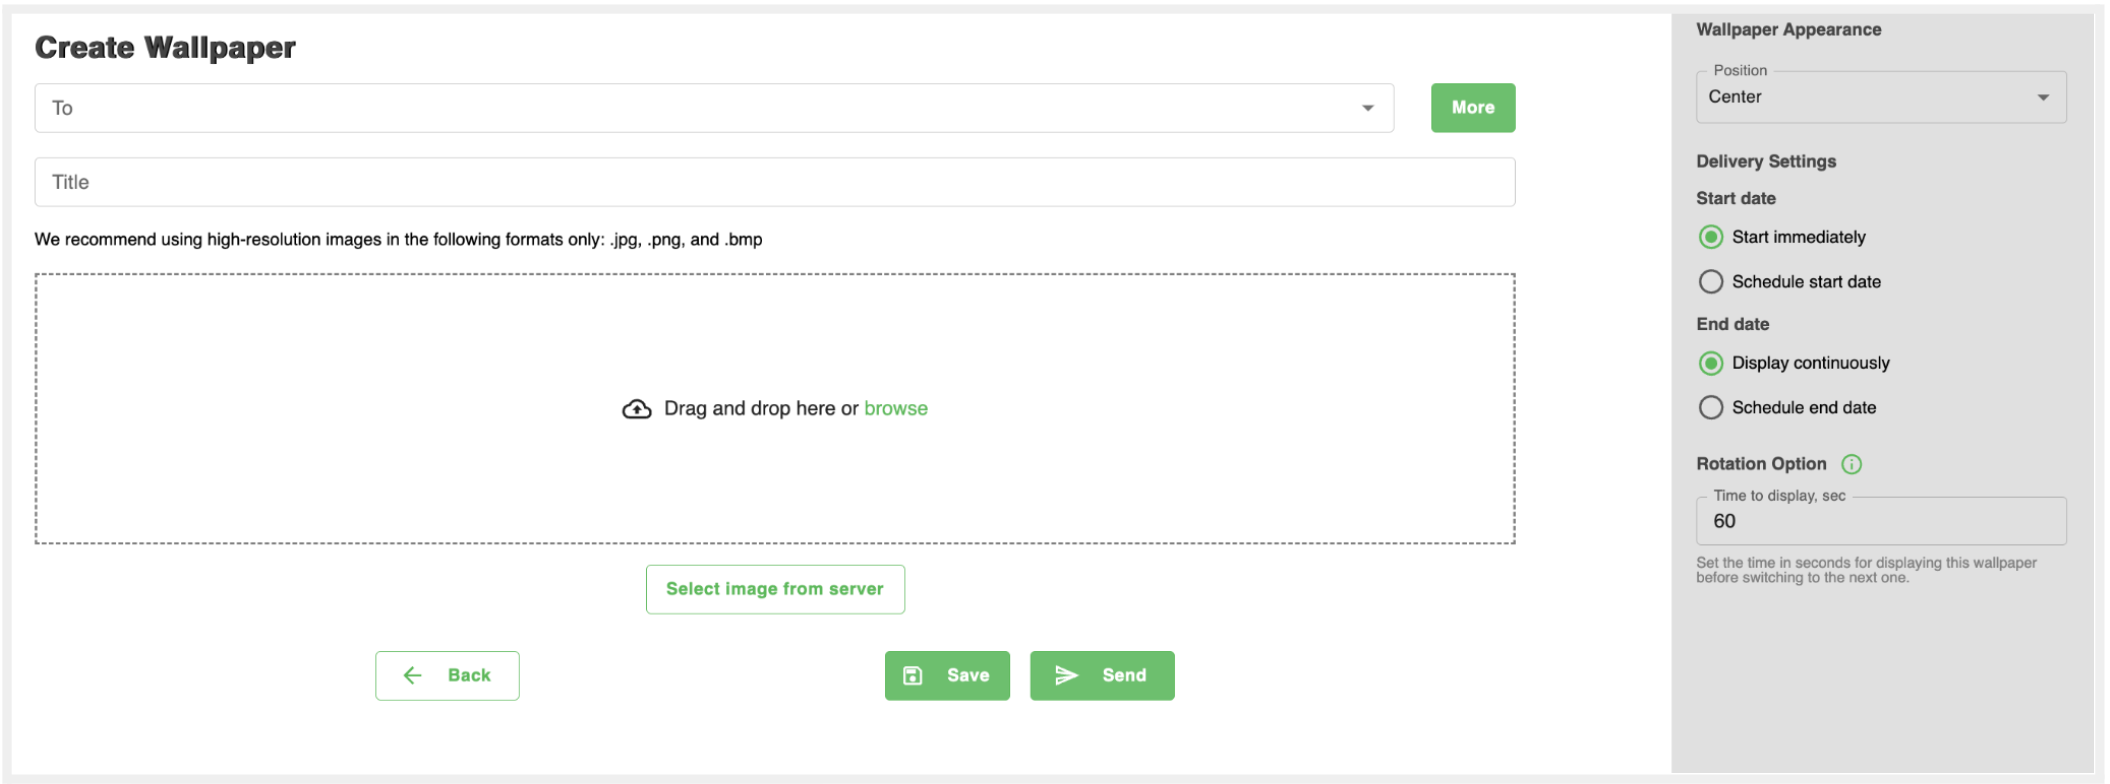
Delivery Settings for Wallpapers
Customize how and when wallpapers are delivered with the following options:
-
Start Date: Specify the date when the wallpaper will begin displaying.
- Start Immediately: Deliver the wallpaper to devices as soon as the alert is sent.
- Schedule Start Date: Plan a future date and time for the wallpaper to be delivered.
-
End Date: Control how long the wallpaper remains active.
- Display Continuously: The wallpaper will remain active indefinitely.
- Schedule End Date: Set a specific date and time for the wallpaper to stop displaying.
These settings ensure precise scheduling and control over wallpaper display durations.
Rotation Option
The Rotation Option allows you to define how long each wallpaper will be displayed before transitioning to the next one. This feature is especially useful when distributing multiple wallpapers to the same device.
- Set Display Time: Specify the display duration in seconds for each wallpaper before it switches to the next.
- Default Setting: 60 seconds.
- If only one wallpaper is being distributed, there’s no need to adjust the default setting.
By customizing the rotation time, you can create a dynamic display experience for your users.
Managing Existing Wallpapers
The Actions menu for managing wallpapers offers similar functionality to managing alerts. Here’s a quick overview of the available options:
- Duplicate Alert: Create a copy of the existing wallpaper and open the settings page with all original configurations pre-filled. Adjust as needed before sending.
- View Schedule: Check the start and end dates, or any scheduled delivery details for the wallpaper.
- Stop Alert: Immediately halt the delivery or scheduled rotation of the wallpaper. This is useful for removing wallpapers from devices before the scheduled end date.
- Preview: View how the wallpaper will look on users' desktops, ensuring the design and position settings meet your expectations.
The Wallpapers module helps deliver impactful visuals directly to users' desktops, ensuring consistent communication. With flexible delivery, scheduling, and management options, you can easily customize and control how wallpapers appear, making it a valuable tool for your organization.
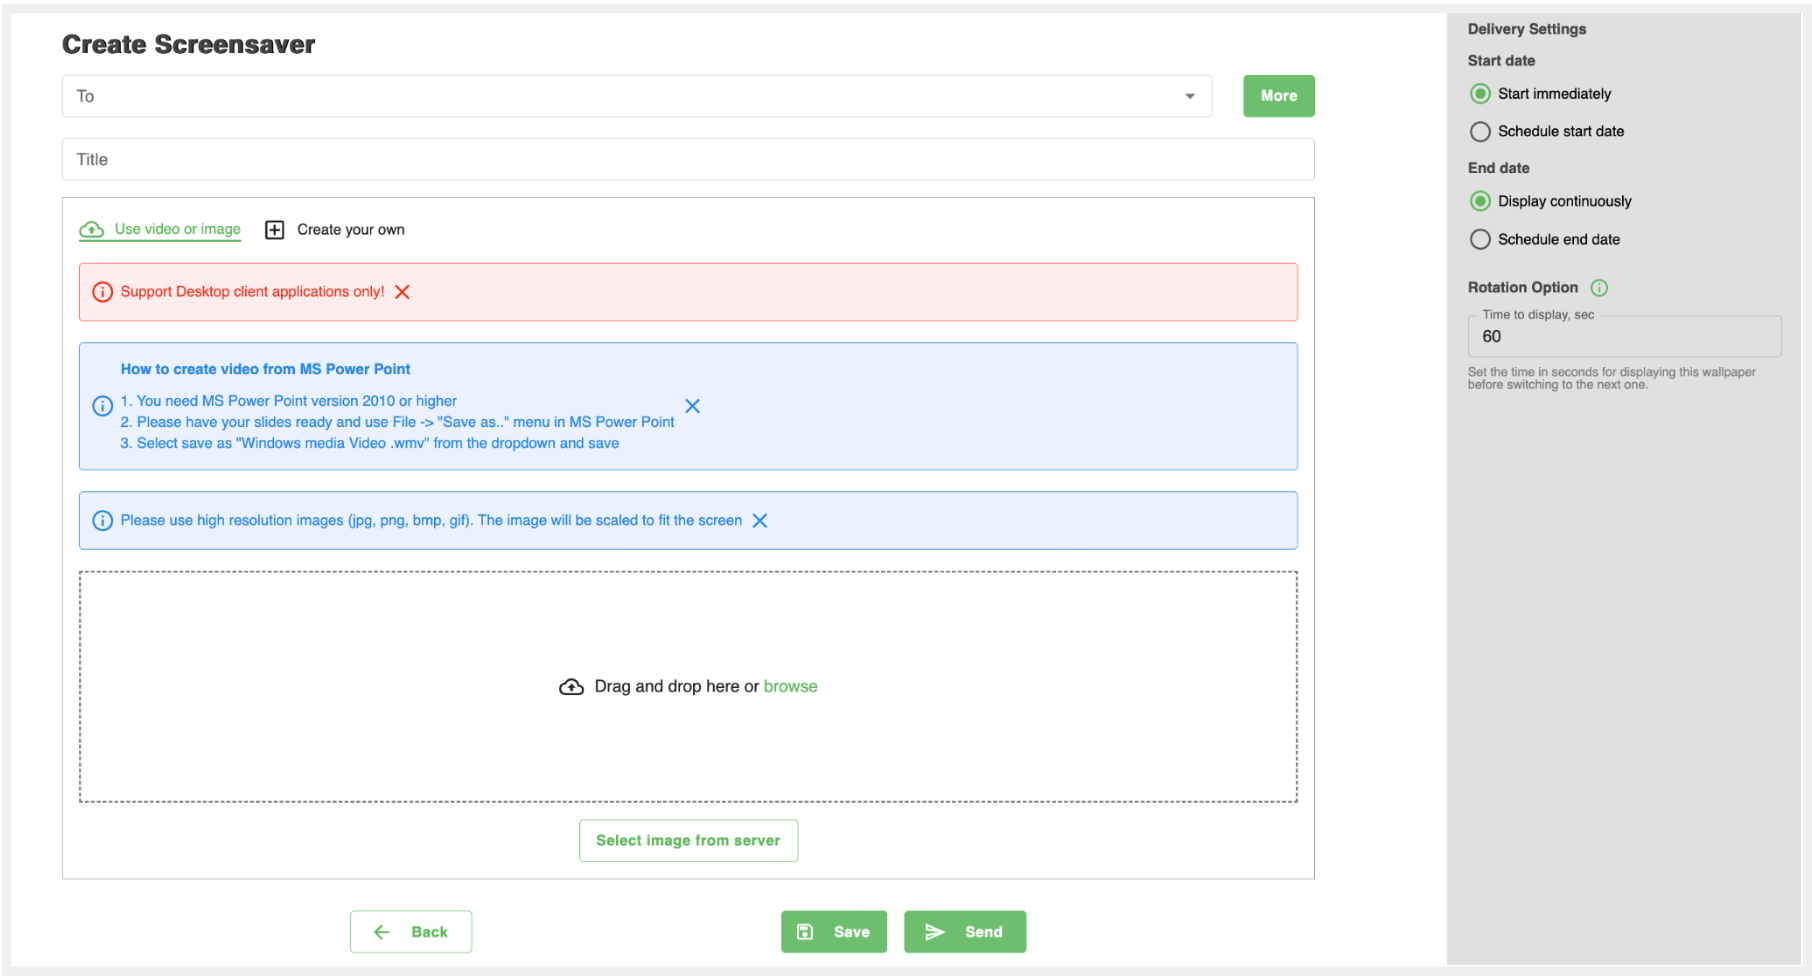
Screensavers Module
The Screensavers module allows you to manage and distribute customized screensavers to Windows devices with the DeskAlerts Desktop Agent installed. Using this feature, publishers can send images or videos to create engaging or branded screensavers for their audience.
Screensavers can be designed using .jpg, .png, .bmp, .gif, or .wmv formats. Once delivered, they replace the existing screensaver settings on the device.
Content Options
Use Video or Image
- Upload high-resolution images (
.jpg,.png,.bmp,.gif) or video files (.wmv) to serve as the screensaver.
Tip for Video Creation
- You can create a video in Microsoft PowerPoint (version 2010 or higher) by following these steps:
- Prepare your slides in PowerPoint.
- Go to File → Save As.
- Select Windows Media Video (.wmv) as the file format and save.
Create Your Own
- Use HTML to design a fully customized screensaver by selecting the Create Your Own option.
Delivery Settings for Screensavers
Control when and how screensavers are displayed with these settings:
-
Start Date
- Start Immediately: Deliver and activate the screensaver right away.
- Schedule Start Date: Specify a future date and time to begin displaying the screensaver.
-
End Date
- Display Continuously: Keep the screensaver active indefinitely.
- Schedule End Date: Set a specific end date and time for when the screensaver will stop displaying.
Rotation Option
The Rotation Option allows you to specify how long a screensaver is displayed before switching to the next one (if multiple screensavers are assigned to the device).
- Default Display Time: 60 seconds.
- You can customize this interval by entering the desired time in seconds.
If only one screensaver is sent to the device, there’s no need to adjust this setting.
Managing Existing Screensavers
The Actions menu for managing screensavers offers similar functionality to managing alerts. Here’s a quick overview of the available options:
- Duplicate Screensaver: Create a copy of the existing screensaver and open the settings page with all original configurations pre-filled. Adjust as needed before sending.
- View Schedule: Check the start and end dates, or any scheduled delivery details for the screensaver.
- Stop Screensaver: Immediately halt the delivery or scheduled rotation of the screensaver. This is useful for removing screensavers from devices before the scheduled end date.
- Preview: View how the screensaver will look on users' desktops, ensuring it meets your expectations.
These actions ensure flexibility and control over your distributed screensavers.
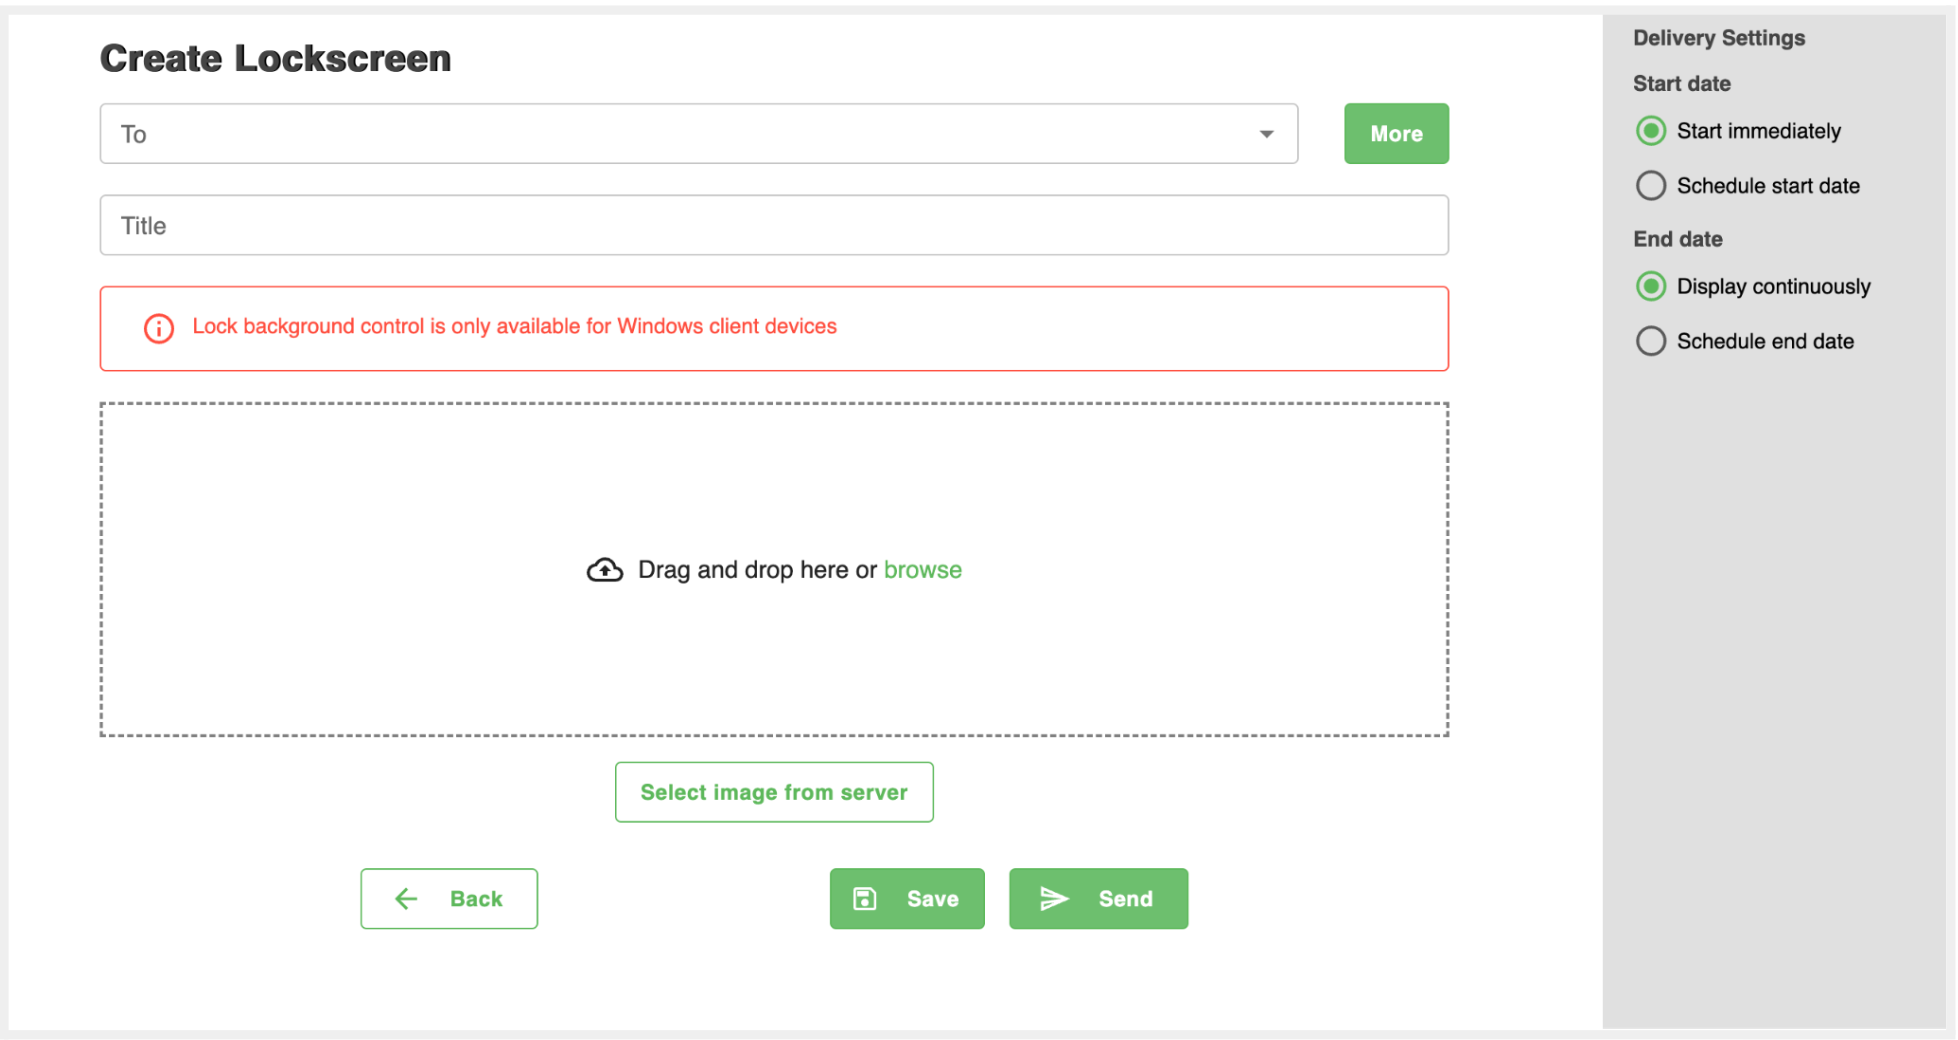
Lockscreens Module
The Lockscreens module allows you to manage and distribute customized lock screen images to Windows devices with the DeskAlerts Desktop Agent installed. Using this feature, publishers can send high-resolution images to replace the existing lock screen backgrounds on users' desktops.
Delivery Settings for Lockscreens
Customize when and how lock screens are displayed with the following settings:
Start Date:
- Start Immediately: Deliver and activate the lock screen image as soon as the alert is sent.
- Schedule Start Date: Set a specific future date and time for the lock screen image to become active.
End Date:
- Display Continuously: Keep the lock screen image active indefinitely.
- Schedule End Date: Set an expiration date and time for the lock screen image.
Rotation of Lockscreens
If multiple lock screens are sent to the same user, the images will rotate every 1 minute on that user’s desktop.
Managing Existing Lockscreens
The Actions menu for managing lock screens offers similar functionality to managing alerts and screensavers. Here’s a quick overview of the available options:
- Duplicate Lockscreen: Create a copy of the existing lock screen and open the settings page with all original configurations pre-filled. Adjust as needed before sending.
- View Schedule: Check the start and end dates, or any scheduled delivery details for the lock screen.
- Stop Lockscreen: Immediately halt the delivery or scheduled display of the lock screen. This is useful for removing lock screens from devices before the scheduled end date.
- Preview: View how the lock screen will look on users' desktops, ensuring it meets your expectations.
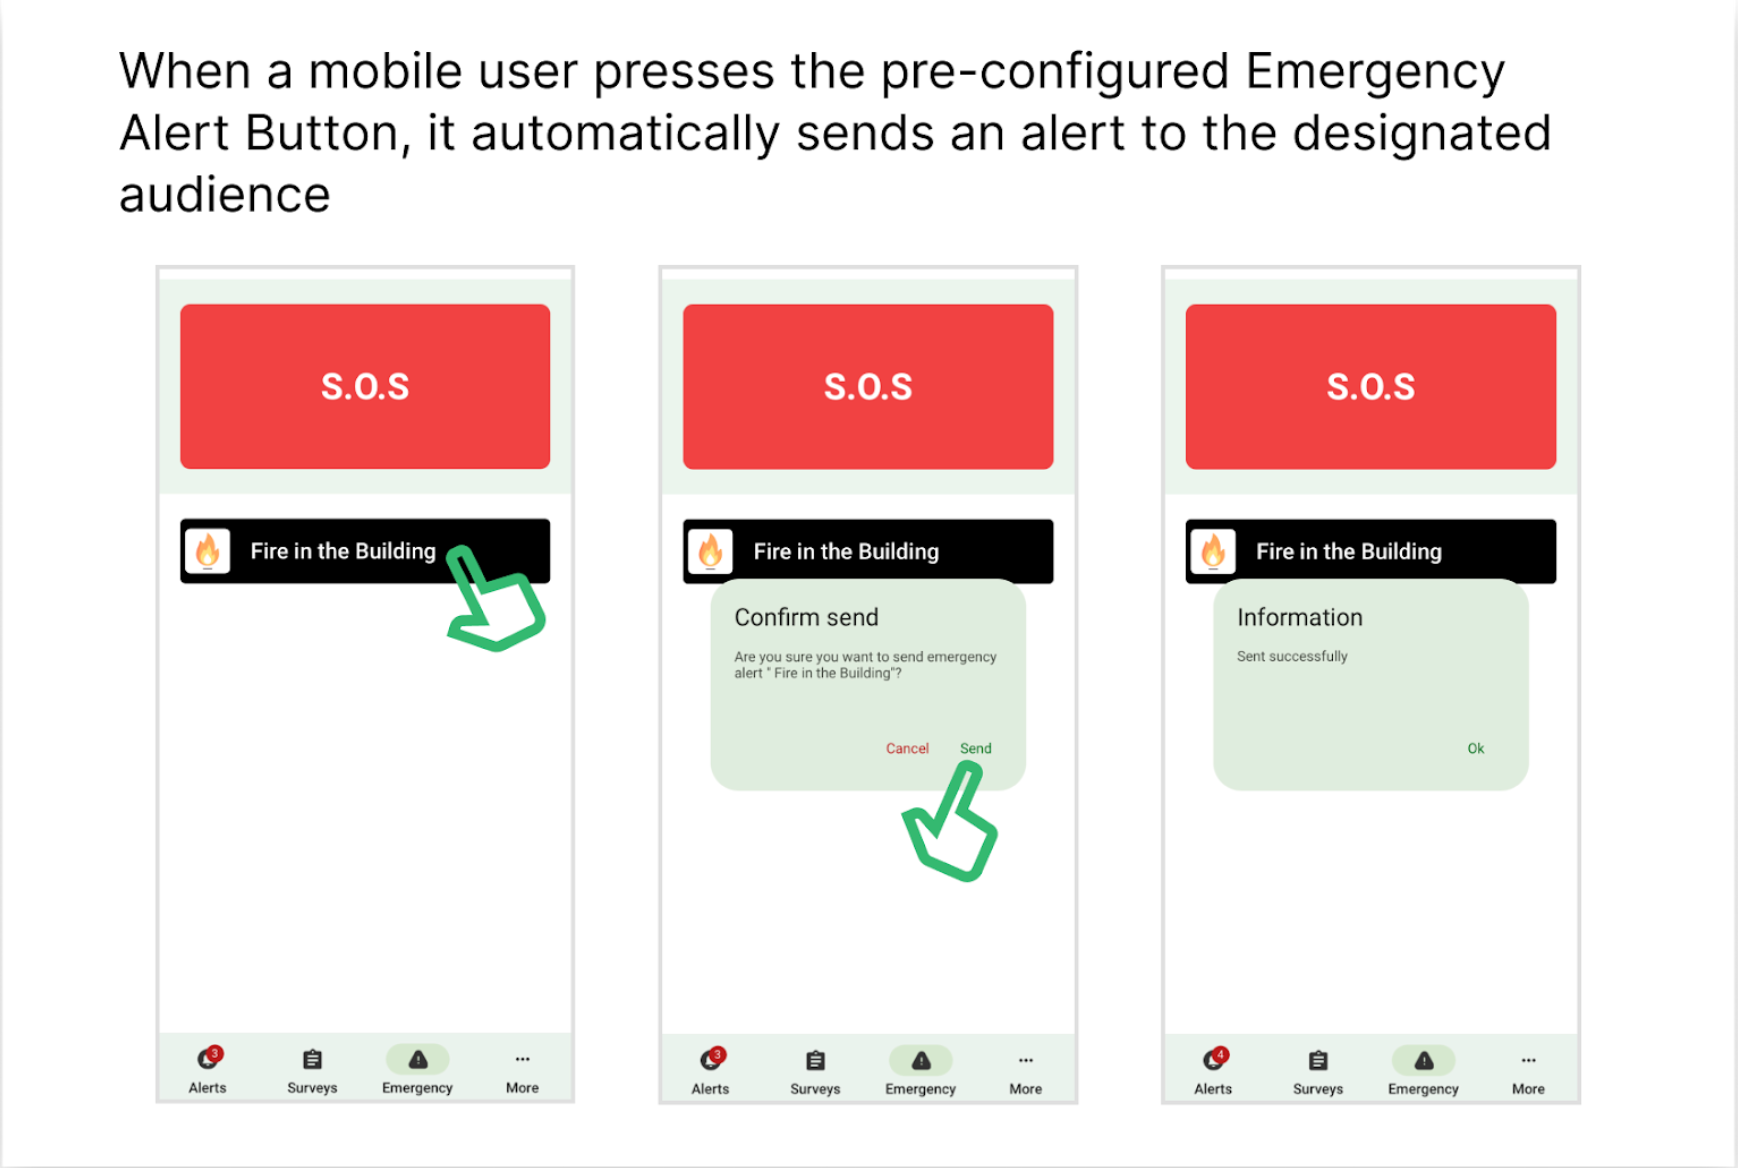
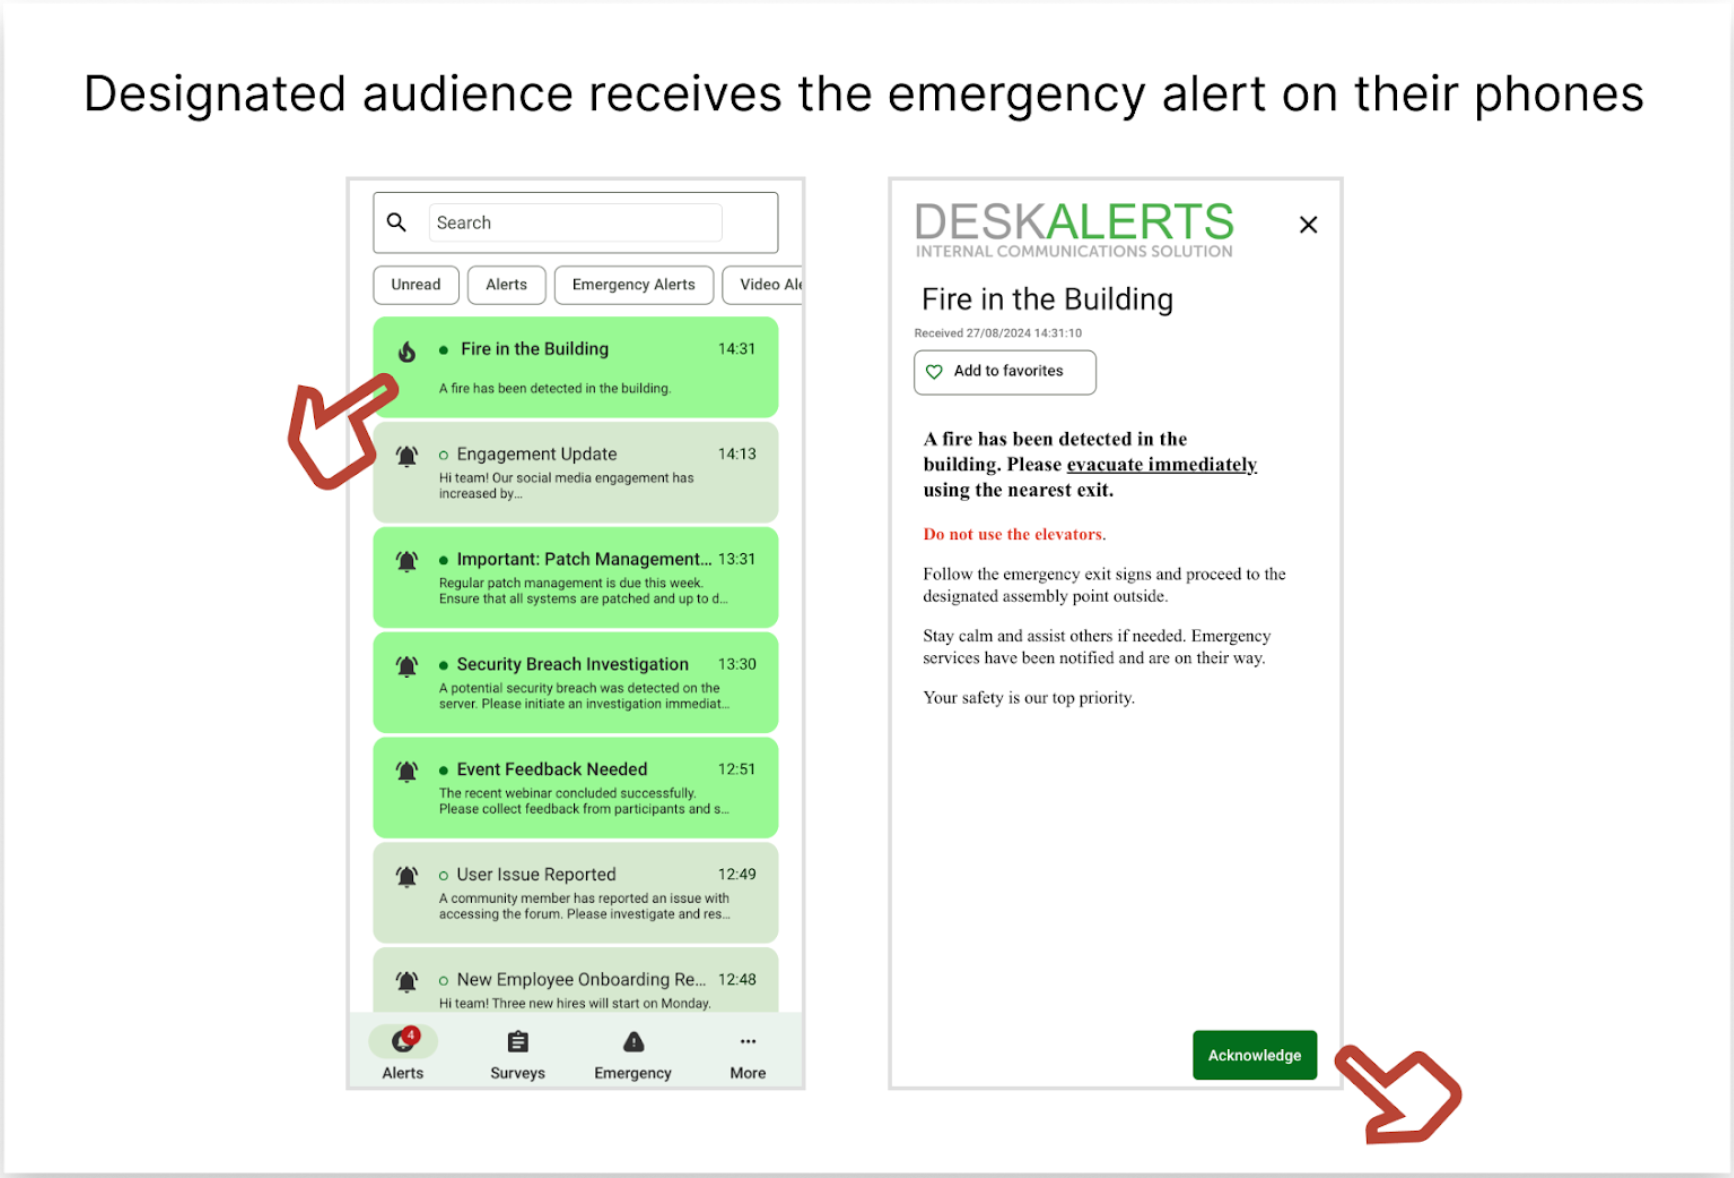
Emergency Alerts Module
The Emergency Alerts Module is a vital DeskAlerts feature, designed to enable fast and effective communication during critical situations. With pre-configured emergency alert buttons, this module ensures your organization is prepared to handle emergencies promptly and efficiently.
The Emergency Alerts module allows publishers and administrators in the DeskAlerts web application to create pre-configured emergency alert buttons:
- Create multiple emergency alert templates, customize their content and appearance, and add additional features such as acknowledgment.
- Define which devices will display the pre-configured emergency alert buttons (e.g., 'Fire in the building').
- Determine which devices will receive the pre-configured emergency alert when the button is pressed by a user in the mobile application.
- Customize the icons and colors of the pre-configured emergency alert buttons, among other options.
How to create a pre-created Emergency Alert
The process of creating a pre-configured Emergency Alert in DeskAlerts is designed to be intuitive and efficient. Below is a step-by-step guide to ensure your alert is set up properly and ready for deployment.
Step 1: Configure the Audience and Button Details (Left Panel)
Audience (TO Section)
- In the TO section, select the audience that will receive the Emergency Alert when the button is triggered by an Authorized Sender.
- This ensures the alert reaches the appropriate group during an emergency.
Title
- The Title is both the name of the button that will appear on the device of the Authorized Sender and the title of the Emergency Alert that will be sent when triggered.
- Make sure the title is clear and descriptive (e.g., “Fire in the Building” or “Security Threat”).
Authorized Senders
- This section allows you to select the audience of Authorized Senders who will see the Emergency Button in their DeskAlerts agent.
- You can customize the button further:
- Icon: Choose an appropriate icon to visually represent the emergency scenario.
- Visibility: Decide whether the button will be visible in the Desktop Agent, Mobile Agent, or both.
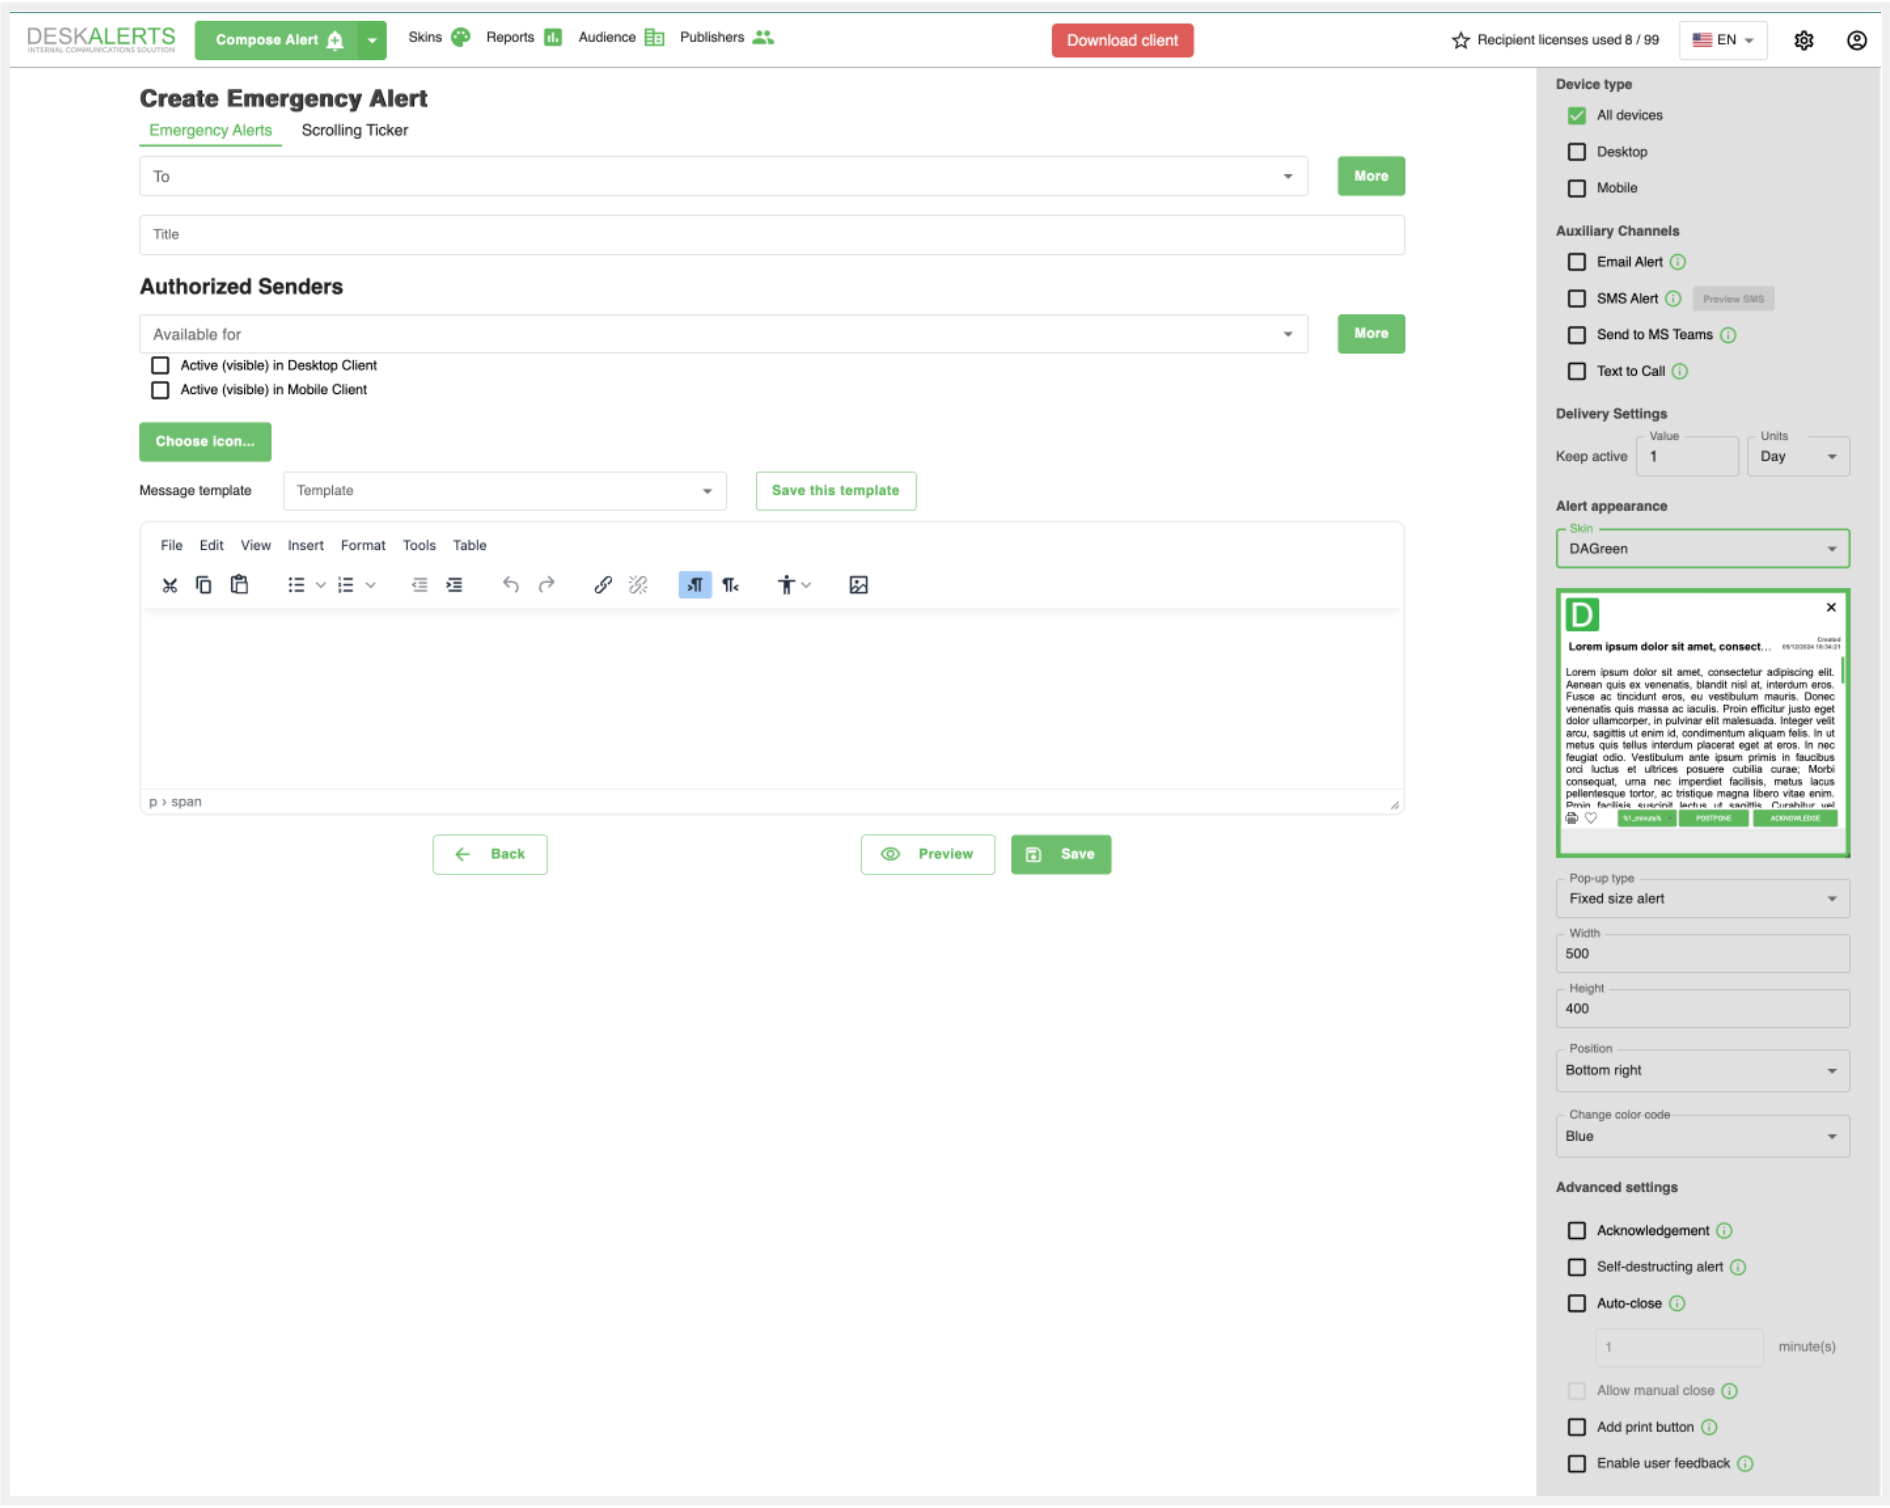
Step 2: Configure Alert Details (Right Panel)
Device Settings
- Under the Device Type section, choose the devices (desktop, mobile, or both) that will display the Emergency Alert to the audience selected in the TO section.
Alert Appearance
- Customize the appearance of the Emergency Alert, including:
- Skin: Select a predefined visual style for the alert.
- Color Codes: Choose a specific color code to make the alert stand out.
- Pop-up Size: Define the dimensions and position of the alert on the screen.
Advanced Settings
- Add functionality to the alert by enabling options like:
- Acknowledgment: Require recipients to acknowledge receipt of the alert.
- Self-destructing Alert: Automatically remove the alert after a specified time.
- Auto-close: Set a timer to automatically close the alert after a certain period.
- User Feedback: Enable the option for users to provide feedback.
Step 3: Compose the Alert Content
Use the message editor in the center of the page to craft the Emergency Alert message. Include clear, concise instructions and any relevant information to ensure recipients understand the situation and next steps.
Step 4: Save and Preview
- Once all configurations are complete, use the Preview button to review how the Emergency Alert will appear on recipients’ devices.
- If satisfied, click Save to store the alert template for immediate or future use.
⚠️ After the Emergency Button is triggered, publishers can view detailed information about the activated Emergency Alert in the Pop-up Alerts section.
By following these steps, you can ensure your pre-configured Emergency Alerts are optimized for rapid response and clarity in critical situations.
How to Manage Emergency Buttons
Once an Emergency Alert is created, it is displayed on the Emergency Alerts page as a card. Each card’s background color corresponds to the color code selected during the alert's creation, providing a quick visual identifier for the type or priority of the alert.
Where Emergency Alerts Appear
- Every Emergency Button immediately becomes available in the Emergency Agent tray menu on the devices of the corresponding Authorized Senders.
- For mobile users, the Emergency Buttons appear under the Emergency tab in the DeskAlerts mobile application.
Available Actions for Emergency Alerts
When you click the three dots on an Emergency Alert card, you can:
- Preview the alert to see how it will appear when triggered.
- Edit Alert to modify its details, such as the audience, content, or settings.
- Delete Alert to remove the alert from the system.
⚠️ Deleting an alert will also remove its associated emergency button from the devices of Authorized Senders.
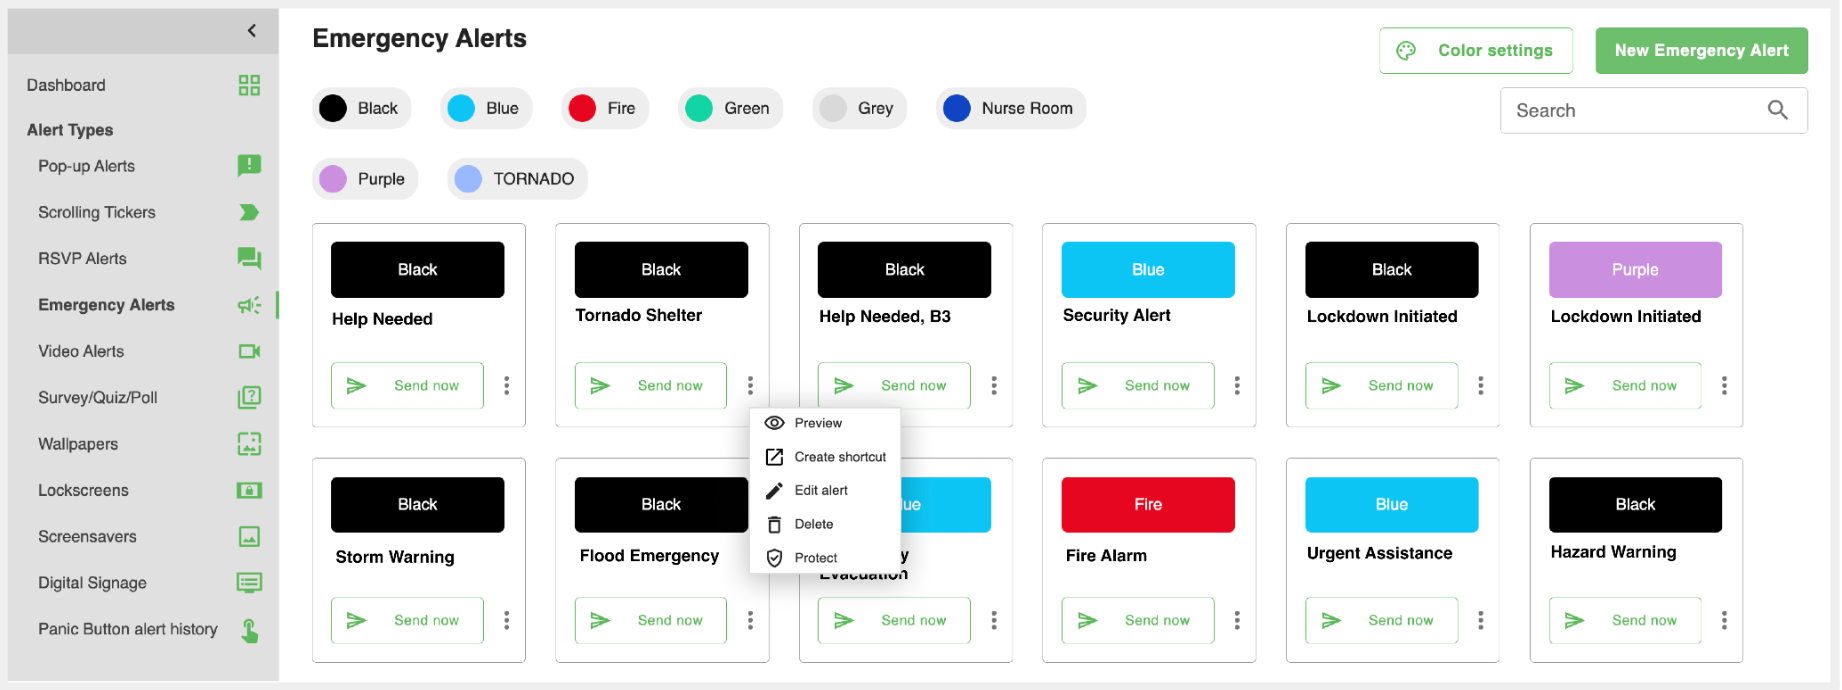
Protecting an Emergency Alert
If you want to safeguard an Emergency Alert from accidental deletion or edits by other publishers, you can enable the Protect option. This ensures that only the creator or administrators can modify or remove the alert.
Creating a Shortcut for Quick Access
Publishers can create a desktop shortcut for any Emergency Alert, making it accessible directly from their Windows desktop.
- To enable this, download the lightweight
DeskAlertsAPI.exeapplication. - Place the Emergency Alert Shortcut in the same folder as the
DeskAlertsAPI.exetool. - Clicking the shortcut allows publishers to quickly send the Emergency Alert without accessing the full DeskAlerts interface.
By organizing and managing Emergency Alerts effectively, publishers can ensure that emergency communications are always ready to be sent and are easy to access by Authorized Senders.
Digital Signage Module
The Digital Signage Module is your go-to tool for creating dynamic, interactive displays that transform any screen into a communication powerhouse. Whether you're delivering crucial information, engaging visuals, or emergency alerts, this module ensures your message takes center stage. With its ability to generate a unique link for each signage, this feature seamlessly connects your creative content to Digital Signage browsers, guaranteeing impactful and timely delivery.
With the Digital Signage Module, you can:
- Create Interactive Content: Build engaging pages using video or HTML, tailored to captivate your audience.
- Enable Scrolling Tickers: Use layouts featuring Section 4 to display scrolling tickers directly on the signage.
- Prioritize Safety: By activating the “Can be overridden by an emergency alert” setting, you ensure emergency notifications take precedence, instantly notifying viewers of potential dangers (the DS has to be chosen as a recipient of the emergency alert).
Creating Your Digital Signage: Step by Step
Crafting your Digital Signage is simple yet powerful. Follow these steps to make your vision a reality:
Choose a Layout: Select the layout that best fits your needs, with options for including sections like Section 4 for scrolling tickers.
Name Your Signage: Give your Digital Signage a clear and descriptive name. Once named, a unique link will be generated on the right panel—this is the URL you’ll place in the browser of the Digital Signage device.
Manage Sections: Select the section you want to customize by clicking Manage Section _.
Add Content to Your Queue:
- Click Add Content to Queue in the right-hand panel.
- Choose your content type:
- Video: Upload engaging video content directly.
- HTML: Use the built-in DeskAlerts editor to add text, images, or fully customized HTML content.
Set Display Durations: Define how long each piece of content will display (in seconds) before transitioning to the next. You can queue multiple items for a seamless flow of information.
Preview Your Digital Signage: Ensure perfection by clicking Preview to review the design and functionality of your signage.
Save and Manage: Once complete, click Save to finalize your Digital Signage and return to the management page, where all created signages are listed for easy access.
Managing Your Digital Signage
From the Digital Signage Management Page, you have full control over your creations:
- Review Your Work: See all your Digital Signages at a glance, along with their titles and unique links.
- Edit or Preview: Fine-tune or preview your signage with just a click.
- Link to the Browser: The generated URL in the table is the final step—simply paste it into the browser of your Digital Signage device to bring it to life.
Sending Scrolling Tickers to Digital Signage
Adding scrolling tickers to your signage is effortless. Here’s how:
Check Layout Compatibility: Ensure your Digital Signage layout includes Section 4.
Create a Scrolling Ticker:
- Navigate to the Scrolling Ticker creation page.
- In the Audience field, enter the title of the Digital Signage you’re targeting.
Send and Display: Once sent, the scrolling ticker will seamlessly appear in Section 4 of the selected signage, ensuring dynamic and engaging updates. From engaging visuals to critical emergency alerts, Digital Signage Module empowers you to captivate audiences and prioritize safety with ease.
Reports Module
The Reports Module in DeskAlerts provides detailed insights into the performance of your alerts and other distributed content. This feature allows publishers to monitor delivery rates, analyze engagement, and ensure that important messages effectively reach their intended audience.
Users Report
The Users Report provides publishers with essential details about user connectivity and activity within the DeskAlerts system, without needing administrator access. This tool ensures transparency and helps troubleshoot communication issues.
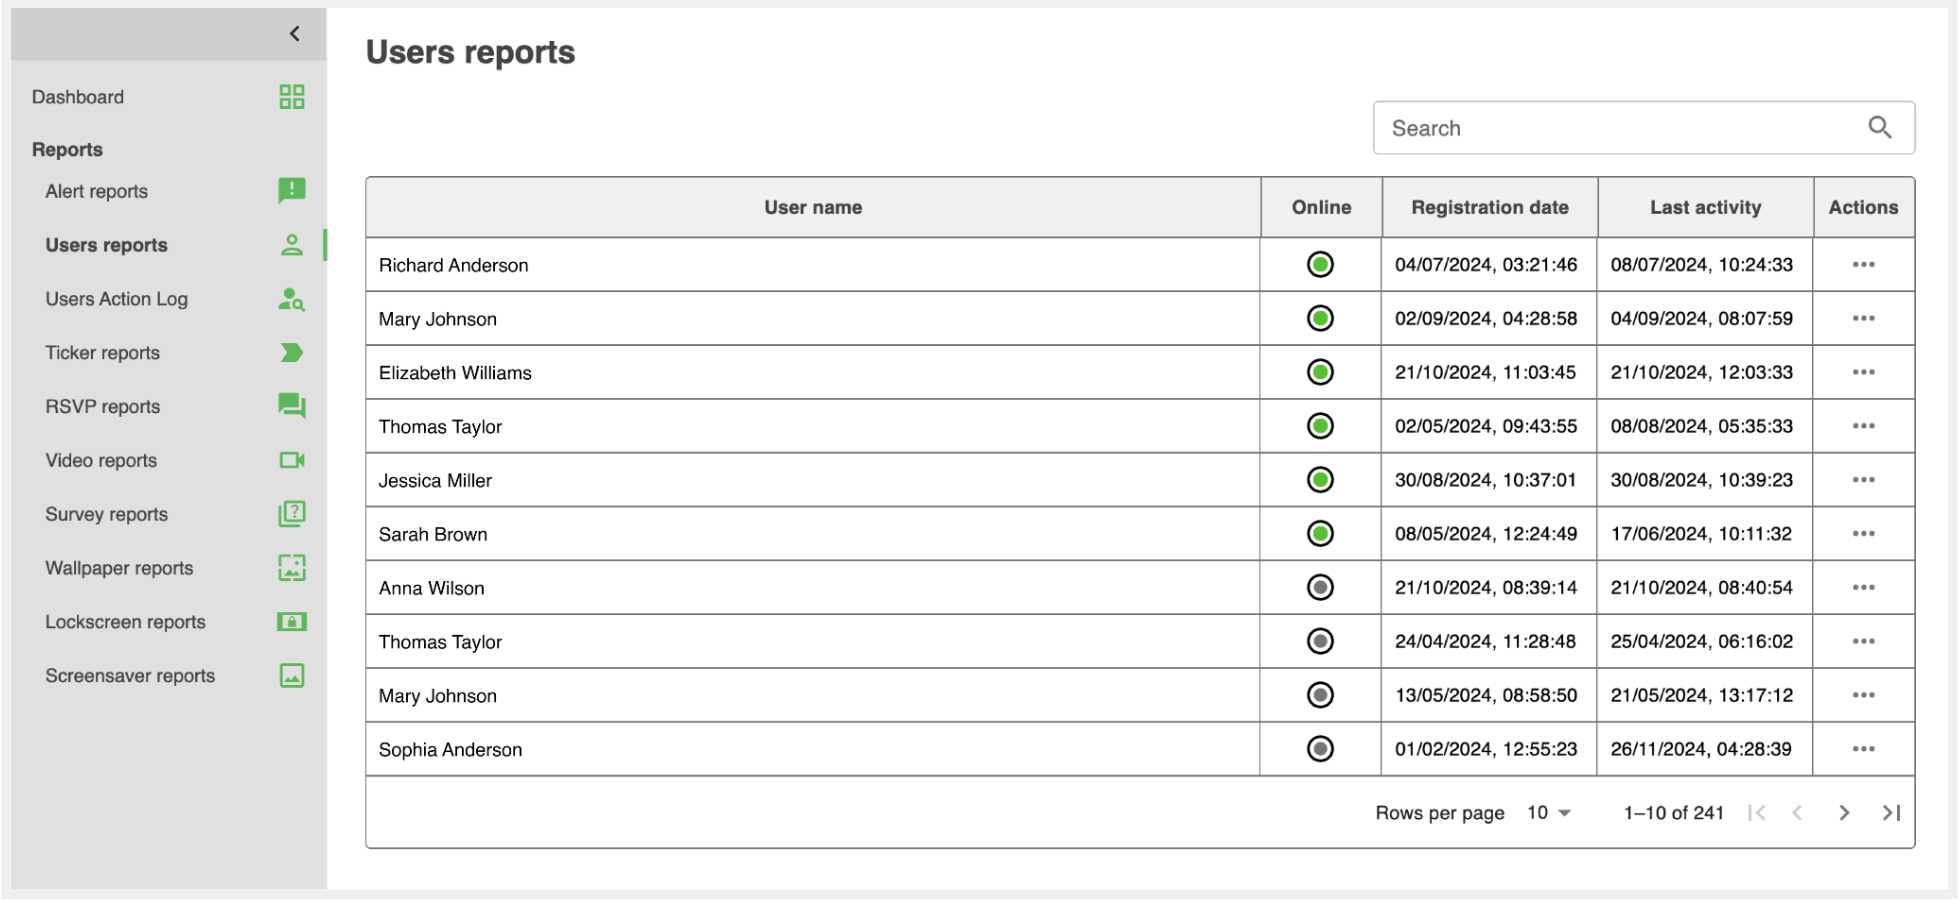
The Users Report provides publishers with a detailed overview of user connectivity and activity within the DeskAlerts system. It allows publishers to determine whether a user is currently online and able to receive alerts, offering real-time visibility into user availability.
The report includes key information for each user, such as:
- Registration Date: When the user was added to the DeskAlerts system.
- Last Activity: The most recent time the user interacted with the platform.
Through the Actions menu, publishers can dive deeper into user-specific data:
- View a breakdown of all received content to confirm successful delivery.
- Identify not received content to troubleshoot potential issues.
- Check acknowledged content to see which alerts or notifications the user has interacted with or confirmed.
These features make the Users Report a vital tool for ensuring smooth communication, troubleshooting delivery problems, and maintaining engagement with recipients.
Users Action Log
The Users Action Log is a dedicated section within the Reports module that provides a detailed record of user activity within the DeskAlerts platform. This tool ensures transparency and allows administrators or publishers to track user interactions for better accountability and system management.
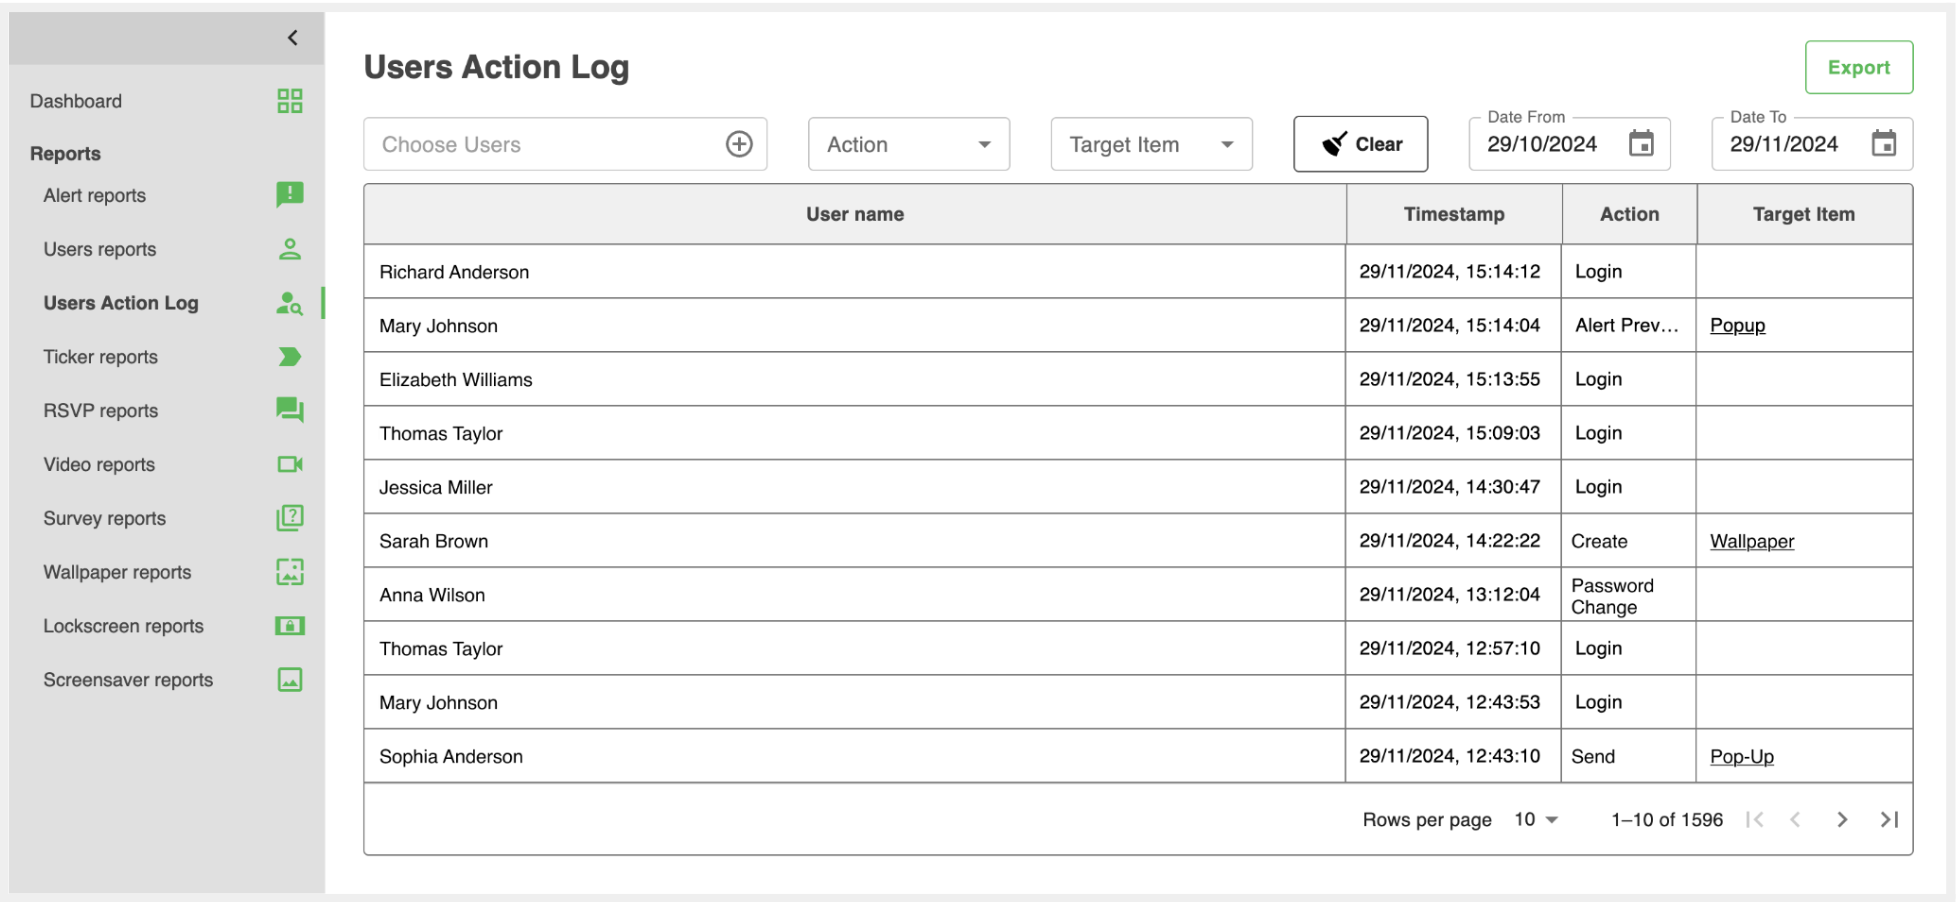
The Users Action Log provides a detailed record of all user activities, including logins, alert creation, password changes, and other management actions. Each action is timestamped and linked to a specific user for clear accountability.
You can filter by specific users, action types (e.g., "Login" or "Send"), target items (e.g., "Pop-Up" or "Wallpaper"), and date ranges, making it easy to find the exact information you need.
Additionally, all data can be exported in CSV or Excel format, enabling further analysis or convenient sharing with stakeholders. This ensures transparency, effective troubleshooting, and efficient system management.
Alert Report
The Alert Reports section offers a detailed overview of how your alerts perform, providing essential metrics and tools to evaluate their effectiveness. Publishers can track delivery rates, user engagement, and response patterns to ensure alerts are meeting their goals.

You can view key details about each alert in the report table, including:
- Title: The name of the alert.
- Sender: The person who created and sent the alert.
- Device: The target devices.
- Channels: Communication methods used, such as Agent or Email.
- Open Rate: The percentage of recipients who opened the alert.
- Creation Date: When the alert was created and sent.
The module also includes powerful filtering options, allowing you to refine your view by title, date range, or other criteria. This helps you focus on the alerts that matter most within a given timeframe.
For deeper insights, click the Actions option to access graphs showing metrics such as:
- Received: Number of users who successfully received the alert.
- Not Received: Number of users who didn’t receive it.
- Acknowledged: Users who confirmed they’ve seen the alert.
- Liked: Users who interacted positively by liking the alert.
These reporting capabilities are consistent across all types of content in the Reports module, ensuring you have the same depth of insights for pop-up alerts, tickers, surveys, wallpapers, screensavers, and more.
Updating Your Password
To update your publisher account password, follow these simple steps:
- Click the Account Icon in the top-right corner of the control panel.
- Select Profile Settings from the dropdown menu.
- Choose the Change Password option.
- Enter your current password in the designated field.
- Enter your new password and confirm it.
Once completed, your password will be updated, ensuring your account remains secure.