Process Automation
Overview
The Process Automation section contains workflow configuration used to control how alerts are reviewed and approved before they are delivered to recipients.
In organizations where alert quality, compliance, or audience scope requires oversight, the approval workflow ensures that content is reviewed by designated approvers before reaching end users. This is especially relevant for emergency alerts, organization-wide campaigns, and alerts sent through external channels such as SMS or email.
⚠ Administrator Access Required Changes to Process Automation settings affect all alert publishing activity across the web portal. Review configurations carefully before saving.
Navigation
The Process automation group of the Settings menu contains a single page:
- Approval workflow settings — the page for enabling the approval workflow, defining dispatch rules, and managing workflow definitions
Approval workflow settings
Approval workflow settings is the configuration page of the approval feature.
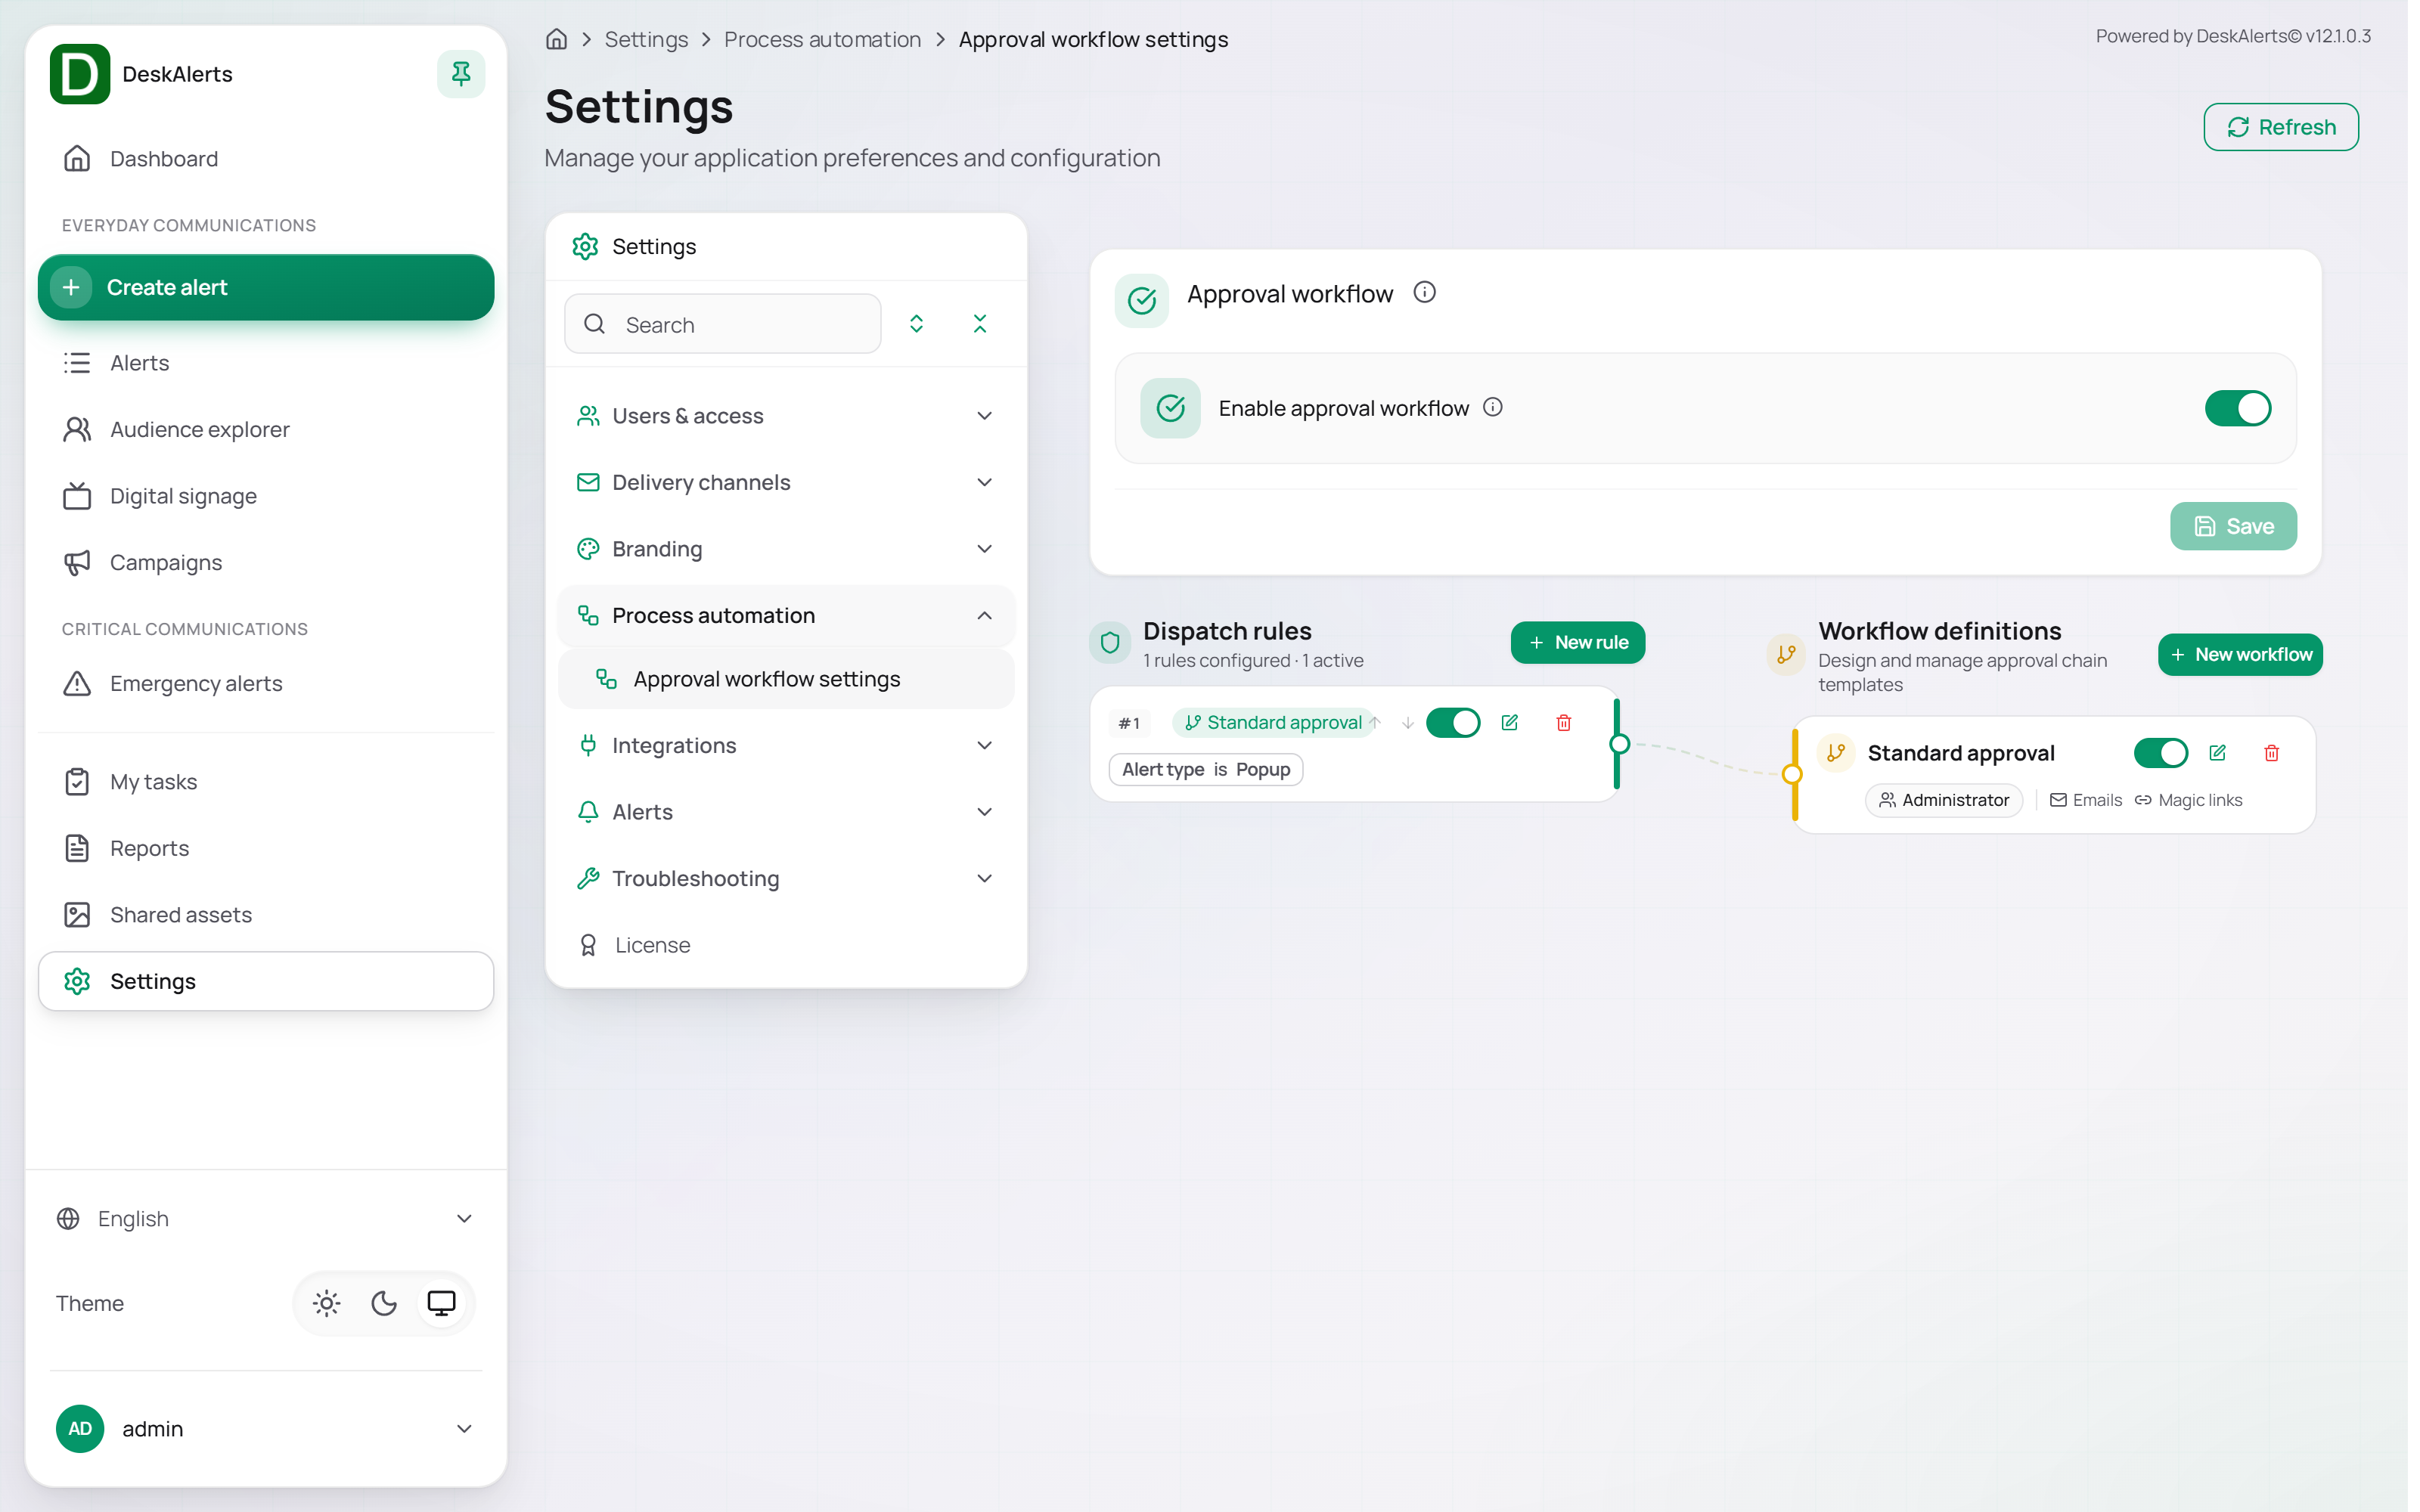 Approval workflow settings — the switch, Dispatch rules and Workflow definitions
The page is divided into two panels:
| Panel | Description |
|---|---|
| Dispatch rules (left) | Rules that determine which alerts require approval, based on conditions. The header shows the total number of rules configured and how many are active (for example, 1 rules configured · 1 active) |
| Workflow definitions (right) | Reusable approval chains assigned to dispatch rules. Each card shows the workflow name, its approver role, and whether Emails and Magic links are on |
At the top of the page, the Enable approval workflow switch activates or deactivates approval enforcement across the whole DeskAlerts environment. When it is off, all alerts are sent immediately after a publisher clicks Send, with no approval step.
Click Save next to the switch to apply the change.
Dispatch rules
Dispatch rules determine which alerts require approval before delivery. Each rule evaluates its conditions against a submitted alert and, when they match, routes the alert to the workflow definition named in the rule.
The Dispatch rules panel displays each rule with its number, name, the workflow it routes to, a switch to enable or disable it, and the condition summary as inline pills (for example, Alert type is Popup).
Note: Rules are evaluated top to bottom. The first rule that matches a submitted alert is applied — the rules below it are not evaluated. Order the rules with the most specific one first.
Click New rule to create a rule.
Creating a dispatch rule
Clicking New rule opens the Create rule dialog.
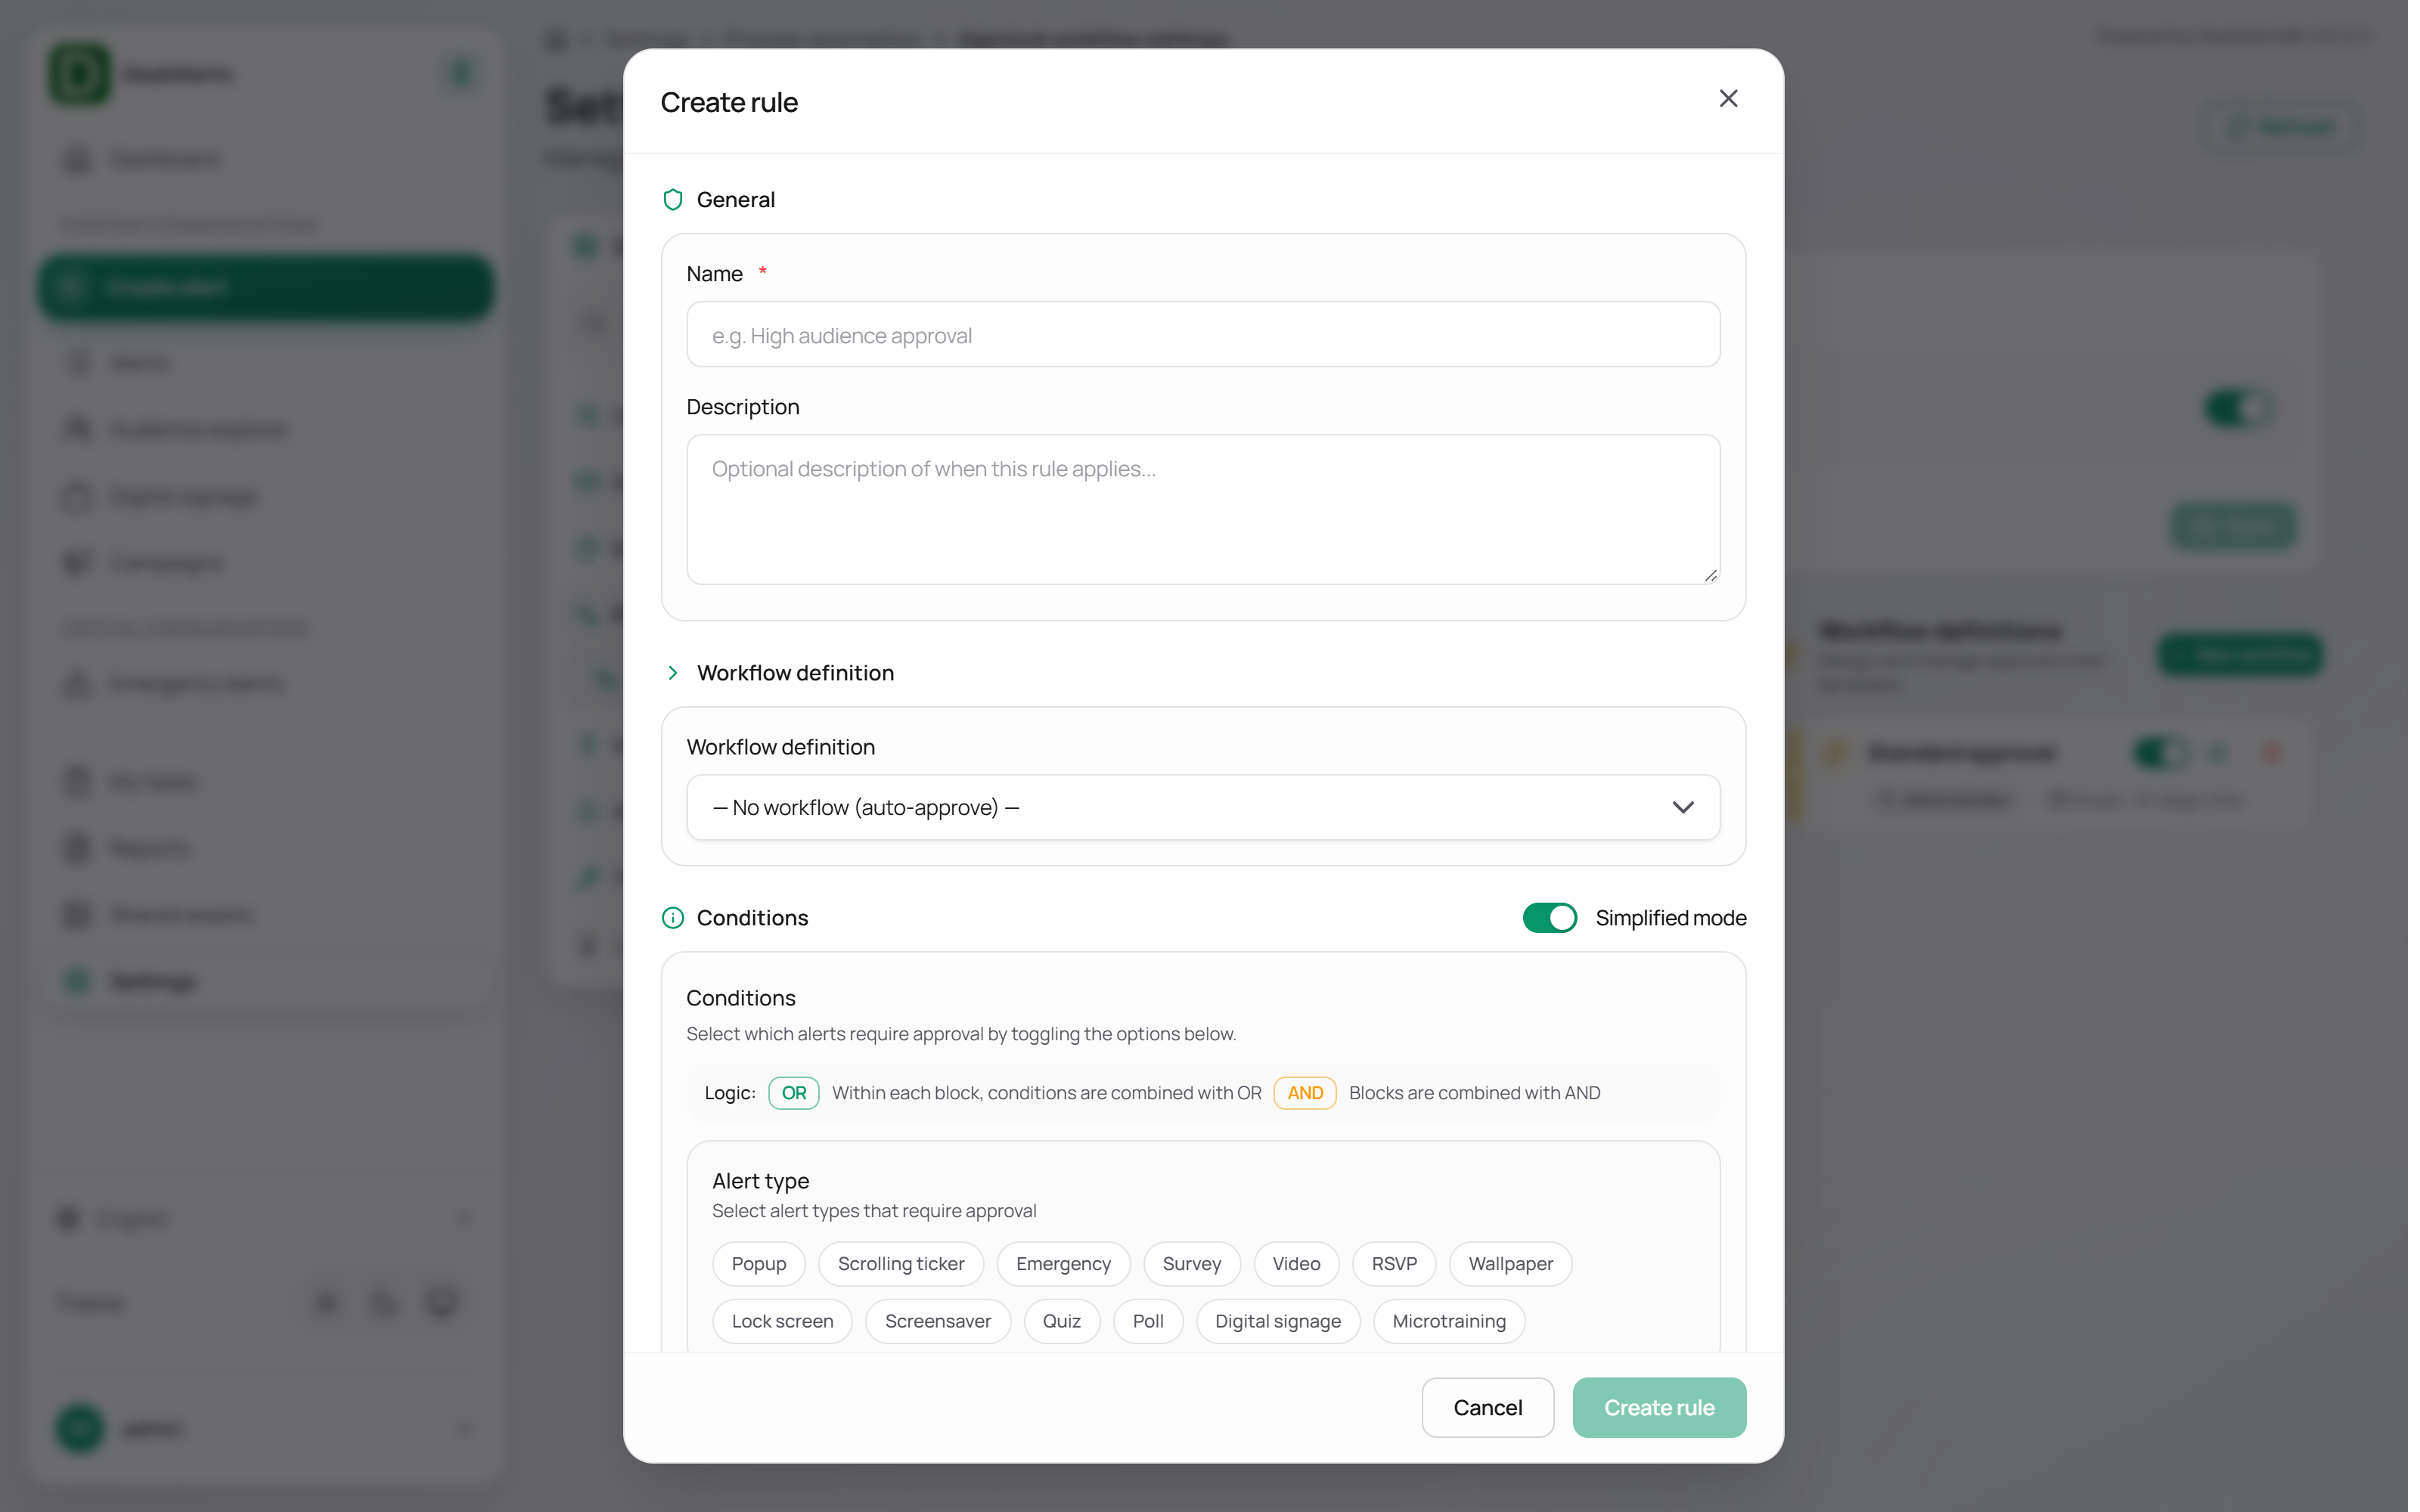
A rule consists of three sections: General, Workflow definition, and Conditions.
General
| Field | Description |
|---|---|
| Name | Required. A descriptive name that identifies the rule's purpose, for example Popups need approval |
| Description | Optional. A brief explanation of when the rule applies, visible to other administrators |
Workflow definition
The Workflow definition list specifies which approval chain is triggered when the rule matches an alert.
The default selection is — No workflow (auto-approve) —, which means an alert matching this rule is approved automatically without manual review. Select a workflow definition from the list to assign a review chain — create the workflow first.
Conditions
Conditions define which alerts require approval. Two editing modes are available, controlled by the Simplified mode switch of the Conditions section.
The logic used in both modes is displayed inline:
- OR — conditions within the same block are combined with OR
- AND — blocks are combined with AND
Simplified mode
Simplified mode presents conditions as four independent blocks with toggle buttons. Select one or more values within each block to activate that condition category. Conditions within a block use OR; blocks use AND between them.
Alert type — select the alert types that require approval:
Popup, Scrolling ticker, Emergency, Survey, Video, RSVP, Wallpaper, Lock screen, Screensaver, Quiz, Poll, Digital signage, Microtraining
Delivery channel — select the delivery channels that require approval:
Desktop Agent, Mobile agent, Email, SMS
Sender role — select the sender roles that require approval. The list reflects the web-portal roles of the system (for example, Administrator, Communications Publisher, HR Publisher).
Audience count — set an audience count threshold for approval:
| Input | Description |
|---|---|
| Operator | The comparison operator, selected from a list |
| Threshold | The numeric recipient count to compare against |
When a block is left empty (no values selected), that condition category is not applied.
Advanced mode
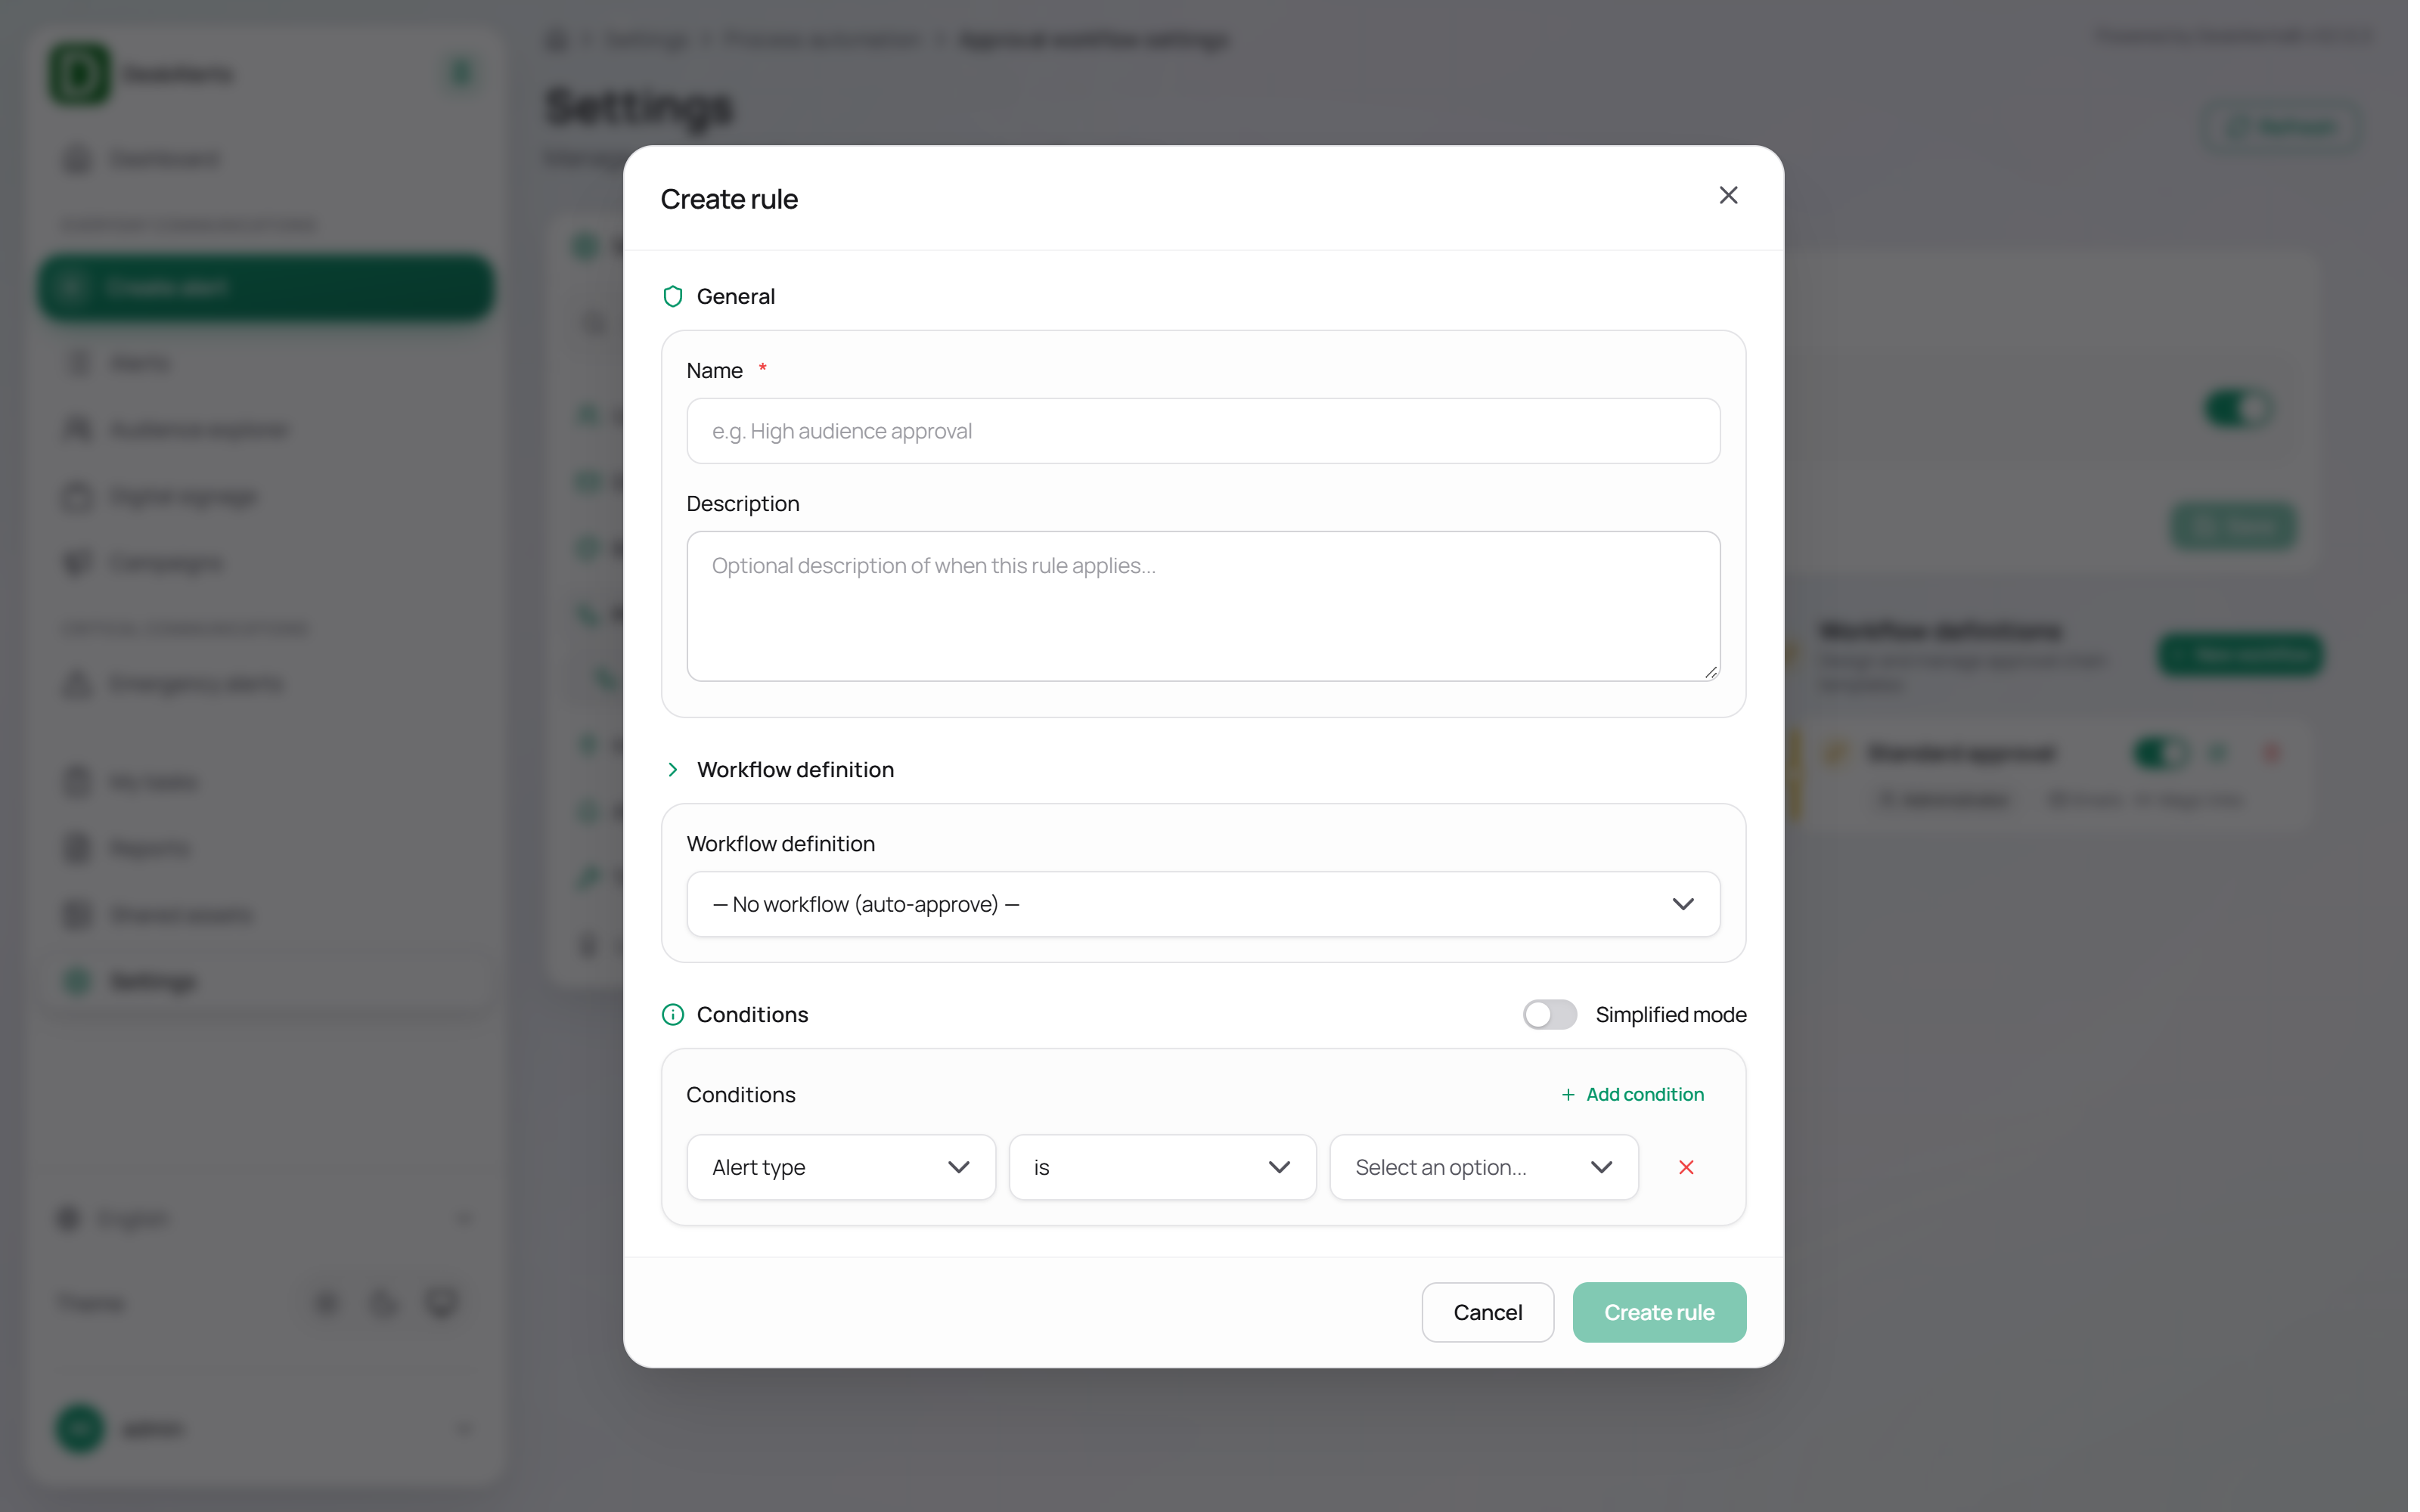
Switching Simplified mode off enables Advanced mode, which builds individual condition rows with a field / operator / value structure.
Each condition row contains:
| Column | Description |
|---|---|
| Field | The attribute to evaluate — alert type, channel, sender role, or audience count |
| Operator | The comparison operator (for example, is) |
| Value | The specific value to match |
Click Add condition to add a row. Rows within the same condition group are combined with OR; groups are combined with AND.
Click Create rule to save the rule, or Cancel to discard it. Switch the new rule on in the list.
Workflow definitions
Workflow definitions are reusable approval chains that define who reviews an alert, in what order, and what happens when nobody decides in time. A single workflow definition can be assigned to several dispatch rules.
Each card of the Workflow definitions panel shows the workflow name, the approver role of its steps, and the Emails and Magic links indicators. The switch on the card publishes or unpublishes the workflow (an unpublished workflow is not offered to the rules); the pencil icon opens the editor, where the saving button is Update workflow; the bin icon deletes the workflow. The rules have the same controls, with Update rule in their editor.
Click New workflow to create a workflow definition.
Creating a workflow definition
Clicking New workflow opens the Create workflow page.
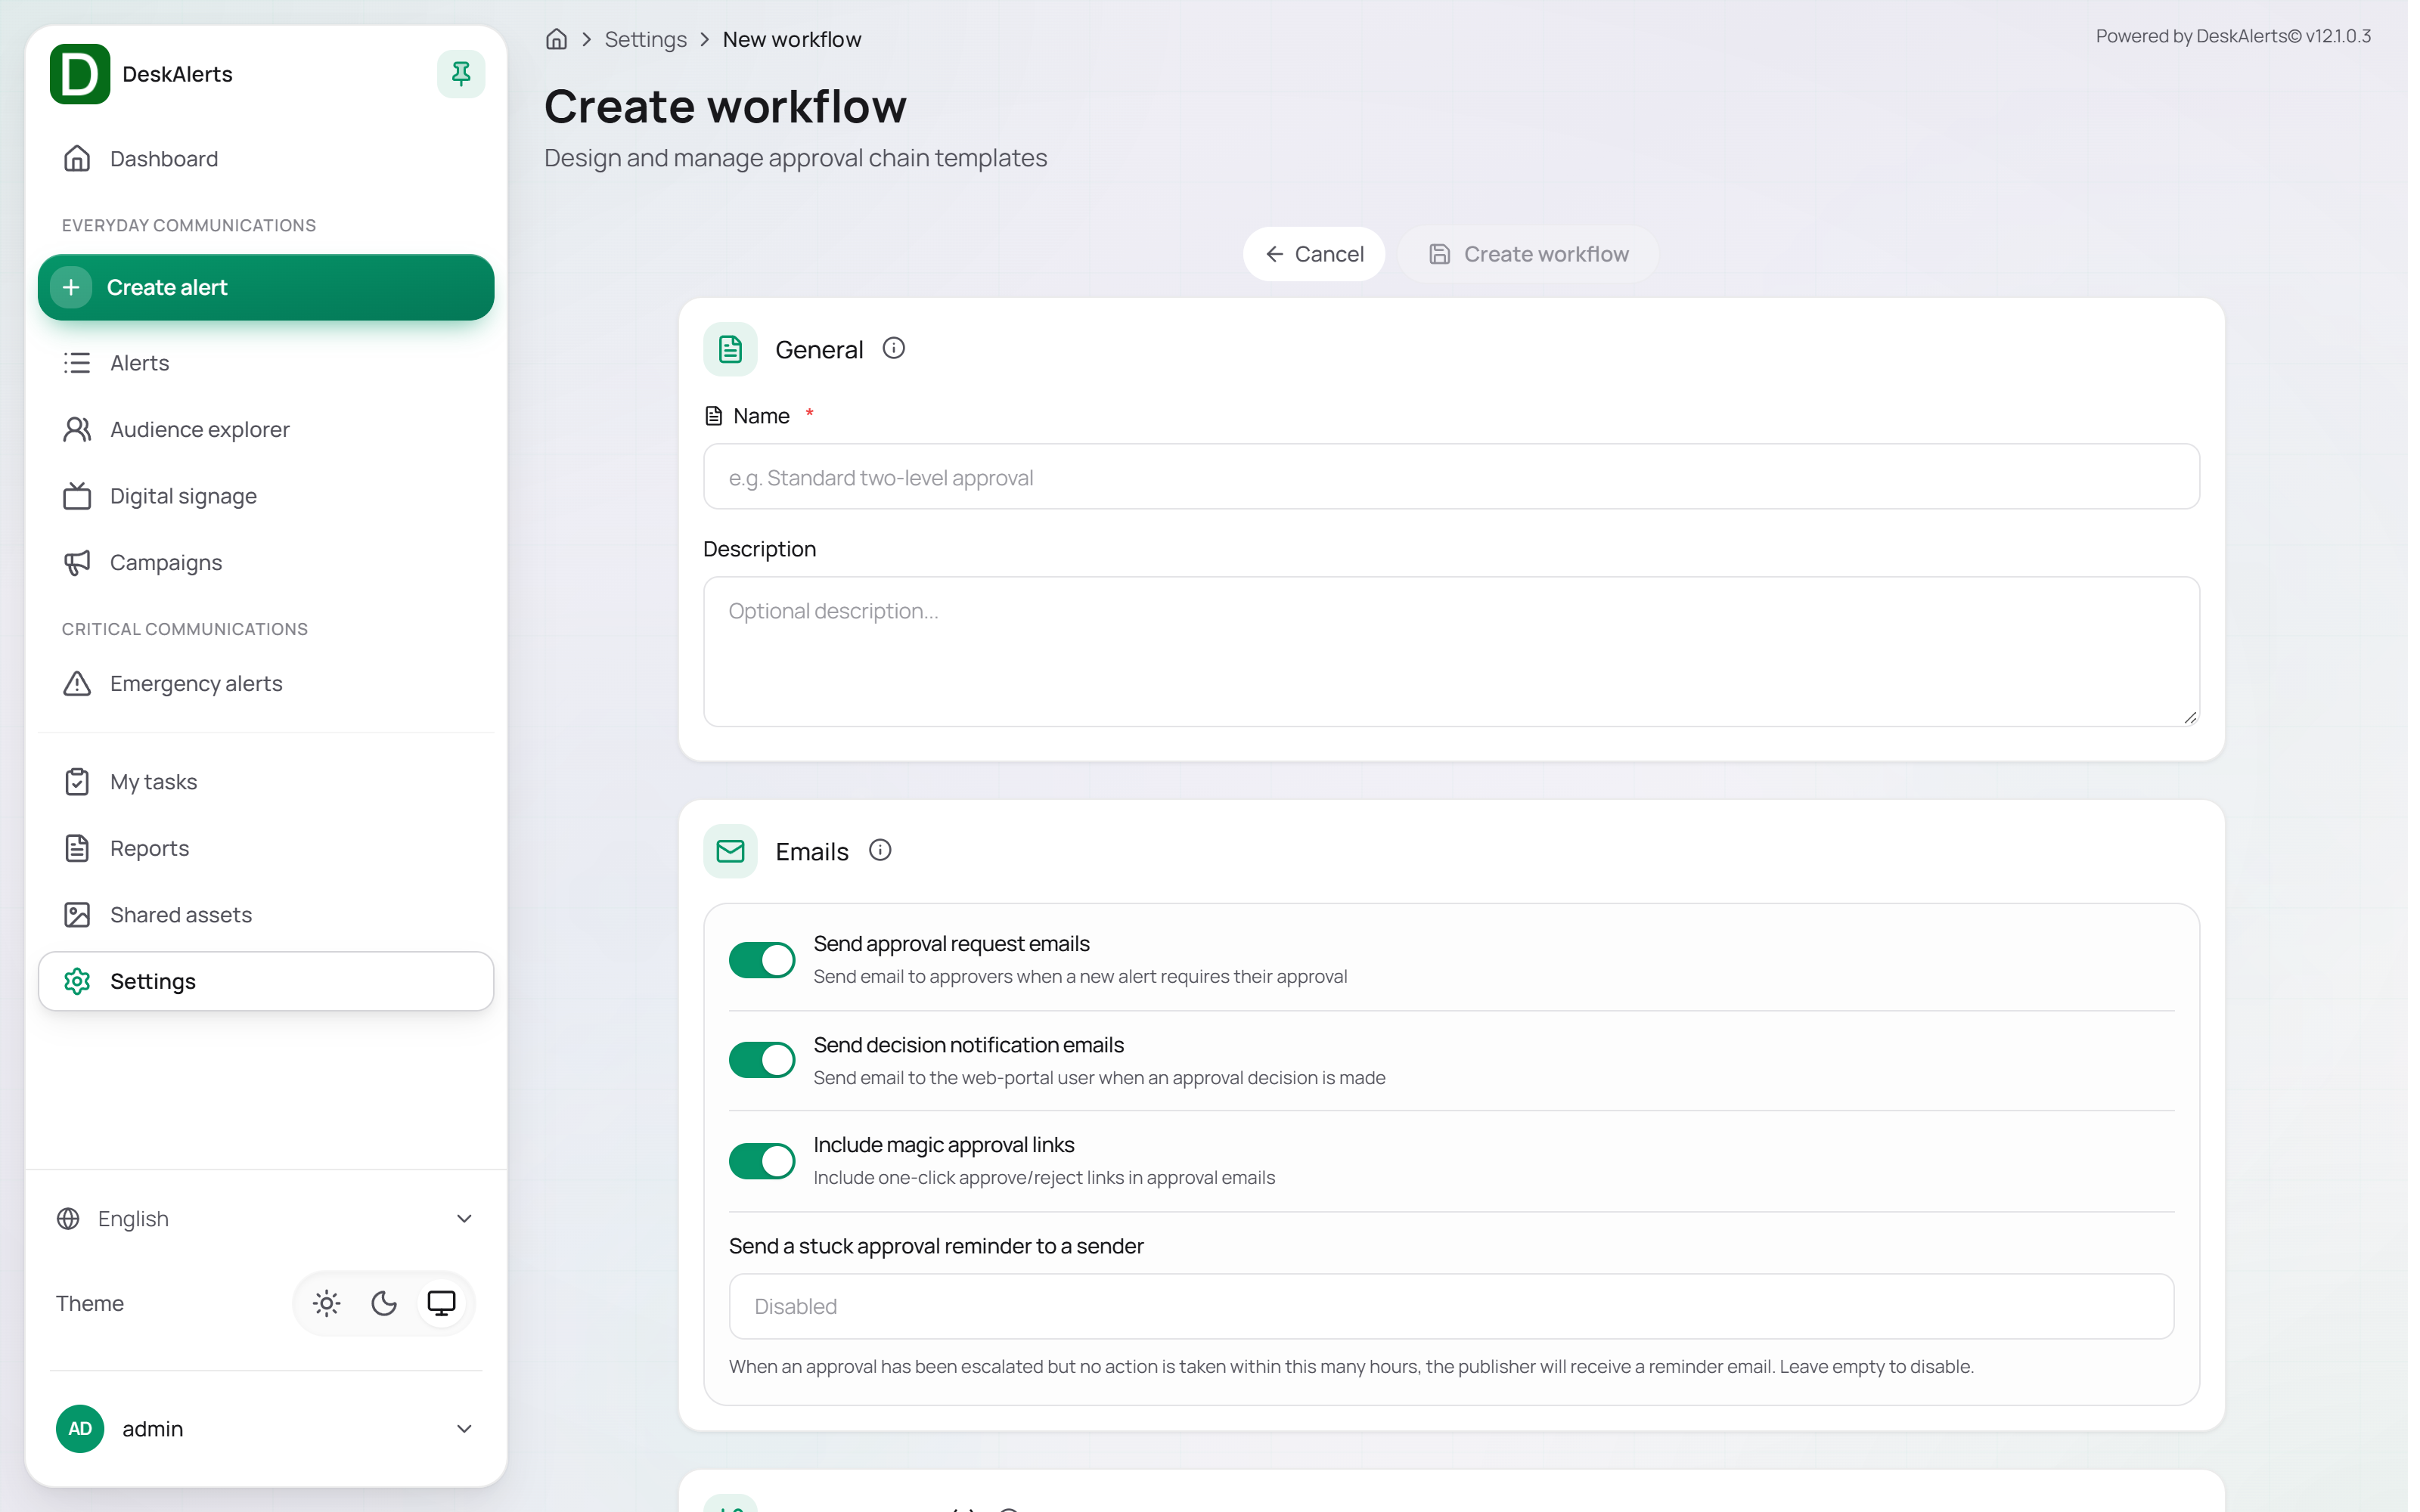
The page contains three sections: General, Emails, and Approval steps. Cancel at the top discards the changes; Create workflow saves the workflow and makes it available in the Workflow definition list of the rules.
General
| Field | Description |
|---|---|
| Name | Required. A descriptive name for the workflow, for example Standard approval |
| Description | Optional. Explains the workflow's purpose or the scenarios it covers |
Emails
The Emails section controls how approvers and publishers are notified during the approval process.
| Setting | Description |
|---|---|
| Send approval request emails | Sends an email to approvers when a new alert requires their approval. On by default |
| Send decision notification emails | Sends an email to the web-portal user (publisher) when an approval decision is made. On by default |
| Include magic approval links | Adds one-click approve/reject links to approval emails, so that approvers can act without signing in to the web portal. On by default |
| Send a stuck approval reminder to a sender | When an approval has been escalated but no action is taken within this many hours, the publisher receives a reminder email. Leave empty to disable |
Note: Email notifications require a configured SMTP server — see Delivery channels. Approvers receive the request only if their web-portal account has an email address.
Approval steps
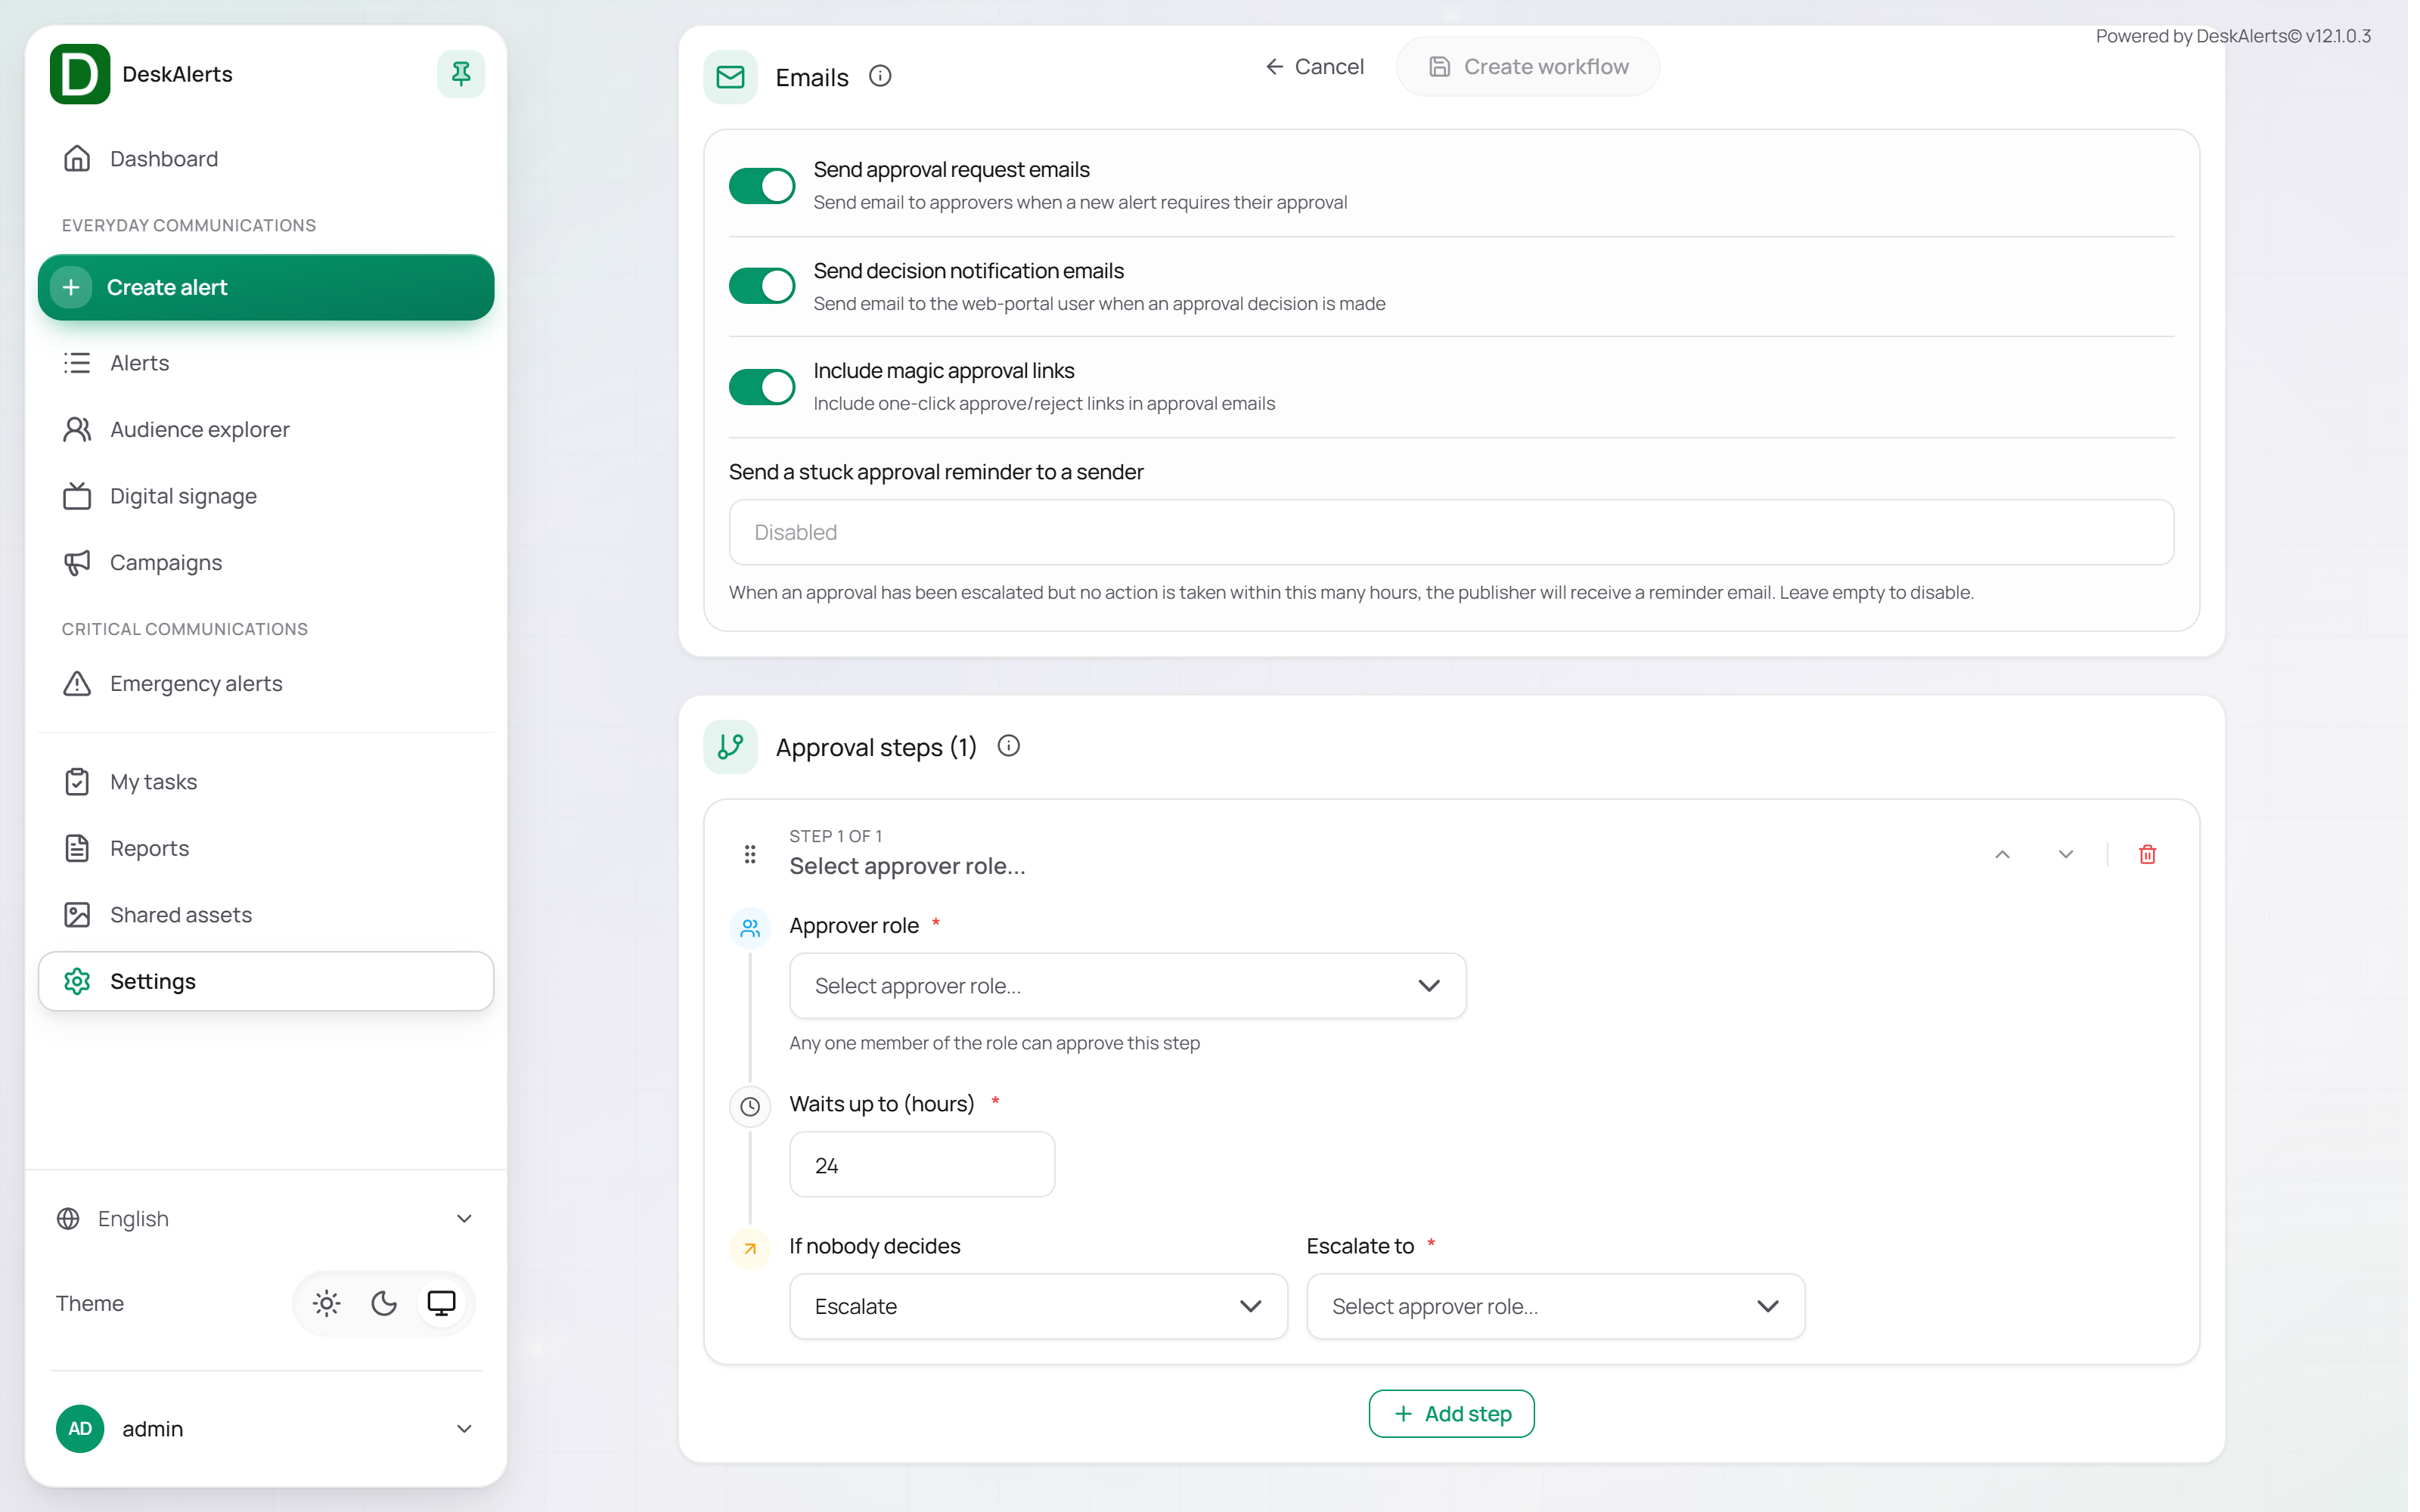
Each workflow contains one or more sequential approval steps. An alert must pass every step before it is cleared for distribution; a step begins only after the previous one is resolved.
Steps are displayed as numbered cards (Step 1 of 1). Use Move up and Move down to reorder steps; Add step adds another sequential step.
| Field | Description |
|---|---|
| Approver role | The web-portal role whose members are authorized to approve this step. Any one member of the role can approve the step |
| Waits up to (hours) | How long the step can remain pending before the If nobody decides action is triggered |
| If nobody decides | What happens when the time runs out — for example Escalate to another role |
| Escalate to | The web-portal role that receives the step when the action is Escalate |
Who receives approval tasks
An approval task appears in My tasks only for publishers who hold the step's Approver role. Check that the role has members before you save the workflow — the editor does not warn about an empty role, and alerts held by a step whose role has no members wait until the If nobody decides action.
- The built-in
adminaccount and accounts of the Administrator account type do not hold a web-portal role, so they do not receive tasks even when the step's role is called Administrator. The Administrator role has no members in a new installation. - To let a person approve, give them a web-portal account of type Web-portal user and assign the approver role to it. The approver role alone does not let that account create alerts; combine it with a role that does, if the same person also sends alerts.
- Approval request e-mails go only to approvers who have an e-mail address on their account. Decision e-mails go to the sender, with the subject
Alert <title> — Approvedor— Rejected, the approver's name, and the notes.
Note: The confirmation toast reads "Alert sent successfully!" also when an alert goes to Pending approval — check the alert status in the Alerts list.
Workflow example — one-step approval
The example below is the configuration used throughout this guide: alerts of the Popup type wait for a member of the Administrator role.
Workflow definition — Standard approval:
- Step 1: Approver role
Administrator, Waits up to24hours, If nobody decidesEscalate, Escalate toAdministrator - Emails: all three switches on
Dispatch rule — Popups need approval:
- Workflow definition:
Standard approval - Conditions (Simplified mode): Alert type → Popup; the other blocks empty
Result: a popup sent by any publisher gets the status Pending approval; James Porter (a web-portal user with the Administrator role) finds it in My tasks, approves it, and the alert starts distributing with an Approved badge. The walk-through is in How-to: Require approval for alerts.
Recommended practices
- Apply dispatch rules to high-impact scenarios only — emergency alerts, alerts targeting the full organization, and alerts sent via SMS or email.
- Place the most specific rules at the top. A broad rule placed first matches alerts that should be handled by a more specific rule lower in the list.
- Keep magic approval links on to reduce approver response times. Approvers can act directly from their email without opening the web portal.
- Configure the stuck approval reminder for time-sensitive alert types to avoid delays caused by unresponsive approvers.
- Prefer escalation over an automatic decision for high-stakes content, so that a person still decides when the primary approver is unavailable.
- Test the full approval flow — from alert submission through each step to final delivery — in a non-production environment before enabling it in production.
Related settings
- Settings → Users & access → Web-portal roles — defines the roles used as approvers in workflow steps
- Settings → Users & access → Web-portal users — the accounts that hold those roles
- Settings → Delivery channels → SMTP server (emails) — required for approval request and decision notification emails